VSphere Client ab Version 4.1: So aktiviert man die Zwischenablage (Copy & Paste)

Symptome:

Man kann über die Remote Console nicht per Copy&Paste in das virtuelle System bzw. aus dem virtuellen System kopieren, wenn der vSphere Client installiert ist.
Die Copy und Paste Option ist deaktiviert.


Grund:

Aufgrund von Sicherheitsrichtlininen sind Copy&Paste Aktionen per Voreinstellung ab dem VSphere Client 4.1 standardmäßig deaktiviert


Lösung:

Um das Problem zu beheben, muß man diese Optionen über den VSphere Client wieder aktivieren.


Um die Copy&Paste Option für eine bestimmte virtuelle Maschine zu aktivieren geht man folgendermaßen vor:

Hinweis: Die VMware Tools müssen auf dem Client installiert sein, damit Copy&Paste funktionieren kann!

  • Loggen Sie sich über einen vCenter Server mittels des vSphere Clients ein und fahren Sie die betreffende virtuelle Maschine runter.
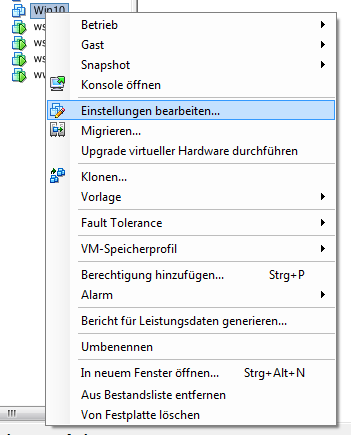
  • Klicken Sie mit der rechten Maustaste auf die virtuelle Maschine und wählen Sie den Menüpunkt „Einstellungen bearbeiten“.

  • Navigieren Sie zum Reiter Optionen und dann zu Erweitert > Allgemein

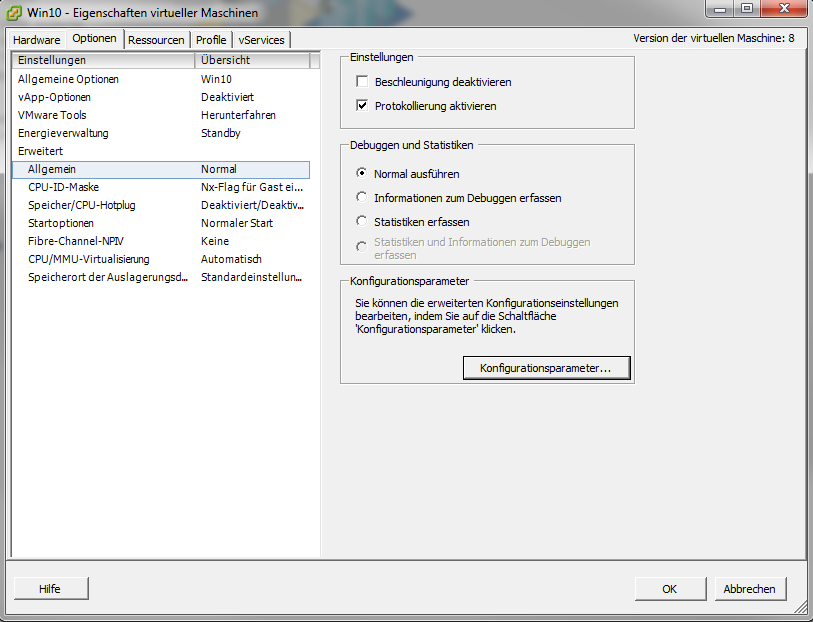
  • Klicken Sie dann auf den Button „Konfigurationsparameter

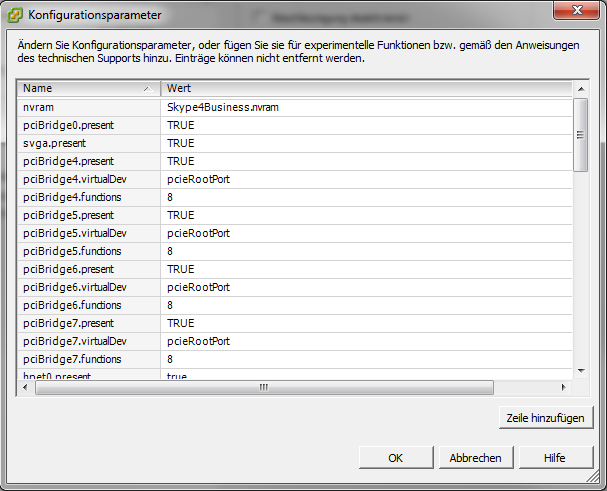
  • Klicken Sie auf „Zeile hinzufügen“ und tragen Sie folgende Werte in die Spalten Name und Wert ein:

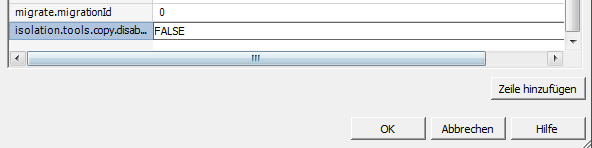
    isolation.tools.copy.disable      FALSE
isolation.tools.paste.disable     FALSE

  • Klicken Sie auf „OK“, um die Einstellung zu speichern und nochmals auf „OK“, um den Eigenschaftendialog zu schließen.
  • Starten Sie nun die virtuelle Maschine und die Zwischenablage sollte funktionieren.


Um die Copy&Paste Option für alle virtuellen Maschinen auf dem ESXi/ESX Host zu aktivieren geht man folgendermaßen vor:

  • Im ESXi/ESX Host als Root-User einloggen
  • Ein Backup der /etc/vmware/config Datei erstellen
  • Dann die /etc/vmware/config Datei in einem Textediter öffnen, z.B. vi
  • Folgende Einträge hinzufügen:


vmx.fullpath = „/bin/vmx“

isolation.tools.copy.disable=“FALSE“

isolation.tools.paste.disable=“FALSE“


  • Dann Datei abspeichern und schließen.
  • Die Copy&Paste Funktion wird erst aktiviert, wenn die virtuellen Maschinen neu gestartet werden. Dies muß über den vSphere Client geschehen, nicht über das virtualisierte Betriebssystem.


Achtung: Diese Optionen bleiben beim Upgrade zu einer neueren Version nicht bestehen! Die Änderungen müssen dann erneut durchgeführt werden.

Content retrieved from: https://industry-electronics.de/knowhow/vsphere-cut-and-paste.

Allow unsupported CPUs when upgrading to ESXi 7.0

As outlined in the vSphere 7.0 release notes (which everyone should carefully read through before upgrading), the following CPU processors are no longer supported:

  • Intel Family 6, Model = 2C (Westmere-EP)
  • Intel Family 6, Model = 2F (Westmere-EX)

To help put things into perspective, these processors were released about 10 years ago! So this should not come as a surprise that VMware has decided remove support for these processors which probably also implies the underlying hardware platforms are probably quite dated as well. In any case, this certainly has affected some folks and from what I have seen, it has mostly been personal homelab or smaller vSphere environments.

One of my readers had reached out to me the other day to share an interesting tidbit which might help some folks prolong their aging hardware for another vSphere release. I have not personally tested this trick and I do not recommend it as you can have other issues longer term or hit a similiar or worse situation upon the next patch or upgrade.

Disclaimer: This is not officially supported by VMware and you run the risk of having more issues in the future.

Per the reader, it looks like you can append the following ESXi boot option which will allow you to bypass the unsupported CPU during the installation/upgrade. To do so, just use SHIFT+O (see VMware documentation for more details) and append the following:

allowLegacyCPU=true

There have also been other interesting and crazy workarounds that attempt to workaround this problem. Although some of these tricks may work, folks should really think long term on what other issues can face by deferring hardware upgrade. I have always looked at homelab as not only a way to learn but to grow yourself as an individual.

Note: The boot option above is only temporarily and you will need to pass in this option upon each restart. It looks like this setting is also not configurable via ESXCLI which I initially had thought, so if you are installing this on a USB device, the best option is to edit the boot.cfg and simply append the parameter to kernelopt line so it’ll automatically be included for you without having to manually typing this. If this is install on disk, then you will need to edit both /bootbank/boot.cfg and /altbootbank/boot.cfg for the settings to passed in automatically.

This is ultimately an investment you are making into yourself, so do not cut yourself short and consider looking at a newer platform, especially something like an Intel NUC which is fairly affordable both in cost as well as power, cooling and form factor.


Content retrieved from: https://williamlam.com/2020/04/quick-tip-allow-unsupported-cpus-when-upgrading-to-esxi-7-0.html.

VMware iSCSI

Should I enable jumbo frames with iSCSI?

The general recommendation is to use the standard MTU of 1500 for iSCSI connectivity.

This recommendation is predicated upon several things:

  1. Simplicity. Enabling jumbo frames requires setting the proper MTU throughout the entire network. This means the vSphere Switch, vmkernel port (vmknic), physical NIC (pNIC), physical switches, routers (if routed iSCSI), and finally the FlashArray target ports. It is an all too common tale to see one or more of these components missed and thus problems with stability or performance are reported. 
  2. Not all environments benefit from jumbo frames. This was at one time a common (and rather heated) discussion in previous years. The anthem was almost always „jumbo frames enabled for best performance“. The reality though is actually based upon the workload between the initiators and target. If your applications / environment are consistently sending larger I/O requests than there is a good chance jumbo frames could help. How much will it help? Well, that answer can vary greatly so we won’t go into that here. The caveat though is that if the opposite is true (mostly smaller I/O requests), it can actually result in a performance penalty in your environment. If your host is waiting around to fill up a jumbo frame with smaller I/O requests then you are actually delaying transmission of your I/O and thus a slight performance penalty can be noted. How much? Again, it varies and isn’t the scope of this document.

The key takeaway here is know your environment. If you find jumbo frames are optimal for your environment please have all proper parties involved from end-to-end to ensure everything is implemented correctly.

If you decide to implement jumbo frames, the following command is vital to ensure you have properly configured your environment end-to-end:

vmkping -I <iscsi_vmk_interface> -d -s 8972 <ip_addr_of_target>

This ensures packets are not fragmented during the ping test (-d) and tests jumbo frames (-s 8972).

Proudly powered by WordPress | Theme: Baskerville 2 by Anders Noren.

Up ↑