Die WinRE Partition (Wiederherstellungsumgebung) ist manchmal nicht am Ende des Datenträgers, das Vergrößern einer Partition davor (für gewöhnlich die „Hauptpartition“) geht dann nicht direkt – schaut in der Datenträgerverwaltung so aus:
Man kann außerhalb von Windows z. B. mit GParted fummeln oder das kurz auf direktem Weg erledigen:
Erstmal WinRE deaktivieren:
reagentc /disable
Dann via diskpart die Recovery Partition löschen:
diskpart list
disk select disk xx
list partition
select partition xx
delete partition override
Dann via Datenträgerverwaltung ganz normal die Hauptpartition vergrößern, am Ende so viel frei lassen wie die Recovery Partition vorher groß war (bissl mehr ist auch nicht verkehrt).
Die neu erstellte Recovery Partition am Ende braucht bestimmte Eigenschaften dass die von WinRE erkannt wird – via diskpart setzen (Partition vorher wieder auswählen):
Für MBR Datenträger:
set id=27
Für GPT Datenträger:
set id=de94bba4-06d1-4d40-a16a-bfd50179d6ac gpt attributes=0x8000000000000001
Zum Schluss WinRE wieder aktivieren:
reagentc /enable
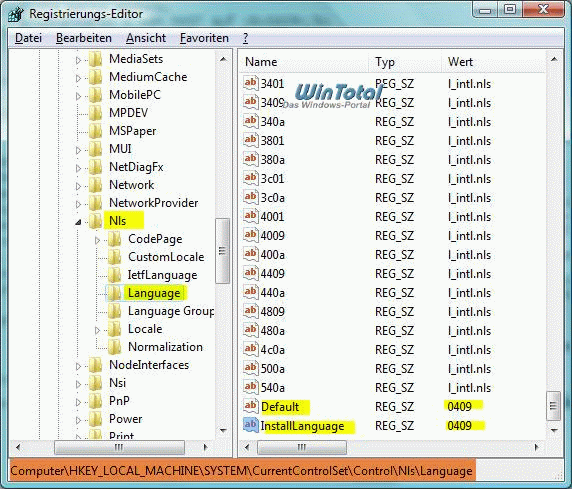
Mit einer deutschen Version kann kein englische Update heruntergeladen werden
Manche Updates sind vorerst nur für die englische XP/Vista-Version verfügbar. Mit einer deutschen Version kann das englische Update nicht heruntergeladen werden, da es gar nicht im Update-Center angezeigt wird – es sei denn, man hat ein MUI-Pack installiert (meist Firmen).
Hier nun ein kleiner Trick, wie es trotzdem geht:
Den Inhalt der Werte „Default“ und „InstallLanguage“ in der Registry (Start – Ausführen: regedit) jeweils vorübergehend von „0407“ auf „0409“ im Schüssel
ändern, „AutoUpdate“ (Windows Update) deaktivieren und Windows neu starten.
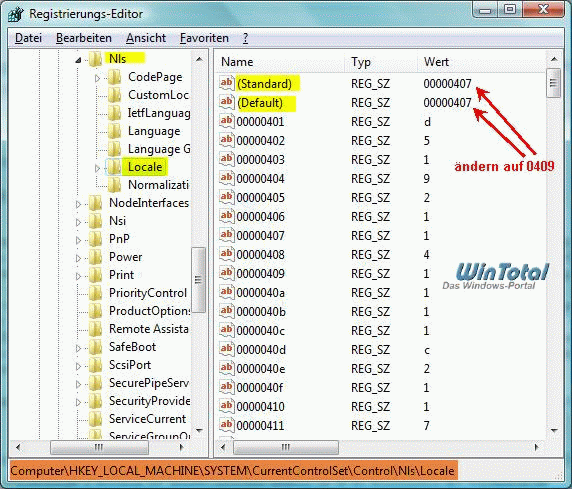
Zusätzlich unter
die Werte ändern:
(Standard) = von 0407 auf 0409
(Default) = von 0407 auf 0409
„0407“ bedeutet deutsche Version
„0409“ bedeutet englische Version
Jetzt das englische Update installieren und danach unbedingt die Registrierungsschlüssel wieder zurück ändern. „AutoUpdate“ (Windows Update) wieder aktivieren und System neu starten.
Damit wird die Manipulation der Installationssprache und das vorübergehende Deaktivieren von „AutoUpdate“ (Windows Update) halbautomatisch durchgeführt.
SIDCHG – Windows eine neue SID ohne Sysprep vergeben
Im Windows-Netzwerk sollte die SID, die Sicherheitskennung des Computers, eindeutig sein, um unnötige Probleme oder gar Sicherheitsrisiken zu vermeiden (Link). Der von Microsoft vorgegebene Weg um einem Windows-Computer eine neue SID zu geben besteht in der Ausführung von “sysprep /generalize”.
Warum nicht Sysprep?
Im Grunde ist nichts gegen Sysprep einzuwenden. Allerdings wird nicht einfach nur eine neue Sicherheitskennung generiert, sondern auch verschiedene weitere Änderungen vorgenommen. Letzteres ist beim Klonen von Computern nicht immer erwünscht. So manche (vorinstallierte) Anwendung steckt tiefgreifende Änderungen am System oder eine durch Sysprep angestossene Quasi-Neuinstallation nicht unbedingt weg.
Alternativen zu Sysprep
Für Windows NT4.0 bis XP gab es seinerzeit vor der Übernahme durch Microsoft von Sysinternals das Tool NewSID, mit dessen Hilfe sowohl eine neue eindeutige SID generiert oder eine SID von einem anderen Computer umkopiert werden konnte. Das war zwar nicht immer problemfrei, i.d.R. gab es Probleme mit Windows Updates oder WSUS, erleichterte aber dennoch das Verteilen von fertigen Installations-Abbildern erheblich.
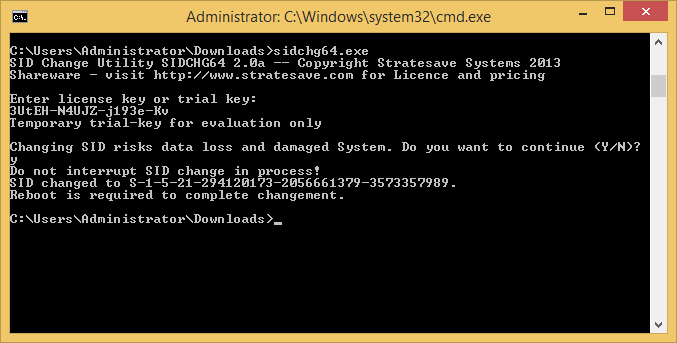
Als Alternative zu Sysprep und NewSID kann das kommerzielle Tool SIDCHG von Stratesave Systems betrachtet werden. SIDCHG steht als Kommandozeilen-Anwendung sowohl für 32-bit (SIDCHG) als auch 64-bit (SIDCHG64) Windows zur Verfügung. Zum Testen gibt es eine Trial-Version, der dazugehörige Lizenzschlüssel wird monatlich in Form eines Bildes auf der Homepage veröffentlicht.
Der Lizenzschlüssel kann sowohl direkt bei der Ausführung als auch via Parameter (“/KEY:”) angegeben werden. Das Tool lässt sich vollständig automatisieren und bietet alle relevanten Einstellungsmöglichkeiten wie z.B. das Ändern des Computernamens an. Darüber hinaus kann die SID von einem Offline-Windows über die Angabe des Installations-Ordners geändert werden:
/OS: Windows-directory (e.g C:Windows) of OS to modify, if not running OS
Im Gegensatz zu NewSID wird unter anderem die WSUS ID geändert. Die Windows-Produktaktivierung wird hingegen nicht angetastet. Der Hersteller verweist dazu auf den Microsoft-Befehl
slmgr -rearm
um einen neuen Produktschlüssel eingeben und eine Aktivierung durchführen zu können.
Anbei ein Screenshot von der Ausführung auf einem Windows 8.1 Pro-Computer:
Zu beachten ist ein mittlerweile geänderter Ablauf:
Der Benutzer wird abgemeldet und der Computer heruntergefahren, sobald die SID geändert wurde. Der Vorgang kann durchaus eine zeitlang benötigen, von daher zur Sicherheit 15 Minuten warten, bevor man selbst das System herunterfährt oder neu startet. Damit der Computer nach der Änderung automatisch neustartet “/R” anhängen.
Ob die SID geändert wurde kann mit PsGetSid überprüft werden:
Vorher: SID for \COMPUTERNAME: S-1-5-21-4055355738-2900492474-2529473953 Nachher: SID for \COMPUTERNAME: S-1-5-21-294120173-2056661379-3573357989
Kleines Beispiel:
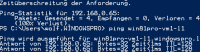
Anbei ein kurzes Skript, das zunächst mittels PsGetSid die alte SID angezeigt und diese dann mit SIDCHG ändert:
@echo off title Generate and set new Machine-SID PsGetsid64.exe echo — echo. set LicenseKey=7qrd3-Kizvx-iC5dk-dJ sidchg64-3.0b.exe /KEY:%LicenseKey% /RMK
Der License Key ist übrigens der aktuelle (Stand: 13.01.2020) monatliche Trial Key. Die Ausgabe sieht z.B. so aus:
Nach der Bestätigung mit “j” fährt nach einem kurzem Moment der Computer herunter. Startet man diesen dann neu und prüft erneut mit PsGetSid, so sieht man die Änderung
PsGetSid v1.45 – Translates SIDs to names and vice versa Copyright (C) 1999-2016 Mark Russinovich Sysinternals – www.sysinternals.com SID for \HV03: S-1-5-21-3614402554-1608471827-1526029250
Download
SIDCHG kann direkt auf der Hersteller-Homepage heruntergeladen werden. Es wird keine Installation benötigt, die *.exe-Datei ist direkt ausführbar. Es reicht aus im Formular den Haken bei “SIDCHG/SIDCHG64” zu setzen und auf die Schaltfläche “Continue” zu klicken. Im Anschluss gelangt man zu den eigentlichen Download-Links.
Preise
Die Preise beginnen bei 49.00 US$ für eine neue private Lizenz. Firmen-, Schul- als auch Upgrade-Lizenzen stehen ebenfalls zur Verfügung.
Die Lizenzierung hat sich seit dem ursprünglichem Beitrag anno 2015 geändert. Am einfachsten direkt auf der Homepage nachsehen.
Update 13.01.2020
Kleine Aktualisierungen im Beitrag inkl. neuem Download-Link und “Preisupdate”.
Mit winget alle benötigten Programme, Apps und Treiber für Windows 10 mit nur einem klick automatisch herunter laden und installieren.
In dieser Anleitung möchte wir ihnen winget vorstellen. Das kleine Tool ist zwar noch nicht in der finalen Version von Windows 10 integriert, Sie können es aber jetzt schon benutzen. Es erleichtert ihnen die Installation von Programmen, Apps und auch diversen Treibern für Windows 10. Einige, die mit Linux oder am Raspberry Pie schon mal gearbeitet haben, werden den Befehl in ähnlicher Form kennen. Das ganze nennt sich dann apt-get. Das gleiche macht dieses Tool hier von Windows10 auch. Mit Winget können Sie über die Kommandozeile Programm-Pakete installieren aber das ist nicht das interessante, sondern die Möglichkeit, alle benötigten Programme automatisch auf einmal herunter zu laden und zu installieren.
Das heißt, wenn Sie Windows neu installieren folgt normalerweise der ganze Aufwand mit den Programmen und den Treibern und so weiter. Das ganze können Sie mit winget erheblich abkürzen. Wie das ganze im Endeffekt funktioniert und wie es die Arbeit erleichtert, dass gehen wir jetzt alles Schritt für Schritt durch. Im Verlauf werden wir ihnen die wichtigsten Befehle erläutern und ihnen zeigen, wie Sie relativ simpel eine Datei erstellen die ihnen die ganze Arbeit abnimmt. Diese brauchen Sie dann nur noch einmalig nach der Installation von Windows 10 ausführen und ihre Programme und Treiber werden automatisch herunter geladen und direkt installiert.
Inhaltsverzeichnis
Toggle
Vorteile von winget
Winget installieren
Winget manuell verwenden
Übersicht der verfügbaren Befehle
Befehle mit Funktionen erweitern
Die wichtigsten Befehle kurz erläutert
Installation automatisieren
Eigene .bat-Datei erstellen
Software auswählen und .bat-Datei erstellen lassen
Nützliche Links
Vorteile von winget
Sie ersparen sich damit die Suche nach den einzelnen Programmen.
Manuelles herunterladen und installieren entfällt.
Sie erhalten immer die neusten Versionen von Programmen und Treibern die verfügbar ist.
Manuelle Updates der Programme / Treiber entfallen, da Sie diese alle über einen einzigen Befehl updaten können. Sie sind somit immer auf dem neusten stand.
Mit einer Batch-Datei alle Programme und Treiber mit nur einem Klick herunterladen und installieren.
Mit einem Klick alle installierten Programme updaten.
Über 1400 Programme und Treiber verfügbar.
Das Angebot an Treibern, Apps und Programmen wird kontinuierlich erweitert.
Sie sehen gerade einen Platzhalterinhalt von YouTube. Um auf den eigentlichen Inhalt zuzugreifen, klicken Sie auf die Schaltfläche unten. Bitte beachten Sie, dass dabei Daten an Drittanbieter weitergegeben werden.
Mehr Informationen
Inhalt entsperren Erforderlichen Service akzeptieren und Inhalte entsperren
Winget installieren
Bevor Sie winget nutzen können, müssen sie das kleine Tool herunterladen und installieren. Dieser Schritt wird aber bald entfallen, denn Microsoft wird es fest in Windows 10 integrieren. Das wird auch nicht mehr lange dauern, da es die Testphase bereits absolviert hat und es gibt schon eine finale Version. Winget lässt sich sowohl manuell installieren als auch über den Microsoft Store. Für letzteren Benötigen Sie aber ein Microsoft-Konto.
Öffnen Sie dazu den Microsoft Store und geben in das Suchfeld App-Installer ein.
Installieren sie diesen und Sie können winget verwenden.
Für die Installation ohne Microsoft-Konto begeben Sie sich auf diese Github-Seite.
Im ersten Beitrag finden Sie immer die aktuell letzte Version vom Entwickler. Momentan ist es die Version 1.0.11451.
Klicken Sie jetzt auf Microsoft.DesktopAppInstaller_8wekyb3d8bbwe.appxbundle
Wechseln Sie jetzt in ihren Download-Ordner, klicken auf Microsoft.DesktopAppInstaller_8wekyb3d8bbwe.appxbundle.
Winget manuell verwenden
Klicken Sie mit der rechten Maustaste auf das Windows-Symbol und im Menü auf Windows Powershell als Administrator starten.
Den Hinweis mit ja bestätigen.
Jetzt können Sie den Befehl winget nutzen.
Damit Sie Programme, Apps und Treiber installieren können, brauchen Sie die ID (Namen) des jeweiligen. Diese finden Sie entweder in der Liste (Befehl: „winget list“) der verfügbaren Pakete oder geben ihn einfach nach dem Install-Befehl ein. Diverse Programme, wie zum Beispiel der Videoplayer VLC, lassen sich auch ohne genaue ID installieren. Winget sucht in der Liste nach Übereinstimmung und installiert dann das Paket. Werden hier aber für ihre Eingabe mehrere Pakete gefunden oder gar keine, benötigen Sie die einmalige ID des Programms. Diese stellt sicher, dass Sie nicht versehentlich ein anderes Programm installieren.
Tippen Sie winget ein und bestätigen mit der Eingabe-Taste. Jetzt erhalten Sie eine Übersicht aller möglichen Befehle, die Sie nutzen können.
Befehle mit Funktionen erweitern
Die einzelnen Befehle lassen sich noch erweitern. Geben Sie dazu den Befehl ein und schreiben –info dahinter. Sie erhalten dann eine Übersicht aller möglichen Erweiterungen und eine kurze Beschreibung. Das ganze sieht dann so Beispielweise so aus.
winget upgrade –info
Die wichtigsten Befehle kurz erläutert
list – Der Befehl „winget list“ gibt eine Übersicht über alle Programme, Apps und Treiber die aktuell verfügbar sind. Hier finden Sie auch die genaue ID (Namen des Programms) falls dieser nicht bekannt sein sollte.
winget list
install – Der Befehl „winget install“ läd das dahinter stehende Paket herunter und installiert es. Das Beispiel zeigt die Installation von Videoplayer VLC.
winget install VideoLAN.VLC
uninstall – Der Befehl „winget uninstall“ deinstalliert das dahinter angegeben Paket. Das Beispiel zeigt die Deinstallation von Videoplayer VLC.
winget uninstall VideoLAN.VLC
upgrade – Der Befehl „winget upgrade“ sucht nach Verfügbaren Updates für das dahinter stehende Paket. Ein Update wird aber nur dann durchgeführt, wenn es eine aktuellere Version für das Programm gibt. Im Beispiel wird einmal nur der VLC-Player geupdatet und beim zweiten Beispiel werden alle installierten Pakete auf einmal geupdatet.
winget upgrade VideoLAN.VLC winget upgrade –all
Installation automatisieren
Im Normalfall haben Anwender eine Auswahl von Programmen die Sie immer verwenden. Diese lassen sich jetzt in eine Ausführbare .bat-Datei schreiben. Diese müssen Sie dann nach der Installation von Windows nur einmal anklicken. Dann werden automatisch alle Programme, Apps und Treiber in der Datei herunter geladen und installiert. Sie sparen sich so eine Menge Zeit, da Sie die Software nicht erst im Netz suchen und manuell installieren müssen. Der zweite Vorteil ist, dass Sie immer die aktuellste Version des Programms bekommen. Die verfügbaren Pakete sind nämlich immer auf dem neusten Stand.
Sie können sich jetzt selber eine Ausführbare .bat-Datei erstellen oder auf dieser Seite relativ simpel per Maus-Auswahl ihre bevorzugten Programme zusammenstellen. Beide Varianten werden hier nochmal kurz erleutert.
Eigene .bat-Datei erstellen
Bevor Sie die Datei erstellen und ausführen, kontrollieren Sie bitte, ob winget auf ihrem System installiert ist. Am Anfang dieser Anleitung finden Sie alle nötigen Informationen. Des weiteren wird dort auch beschrieben, wo Sie die Namen der Pakete finden (ID).
Klicken Sie mit der rechten Maustaste auf einen freien Bereich auf dem Desktop.
Wählen Sie jetzt Neu und Textdokument.
Öffnen Sie das Textdokument und tragen alle Programme, Apps und Treiber ein.
Im Beispiel erklären wir ihnen wie die genaue Formatierung lauten muss.
winget install –id=Mozilla.Firefox -e && winget install –id=Mozilla.ThunderbirdBeta -e && winget install –id=VideoLAN.VLC -e
Der Befehl startet immer mit winget install, gefolgt von einem Leerzeichen. Danach steht –id= gefolgt von dem Namen des Pakets (Programm, App, Treiber). Nach einem Leerzeichen können Sie jetzt noch alternative Anweisungen schreiben wie hier im Beispiel -e. Mit dem Befehl wird dann der genaue Paketname überprüft. Ist dieser nicht vorhanden, wird dieses Paket nicht installiert. Ohne den Befehl -e wird nach einem Ähnlichem Paket-Namen gesucht und diese dann installiert. Damit die nachfolgenden Pakete ebenfalls installiert werden folgt noch ein Leerzeichen und zweimal das &-Symbol. Beim letzten Schritt lassen sie die beiden &-Symbole weg, so weiß das Skript, das es hier am Ende angelangt ist.
Nachdem alle gewünschten Programme eingetragen sind speichern Sie die Textdatei.
Klicken Sie diese jetzt mit der rechten Maustaste an und ändern den Dateityp von .txt zu .bat.
Ist die Datei-Endungen nicht sichtbar, finden Sie hier eine Aneitung dazu.
Bestätigen Sie jetzt noch den Warnhinweis und die automatische Installations-Datei für ihre Programme ist fertig.
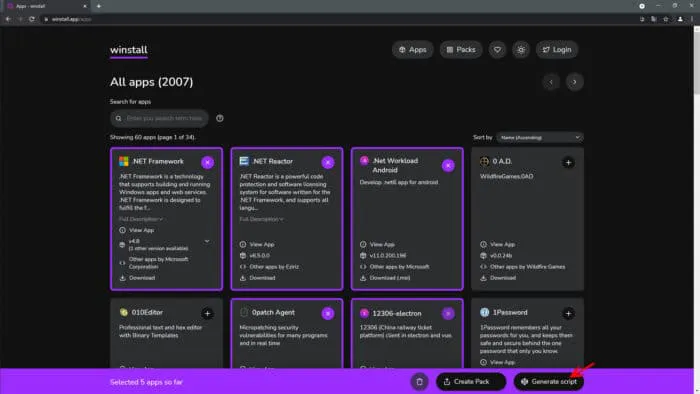
Software auswählen und .bat-Datei erstellen lassen
Wichtiger Hinweis Vorab: Nutzen Sie zum download der Datei am besten den Chrome-Browser. Bei Microsoft Edge kommt es zu Problemen. Bei Chrome müssen Sie lediglich die Sicherheitsabfrage mit „behalten“ bestätigen. Beim Firefox müssen Sie die Dateiendung nachträglich ändern von .sql in .bat. Ist die Datei-Endungen nicht sichtbar, finden Sie hier eine Aneitung dazu.
Öffnen Sie die Seite winstall.app und klicken Sie auf das +-Symbol neben den Programmen um diese ihrem persönlichen Paket hinzuzufügen.
Alle verfügbaren Programme, Apps und Treiber finden Sie oben im Menü unter dem Punkt Apps.
Hinweis: Die .bat-Datei können Sie erst ab einer Auswahl von mindestens 5 Paketen erstellen lassen.
Nachdem Sie ihre Auswahl getroffen haben, klicken Sie unten auf Create script.
Klicken Sie jetzt auf Download .bat und ihre persönliche Installations-Datei wird herunter geladen.
Variante 1 – Reset Local Account password mittels Setup-Medium
Boot von Setup-Stick
Shift+F10 um CMD zu öffnen
Auf c:\windows\system32 wechseln
ren utilman.exe utilman.exe.bak
copy cmd.exe utilman.exe
wpeutil reboot
Im Anmeldebildschirm mittels „Eingabehilfe“ die CMD öffnen (Mittleres Symbol re.unten)
net user Administrator /active:yes um Admin. zu aktivieren (falls benötigt), danach Reboot
lusrmgr.msc
Kennwort vom Administrator löschen
utilman.exe löschen
ren utilman.exe.bak utilman.exe
Detailiert:
To reset your local account password and regain access to your account after forgetting your password, you first need to create a Windows installation media (if you don’t have one handy) and then follow the instructions as outlined below.
Boot your computer with Windows installation media.
In the Windows Setup page, press the Shift + F10 keyboard shortcut to open Command Prompt.
Type C: and hit Enter to move from the X:\Sources folder to the root folder of your Windows installation.
Note: If C is not the drive letter for the drive on which Windows 11/10 is installed, you can find the right drive letter by confirming the location using the dir command. If the result shows the Programs Files as well as Windows folders, then you’re in the correct location. Otherwise, type the correct drive letter.
Next, type the command below and hit Enter to navigate to the System32 folder:
cd Windows\System32
Now, type the commands below and hit Enter (on each line) to replace the Utility Manager button with direct access to Command Prompt from the Sign-in screen:
Next, type the command below and hit Enter to restart your computer normally:
wpeutil reboot
In the Sign-in screen, click the Utility Manager (Ease of access) button (the one in the middle of three buttons) in the bottom-right corner to open Command Prompt.
Type the command below and hit Enter to enable the built-in Administrator account:
net user Administrator /active:yes
Next, click the Power button in the bottom-right corner and select Restart.
In the Sign-in screen, select the Administrator account.
Next, press Windows key + R to invoke the Run dialog.
In the Run dialog box, type lusrmgr.msc and hit Enter to open Local Users and Groups.
Expand the Local Users and Groups branch.
Expand the Users branch.
Right-click the account you want to reset the password and select the Set password option.
Specify the new password.
Click OK.
Next, to sign out from the Administrator account, press Windows key + X to open Power User Menu, tap U and then I on the keyboard.
Sign back in using the account with the new password.
Now, shut down the Windows 11/10 PC.
Now, you should restore the utilman.exe file. If not, you won’t be able to use the Utility Manager on Windows 11/10 sign-in screen and on the other hand, others might use the command prompt to change your Windows 11/10 admin password or make other changes to your computer. To restore the utilman.exe file, do the following:
Boot the device using the Windows 11/10 installation media again.
In the Windows 11/10 Setup page, press Shift + F10 keyboard shortcut to open Command Prompt.
Type C: and hit Enter to move to the root folder of your Windows 11/10 installation:
Now, type the commands below and hit Enter (on each line) to replace the direct access to Command Prompt with the Utility Manager button on the sign-in screen:
del utilman.exe
ren utilman.exe.bak utilman.exe
Next, type the command below and hit Enter to disable the inbuilt Administrator account:
net user Administrator /active:no
Finally, type the command below and hit Enter to restart your computer normally:
Zunächst einmal musst du die Software PassFab 4WinKey herunterladen und installieren.
Anschließend startest du die Software.
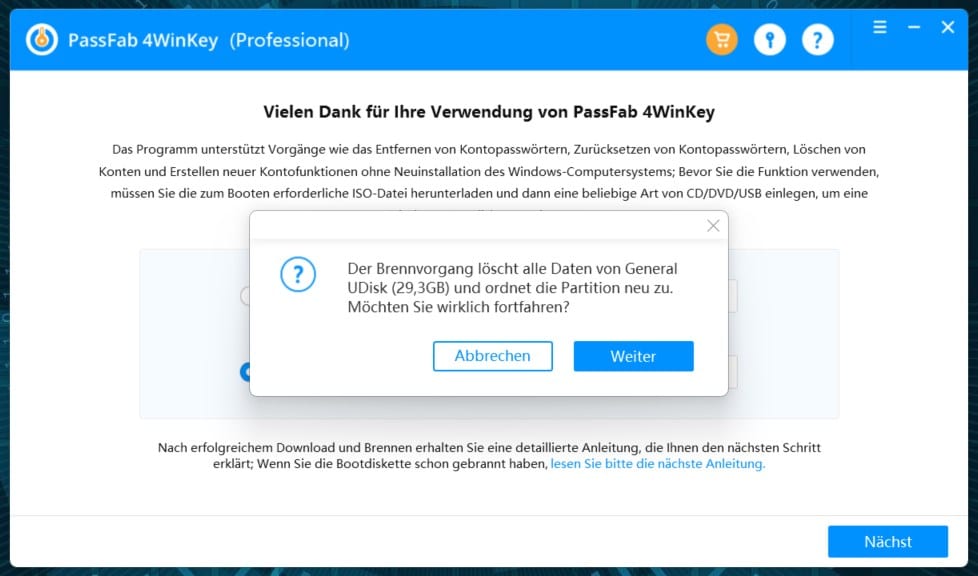
Um loszulegen, musst du zu allererst ein Windows-Bootmedium erstellen. Entweder du entscheidest dich dafür, eine CD/DVD zu brennen oder aber du erstellst einen bootfähigen USB-Stick. Wir haben uns an dieser Stelle für Letzteres entschieden.
Nachdem du auf Weiter geklickt hast, weist dich PassFab 4WinKey darauf hin, dass der USB-Stick in neue Partitionen eingeteilt wird und alle darauf befindlichen Daten gelöscht werden, wenn du auf Weiter Sei dir also im Vorfeld sicher, das sich auf dem USB-Stick keine wichtigen Daten befinden. Falls doch, klicke auf Abbrechen und sichere deine Daten zuerst an einem anderen Ort, bevor du fortfährst.
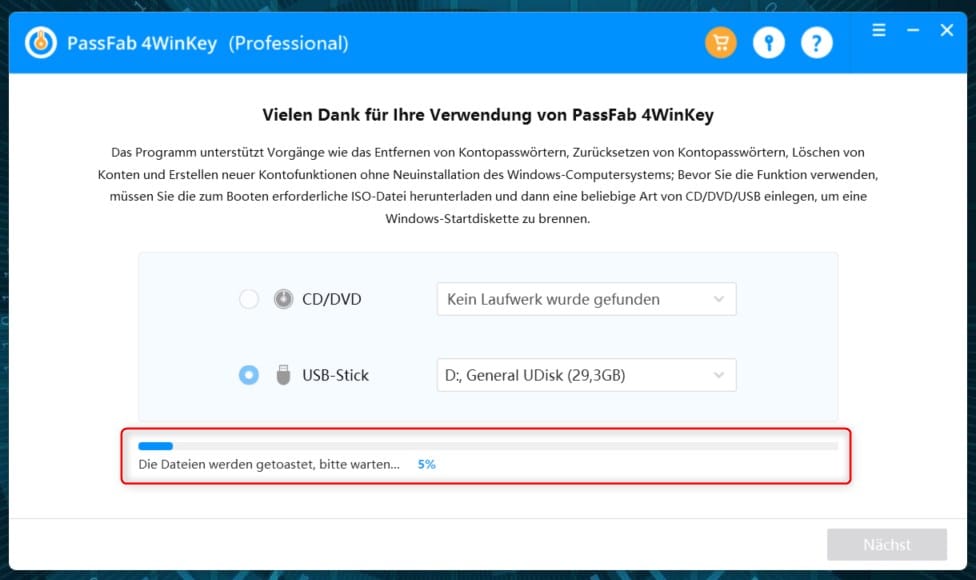
Die erforderlichen ISO-Dateien werden nun heruntergeladen und auf das ausgewählte Medium transferiert. Dieser Vorgang kann je nach Medium ein paar Minuten in Anspruch nehmen.
Sobald das Medium fertiggestellt wurde, erklärt die Software in einem kleinen Tutorial, wie du weiter vorgehen kannst und hält dabei ein paar Tipps bereit.
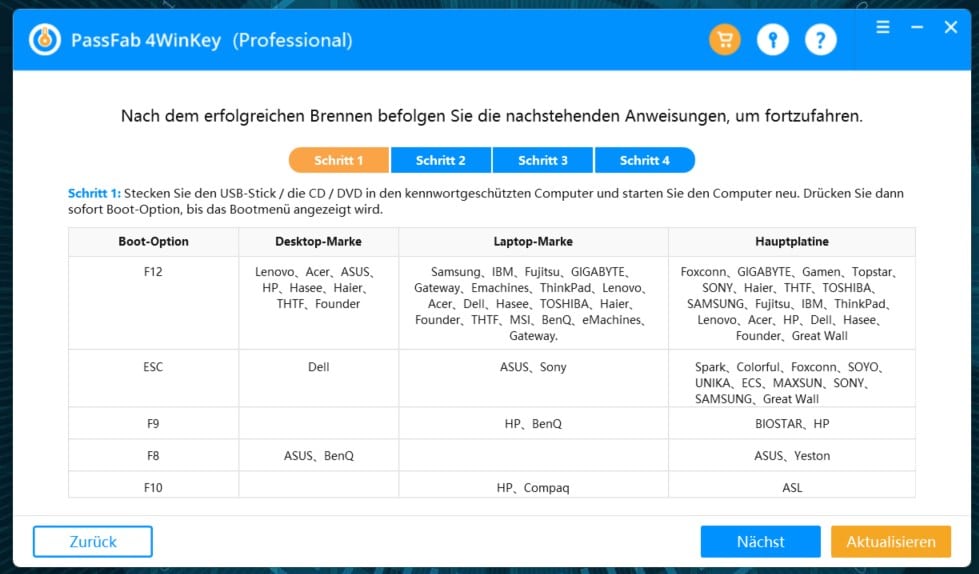
Im nächsten Schritt musst du deinen Computer neu starten. Stelle dabei sicher, dass sich dein soeben erstelltes Medium im CD/DVD-Laufwerk befindet bzw. an einem USB-Anschluss steckt.
Je nach Markle und Modell deines Computers bzw. Laptops musst du direkt beim Starten einen Hotkey auf deiner Tastatur drücken, um in die Boot-Optionen zu gelangen. Welcher das sein könnte, kannst du der nachfolgenden Tabelle entnehmen.
Bist du im Boot-Menü angelangt, wähle mit den Pfeiltasten das Medium aus, das du erstellt hast und bestätige deinen Vorgang mit der Enter-Taste – wie im Screenshot zu sehen.
In der Regel sollte PassFab 4WinKey nun starten und dir eine Übersicht der Funktionen anzeigen. Je nach Anwendungsfall kannst du nun entscheiden, was du machen möchtest. Keine Sorge, die Vorgänge sind selbsterklärend.
Extrahieren Sie die darin enthaltene ISO-Datei und erstellen einen USB-Stick mit z.B. UNetbootin.
Schalten Sie Ihren Computer aus und starten Sie Ihn erneut. Damit vom USB-Stick gebootet wird, müssen Sie unter Umständen die Boot-Reihenfolge im BIOS ändern.
Wurde das Tool vom USB-Stick gestartet, wählen Sie als erstes die Partition aus, auf der Windows 10 installiert ist. Bestätigen Sie anschließend den Pfad der Registry.
Wählen Sie nun die Option „1 – Password reset with space as delimeter“ sowie anschließend „1 – Edit user data and passwords“.
Entscheiden Sie sich für Ihren Benutzer unter Windows 10 und wählen Sie die Option „1 – Clear (blank) user password“.
Mit der Eingabe von [!] und [Q] wird der Vorgang durchgeführt und bestätigt. Drücken Sie abschließend auf [Z] und starten Sie Windows ohne die CD oder den USB-Stick neu.
Anschließend können Sie sich ohne Passwort anmelden. Aus Sicherheitsgründen sollten Sie aber nach dem Login ein neues Passwort vergeben.
Na, auch keine Lust auf Candy Crush, Skype, Office und andere vorinstallierte Apps? Ja, ich auch nicht. Trotzdem kommen mit gefühlt jedem Windows 10-Upgrade neue sinnlose Apps und Programme hinzu. Zum Glück gibt’s findige Programmierer, die den ganzen Spaß wieder vom System fegen.
Das Zauberwort ist Decrapifier. Das kleine Tool Windows 10 Decrapifier entfernt im Standard-Modus alle unnötigen Apps. Ich stelle euch hier kurz dar, wie ihr dieses kleine Script richtig anwendet.
Zuerst müsst ihr es natürlich herunterladen. Dazu auf der Seite rechts oben auf Get the code und danach auf Download klicken. Die Datei als decrapifier.ps1 abspeichern.
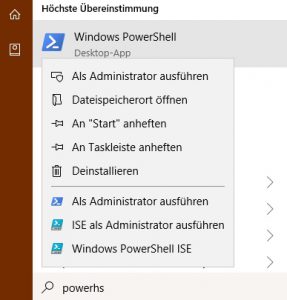
Öffne anschließend die PowerShell als Administrator (über Windows+X). Navigiere mithilfe des Befehls cd zum Speicherpfad des Scripts, z.B. mittels cd C:UsersNutzerDownloads. Anschließend muss noch das Ausführen von Scripts erlaubt werden. Dies geschieht min dem Kommando set-executionpolicy unrestricted.
Nun das Script mittels .decrapifier.ps1 ausführen und abwarten. Wenn alles fertig ist, noch den Befehl set-executionpolicy restricted absetzen. Dann das Fenster schließen und den Windows Explorer öffnen. Dort den Pfad C:WindowsSystem32sysprep aufrufen und die sysprep.exe ausführen.
Hier kann man die Standardeinstellungen lassen und nach einem Klick auf OK wird Windows zurückgesetzt und kann nach einem Neustart ohne vorinstallierte Apps eingerichtet werden.
Besonders beim Automatisieren sind Skripte immer wieder hilfreich. Was aber nun, wenn man diese Skripte über eine Gruppenrichtlinie mit erhöhten Rechten ausführen möchte? Wer hier nicht aufpasst, tappt schnell in eine der klassischen Fallen der Gruppenrichtlinien-Verarbeitung. Nämlich dem Unterschied zwischen der Computer- und Benutzerkonfiguration innerhalb einer Richtlinie.
Vorm Anlegen der Richtlinie sollte man sich darüber im Klaren sein, auf welcher Ebene das Skript laufen soll. Also: Benutzer- oder Computerebene? Skripte auf Benutzerebene werden folgerichtig im Kontext des angemeldeten Benutzers ausgeführt und sind dann auch all dessen Einschränkungen unterworfen. Für benutzerspezifische Änderungen gut, sonst wahrscheinlich eher nicht.
Bindet man das Skript jedoch auf Computerebene ein, entfällt der Benutzerkontext und es erfolgt eine Ausführung mit administrativen Rechten. Quasi wie wenn man lokal eine Batch als Administrator ausführt. Um nun Skripte per GPO mit Adminrechten auszuführen, sind folgende Schritte notwendig:
Öffne in der Gruppenrichtlinien-Verwaltung den Gruppenrichtlinien-Editor der entsprechenden Richtlinie
Suche dort den folgenden Pfad auf: Computerkonfiguration -> Windows-Einstellungen -> Skripts -> Starten
Füge nun das gewünschte Skript hinzu
Überprüfe abschließend die Richtlinienzuweisung und setze die Änderungen ggf. per gpupdate /force durch
Da die Richtlinie auf der Computerebene greift, wirkt sie natürlich ohne weitere Vorkehrungen nur auf Computer-Objekte im AD. Wer also die GPO auch auf Benutzerobjekte wirken lassen möchte, muss vorher die Loopback-Verarbeitung aktivieren.
Damit sind dann hoffentlich alle Unwägbarkeiten aus dem Weg geräumt. Die in der Computerkonfiguration der Richtlinie eingebundenen Skripte sollten nach einer Aktualisierung der wirkenden Richtlinien beim nächsten PC-Start mit administrativen Rechten ausgeführt werden.
In größeren Active Directory-Infrastrukturen kann die Ordnung der Gruppenrichtlinien schnell verloren gehen. Dies erschwert unter Umständen die Fehlerbehebung, wenn es zu Problemen kommt. Um bei der Recherche trotzdem schnell einen Überblick über die auf einen Client wirkenden GPOs zu erhalten, gibt es diverse Tools, mit denen man die aktiven Gruppenrichtlinien anzeigen lassen kann.
Variante 1: gpresult
Die gängigste Variante der Auswertung ist heutzutage gpresult. Mit diesem Helferlein sieht man recht schnell und übersichtlich, welche aktiven Gruppenrichtlinien auch aktuell greifen. Für dieses Tool gibt es einige verschiedene Ausgabemöglichkeiten, die ich hier mal kurz darstelle.
Ergebnisse in Kommandozeile anzeigen lassen
Das ist der schnellste Weg, um direkt in der Konsole einen Überblick über die wirkenden GPOs zu erhalten. Außerdem erhält man noch weitere Informationen, wie zum Beispiel den Zeitpunkt des letzten Updates, den dabei genutzten Domänen-Controller oder etwaige Gruppenmitgliedschaften. Dafür muss man lediglich den folgenden Befehl absetzen:
gpresult /r
Auswertung auf Computerkonfiguration beschränken
Zur Übersichtlichkeit kann man die Ausgabe auch einschränken, zum Beispiel auf die Richtlinien der Computerkonfiguration. Dazu hängt man einfach ein /scope:computer ran:
gpresult /r /scope:computer
Auswertung auf Benutzerkonfiguration beschränken
Das Gleiche geht natürlich auch für die Benutzerebene:
gpresult /r /scope:user
Remote-Computer abfragen
Auch ganz praktisch: Man kann die Anfrage ebenso an einen entfernten Computer schicken. Dies geschieht durch folgendes Kommando (%PC-NAME% entsprechend abändern):
gpresult /s %PC-NAME% /r
Ergebnisse in Datei exportieren
Wem jetzt allerdings die Kommandozeile etwas zu unübersichtlich ist, dem empfehle ich den Export der Ergebnisse in eine externe Datei. Dafür gibt es diverse Möglichkeiten.
TXT-Datei
Wer’s simpel mag, kann hier zur guten alten Text-Datei greifen. Dafür braucht es den folgenden Befehl:
gpresult /r >C:GPOs.txt
HTML-Datei
Wer jedoch lieber eine grafische Übersicht möchte, sollte auf eine HTML- oder XML-Datei zurückgreifen. Für einen HTML-Export sieht das Kommando wie folgt aus:
gpresult /h C:GPOs.html
XML-Datei
Wer stattdessen zum XML-Export tendiert, muss nicht viel anpassen:
gpresult /x C:GPOs.xml
Detaillierte Informationen ausgeben lassen
Abschließend noch ein kleiner Tipp aus den Kommentaren (danke): Mit dem Parameter /z lassen sich detailliertere Ergebnisse generieren, für komplexere Probleme:
gpresult /z
Variante 2: rsop
Die rsop-Konsole ist schon etwas in die Jahre gekommen, kann sich im Einzelfall aber trotzdem noch als nützlich erweisen, um zu sehen, welche Optionen einer GPO greifen. Im Gegensatz zu gpresult werden die Ergebnisse in einem vom Gruppenrichtlinienen-Editor bekannten Fenster dargestellt. Es gibt allerdings zwei entscheidende Nachteile: Man muss sich zu jeder einzelnen Option durchklicken, um nachzuschauen, wie diese eingestellt ist. Es gibt also keine Übersicht. Zudem werden die Einträge der Rubrik Windows-Einstellungen einer GPO nicht ausgewertet. Wer rsop trotzdem eine Chance geben möchte, gibt folgendes in der Kommandozeile oder im Ausführen-Dialog ein:
rsop.msc
Mit dieser letzten Möglichkeit haben wir jetzt die gängigsten Optionen abgedeckt, um Gruppenrichtlinien anzeigen zu lassen. Es sei denn, jemanden fällt hier noch eine ein. Abschließend sei noch auf die Microsoft Docs verwiesen, wo alle Schalter für gpresult aufgeführt sind.
Windows blockiert Ping-Anforderungen durch eine entsprechende Konfiguration der Firewall. Diese Einstellung lässt sich auf mehrere Arten ändern, entweder über die grafische Konsole der Firewall, über die Kommandozeile sowie PowerShell oder zentral über Gruppenrichtlinien.
Der Grund für das abweisende Verhalten von Windows gegenüber Ping-Requests sind Sicherheitsbedenken von Microsoft. Schließlich wird der Dienst gerne für Angriffe missbraucht, bevorzugt für Denial-of-Service-Attacken.
Änderung der Regeln nur als Administrator
Nichtsdestotrotz hat Ping nach wie vor seine Berechtigung als Diagnosewerkzeug bei Netzwerkproblemen, so dass man diese strikte Konfiguration der Firewall meistens lockern wird. In Firmennetzen kann man die damit verbundenen Risiken reduzieren, indem man die vordefinierte Firewall-Regel nur für das Profil Domäne aktiviert oder zulässige Anfragen auf bestimmte IP-Adressen beschränkt.
Für diesen Zweck stehen mehrere Werkzeuge zur Verfügung. Während Standardbenutzer die vorhandenen Einstellungen mit den Kommandozeilen-Tools ansehen können, setzt die Aktivierung von Firewall-Regeln grundsätzlich administrative Rechte voraus.
Eingehende Pings durchlassen
Das gängigste Programm zur Aktivierung der Firewall-Regeln für eingehende Pings ist die grafische Oberfläche Windows-Firewall mit erweiterter Sicherheit. Hier muss man sich als Administrator anmelden, um überhaupt die Einstellungen angezeigt zu bekommen.
Dort wechselt man in der linken Spalte zu Eingehende Regeln und sucht anschließend im Hauptfenster nach Datei- und Druckerfreigabe (Echoanforderung – ICMPv4 eingehend). Diese Regel existiert in Ausprägungen für die Profile Domäne sowie für Öffentlich und Privat. Je nach Bedarf aktiviert man sie für ein bestimmtes oder für mehrere Profile (siehe dazu: Windows-Firewall: Regeln für Profile konfigurieren).
Öffnet man den Dialog Eigenschaften aus dem Kontextmenü dieser Regel, dann kann man dort unter Bereich => Remote-IP-Adresse die Clients, von denen Ping-Anfragen erlaubt sind, weiter einschränken. Existieren auf dem Rechner mehrere NICs, dann besteht zudem die Möglichkeit, über Lokale IP-Adressen jene festzulegen, zu denen Requests durchgelassen werden.
Ping zulassen mit PowerShell
PowerShell verfügt über eine Reihe von Cmdlets, mit denen sich die Firewall vollständig konfigurieren lässt. Für das Management der Regeln eignen sich Get-NetFirewallRule und Set-NetFirewallRule. Ersteres hilft dabei, den Status von Regeln zu ermitteln, Zweiteres kann diesen ändern.
Möchte man sich anzeigen lassen, welche Regeln für Ping zuständig sind, dann filtert man sie nach dem Begriff ICMP4:
Dieser Befehl gibt eine relative kurze Liste aus und zeigt unter anderem auch, für welches Firewall-Profil die Regeln gelten und ob sie aktiviert sind. Für eingehende Ping-Anforderungen in Domänen-Netzwerken ist demnach FPS-ICMP4-ERQ-In-NoScope zuständig, für die Profile Öffentlich und Privat hingegen FPS-ICMP4-ERQ-In.
Nun kann man im nächsten Schritt die gewünschte Regel aktivieren, beispielsweise mit dem Befehl
Er ändert nicht nur den Status der Regel FPS-ICMP4-ERQ-In-NoScope, so dass Ping-Anforderungen durchgelassen werden, sondern grenzt zusätzlich die zulässigen Hosts auf die IP-Adresse 192.168.0.66 ein. Vom Erfolg der Maßnahme kann man sich durch
Wie schon in früheren Versionen von Windows steht auch weiterhin das Kommandozeilen-Tool netsh.exe für diese Aufgabe zur Verfügung. Zu seinen Nachteilen gehört nicht nur eine eigenwillige Syntax, sondern auch ein Mix aus übersetzten Namen für die Regeln und englischsprachigen Werten für die meisten Parameter.
Das netsh-Äquivalent zum obigen Aufruf von Set-NetFirewallRule würde so aussehen:
netsh advfirewall firewall set rule profile=Domain name=“Datei- und Druckerfreigabe (Echoanforderung – ICMPv4 eingehend)“ new enable=yes remoteip=192.168.0.66
Möchte man Anfragen von allen Rechnern zulassen, dann verzichtet man auf den Parameter remoteip. Will man hingegen die Regel für die Profile Öffentlich und Privat aktivieren, dann ändert man den Wert für profile auf Private,Public.
Ping erlauben über Gruppenrichtlinien
In zentral verwalteten Umgebungen wird man die Firewall-Einstellungen wahrscheinlich über GPOs konfigurieren wollen, beispielsweise für alle Rechner in einer bestimmten OU. Diese Möglichkeit bestand ebenfalls schon unter Windows 7 / 8.1, das Vorgehen ist dabei gleich geblieben. Siehe dazu meine Anleitung Ping mittels GPO erlauben in Windows 7 / 8.x und Server 2012 (R2).
Zunächst wählst du ganz normal dein Land und die dazugehörige Sprache sowie das Tastaturlayout aus.
Bist du bei der Auswahl des WLANs angekommen, öffnest du mit der Tastenkombination „(fn+)Shift+F10“ die Eingabeaufforderung. Die Funktionstaste (fn) ist nur notwendig, wenn auf deinem Notebook für F10 eine Sonderfunktion wie bspw. „Display-Hellgikeit erhöhen“ zugewiesen ist.
Dort tippst du den Befehl „oobe\BypassNRO“ ein, bestätige im Anschluss mit der Enter-Taste.
Das Notebook startet daraufhin neu und du musst erneut Land und Sprache auswählen.
Bei der Auswahl der Internetverbindung hast du nun allerdings die Option unten rechts, „Ich habe kein Internet“ auszuwählen.
Im nächsten Schritt musst du unten rechts ein weiteres Mal bestätigen, dass du „Mit eingeschränkter Einrichtung fortfahren“ möchtest.
Danach kannst du die Einrichtung mit einem lokalen Konto fortführen.
Auf dem Desktop angekommen, kannst du dein entsprechendes WiFi mit einem Klick auf die Taskleiste unten rechts aktivieren und anschließend die Windows-Updates durchlaufen lassen.

 Zu beachten ist ein mittlerweile geänderter Ablauf:
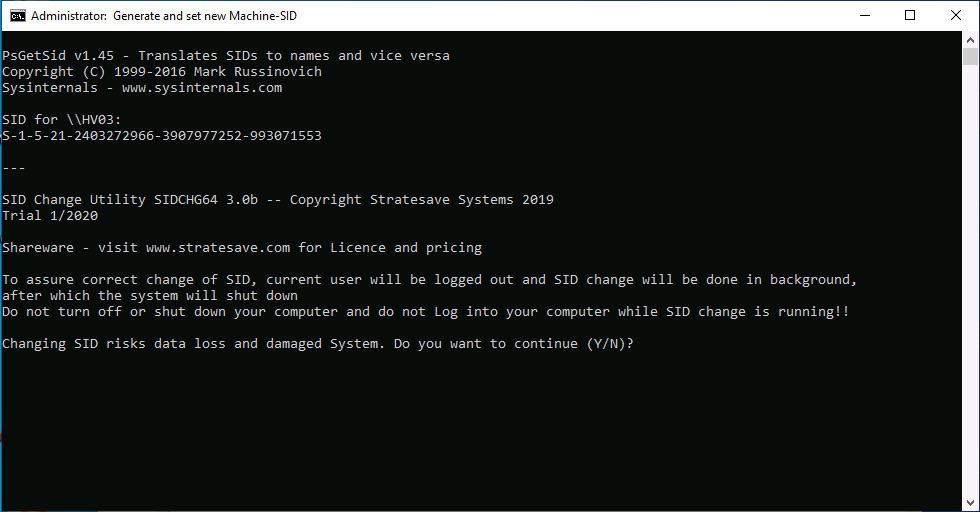 Nach der Bestätigung mit “j” fährt nach einem kurzem Moment der Computer herunter. Startet man diesen dann neu und prüft erneut mit PsGetSid, so sieht man die Änderung
 © Microsoft


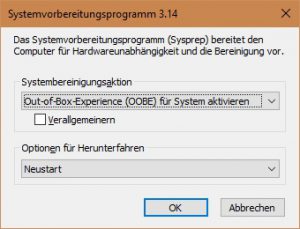 Nun das Script mittels .decrapifier.ps1 ausführen und abwarten. Wenn alles fertig ist, noch den Befehl set-executionpolicy restricted absetzen. Dann das Fenster schließen und den Windows Explorer öffnen. Dort den Pfad C:WindowsSystem32sysprep aufrufen und die sysprep.exe ausführen.
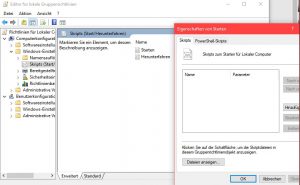