Sind Sie von Ihrem System abgemeldet, weil Sie das Standard-Login des Raspberry Pi nicht kennen und nun nach Möglichkeiten suchen, es zurückzusetzen? Wenn ja, dann seien Sie versichert! Wir geben Ihnen alle Informationen, die Sie zum Zurücksetzen und Sichern Ihres Raspberry Pi OS benötigen.
Wie bei anderen Geräten gibt es auch eine integrierte Raspberry Pi-Standardanmeldung, wenn Sie Ihr Raspberry Pi-Betriebssystem installieren. Da diese Standard-Logins jedoch im Internet leicht verfügbar sind, könnte jeder mit schädlichen Absichten versuchen, darauf zuzugreifen. Daher ist es nicht sicher, mit dem Standard-Login weiterzuarbeiten.
Wir helfen dir, das Passwort und alles, was damit zusammenhängt, zurückzusetzen. Also, worauf warten? Lass uns darauf eingehen!
In der Vergangenheit hatte das Raspberry Pi OS einen Standardbenutzernamen und ein Standardpasswort; Benutzername pi, mit Passwort raspberry. Dies ist nicht mehr der Fall. Wenn du jedoch eine ältere Version des Betriebssystems verwendest oder mit einer bestehenden Installation arbeitest, kann dieser Standardbenutzer vorhanden sein. Wenn du dies noch nicht getan hast, solltest du das Standardpasswort sofort ändern, um sicherzustellen, dass dein Raspberry Pi sicher ist.
Raspberry Pi Standardpasswort per RPi Imager setzen (Headless)
In neueren Raspberry Pi OS Versionen müssen wir das Passwort selbst setzen. Wir haben zwei Optionen:
- Nach dem ersten Booten (hierfür wird eine Tastatur und ein Bildschirm benötigt)
- Direkt bei der Installation (Headless). Diesen Fall schauen wir uns detailiert an.
Dazu laden wir den Raspberry Pi Imager und wählen ein Betriebssystem, das wir installieren möchten. Dieses kann direkt über den Downloader heruntergeladen werden.
Im Anschluss klicken wir das Optionssymbol (alternativ per STRG + Shift + X) und setzen den Haken bei „Username und Passwort setzen“. Wir können ebenfalls weitere Einstellungen (Wifi, Sprache, etc.) direkt konfigurieren.
Nach dem Flashen kannst du direkt loslegen und benötigst keine weitere Raspberry Pi Standard-Zugangsdaten.
Der Standardbenutzername und das Standardpasswort auf allen (älteren) Raspberry Pi-Betriebssystemen
Die meisten Raspberry Pi-Betriebssysteme haben Standardpasswörter für den Zugriff über SSH. In Raspberry OS ist der Standardbenutzername beispielsweise „pi“ und das Standardpasswort: „raspberry„. Andere Distributionen haben jedoch ihre Standardbenutzernamen und -passwörter, die nicht immer dem Raspberry Pi OS ähnlich sind.
Die folgende Tabelle enthält die Standard-Benutzernamen und -Passwörter der bekanntesten Raspberry-Pi-Distributionen:
| Raspberry Pi-Distributionen |
Nutzername |
Passwort |
| Raspberry Pi OS |
pi |
raspberry |
| DietPi |
root |
dietpi |
| Lakka Linux |
root |
root |
| Kali Linux |
root |
toor |
| OpenELEC |
root |
openelec |
| Arch Linux ARM |
root |
root |
| Debian |
pi |
raspberry |
| LibreELEC |
root |
libreelec |
| OSMC |
osmc |
osmc |
| QtonPi |
root |
rootme |
| Ubuntu Server |
ubuntu |
ubuntu |
| ROKOS |
rokos |
rokos |
| Retropie |
pi |
raspberry |
Wie ändert man das Raspberry Pi-Standardpasswort?
Die Raspberry Pi-Standardanmeldung ist integriert, um die Einrichtung für neue Benutzer zu vereinfachen. Trotzdem ist es besser, die Standardanmeldung zu ändern, um die Sicherheit Ihres Systems zu gewährleisten. Mit dem jüngsten Update fordert Raspberry Pi OS die Benutzer auf, direkt nach der Installation ein neues Passwort einzurichten. Wenn Sie Ihr Passwort jedoch immer noch nicht geändert haben, gehen Sie wie folgt vor.
Gehen Sie die folgenden Anweisungen durch, um Ihr Passwort zu ändern:
- Sie können sich mit dem Standardbenutzernamen „pi“ und dem Standardkennwort: „raspberry“ anmelden.
- Verwenden Sie nach der Anmeldung den Befehl passwd um Ihr Passwort sofort zu ändern.
- Öffnen Sie die Befehlszeile, geben Sie passwd, ein und drücken Sie die “Enter”.
- Sie werden aufgefordert, Ihr aktuelles Passwort zur Überprüfung einzugeben.
- Nach der Verifizierung können Sie Ihr neues Passwort eingeben und auf „Enter“ drücken.
- Sobald Sie Ihr Passwort erfolgreich bestätigt haben, wird es sofort angewendet.
Notiz:
Während der Passworteingabe werden übrigens keine Zeichen auf dem Display angezeigt. Also, keine Panik; Geben Sie einfach Ihr Passwort ein und drücken Sie „Enter“.
Wie ändert man die Passwörter anderer Benutzer?
Falls Ihr Benutzer über „sudo“ -Berechtigungen verfügt (die der Standardbenutzer „pi“ hat), können Sie jedes der Passwörter des Benutzers ändern, indem Sie die unten aufgeführten Schritte ausführen.
- Eintreten passwd in der Befehlszeile zusammen mit dem Benutzernamen..
- Geben Sie sudo passwd jack ein, um das Passwort des Benutzers jack festzulegen.
- Der Vorgang ähnelt dem Ändern des (Standard-)Passworts Ihres eigenen Benutzers.
Übrigens:
Sie können sogar das Passwort des Benutzers entfernen, indem Sie den Befehl sudo passwd bob -d in die Befehlszeile eingeben. Diese Vorgehensweise wird jedoch nicht empfohlen, da sie die Sicherheit Ihres Systems schwächt.
Wie ändert man das Root-Passwort auf dem Raspberry Pi?
Normalerweise melden Sie sich beim Start nicht als Root-Benutzer an. Sie können sich jedoch als Root-Benutzer anmelden und das Root-Passwort auf dem Raspberry Pi durch die folgenden Schritte ändern:
- Geben Sie in der Befehlszeile sudo su ein und drücken Sie die Eingabetaste, um als Supervisor darauf zuzugreifen.
- Verwenden Sie nun den Befehl passwd root um aufgefordert zu werden, das Root-Passwort zu ändern.
- Geben Sie das neue Root-Passwort ein und drücken Sie „Enter“.
Wie erstellt man einen neuen Raspberry Pi Benutzer?
Wenn Sie auf Ihrem Betriebssystem neue Nutzer erstellen möchten, können Sie die folgenden drei grundlegenden Schritte ausführen:
Neue (Standard-)Benutzeranmeldung in Linux oder Raspberry Pi OS hinzufügen
- Geben Sie adduser in die Befehlszeile ein und drücken Sie die Eingabetaste.
- Geben Sie nun den Namen des neuen Benutzers ein, z. B.: sudo adduser jack und drücken Sie „Enter“.
- Sie müssen die Login-Informationen für den neuen Benutzer „jack“ eingeben.
- Nachdem Sie die erforderlichen Informationen eingegeben haben, drücken Sie „Enter“, um fortzufahren.
- Der neue Benutzer wird sofort hinzugefügt.
Speicherort des Home-Ordners
- Der neu hinzugefügte Benutzer hat einen Home-Ordner in/home/.
- Der Home-Ordner des standardmäßigen Raspberry Pi-Benutzers befindet sich als /home/pi/.
Skel
- Der Inhalt von /etc/skel/ wird in den Home-Ordner des neuen Benutzers übertragen.
- Alle Änderungen, die Sie an den Dateien mit Erweiterungen vornehmen, wie z.b.; .bashrc in /etc/skel/ wird automatisch auf die kürzlich hinzugefügten Benutzer angewendet.
Wie fügt man der Sudo-Gruppe ein neues Mitglied hinzu?
Der standardmäßige Raspberry Pi-Benutzer gehört zu einer „sudo“-Gruppe. Die Zugehörigkeit zu einer „sudo“-Gruppe ermöglicht es dem Standardbenutzer, Befehle als Root-Benutzer (Superbenutzer) auszuführen.Es ermöglicht dem Benutzer auch, mit sudo su zum Root-Benutzer zu wechseln.
Die folgenden Anweisungen helfen Ihnen, der sudo-Gruppe ein neues Mitglied hinzuzufügen:
- Geben Sie sudo adduser jack in die Befehlszeile ein.
- Der Benutzer „jack“ wird aufgefordert, sein Passwort einzugeben, um „sudo“ auszuführen.
Falls Sie diese Aufforderung entfernen möchten:
- Erstellen Sie eine Sudoer-Datei mit sudo visudo /etc/sudoers.d/010_jack-nopasswd.
- Platziere es in /etc/sudoers.d index.
- Geben Sie jack ALL= (ALL) NOPASSWD: ALL in einer einzigen Befehlszeile ein.
- Speichern und schließen.
Nach diesem Vorgang wird Ihre Datei auf Fehler überprüft. Falls es Fehler gibt,
- Es öffnet sich ein Dialogfeld mit der Meldung „Was jetzt?“. Drücken Sie die „Enter“-Taste.
- Sie sehen verschiedene Optionen; Drücken Sie einfach „e“, um die sudoers-Datei zu bearbeiten, um das Problem zu beheben.
Wie löscht man einen Benutzer?
Wenn auf Ihrem System viele Benutzer vorhanden sind und Sie einige davon entfernen möchten. Dann können Sie die unerwünschten Benutzer mit nur einem Befehl löschen, der wie folgt lautet:
- Geben Sie userdel in die Befehlszeile ein und drücken Sie „Enter“.
- Sie können -r im selben Befehl hinzufügen, um auch den Home-Ordner des Benutzers zu löschen.
sudo userdel -r jack.
- Achten Sie darauf, nichts zu löschen, bei dem Sie sich nicht sicher sind.
Abschluss
Zusammenfassend ist es daher wichtig, den Raspberry Pi-Standard-Login (also sein Passwort) zurückzusetzen, sobald Sie zum ersten Mal darauf zugreifen. Falls Sie neu in diesem System sind und nicht wissen, wie Sie das Passwort zurücksetzen können, haben wir hier in diesem Artikel alle Grundlagen zum Zurücksetzen des Standardpassworts behandelt. Darüber hinaus finden Sie auch einige zusätzliche Hilfen und Informationen.


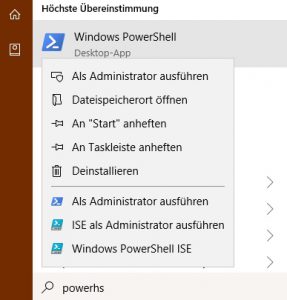
 Nun das Script mittels .decrapifier.ps1 ausführen und abwarten. Wenn alles fertig ist, noch den Befehl set-executionpolicy restricted absetzen. Dann das Fenster schließen und den Windows Explorer öffnen. Dort den Pfad C:WindowsSystem32sysprep aufrufen und die sysprep.exe ausführen.