Das Hinzufügen des ARP-Eintrags ist fehlgeschlagen: Der Zugriff wird verweigert: arp -s geht nimmer

Stattdessen wir jetzt netsh verwendet:

netsh interface ipv4 add neighbors „Name der LAN-Verbindung“ [IP] [MAC]

für Copy & Paste:
netsh interface ipv4 add neighbors LAN-Verbindung 10.11.1.5 00-11-32-B7-00-E9
netsh interface ipv4 add neighbors Local Area Connection 192.168.0.1 00-24-01-d2-3a-bd
netsh interface ipv4 add neighbors Ethernet 10.11.1.5 00-11-32-B7-00-E9

Netzwerkkarten anzeigen:
netsh interface show interface

How to restore Registry from its secret backup on Windows 10

On Windows 10, it is never a good idea to modify the Registry because the database contains low-level settings necessary for the system and certain apps to operate correctly, and the slightest mistake can prevent the device from booting again.

If you recently made system setting changes or installed a buggy update that caused the computer to stop working, you can still recover Windows 10 using the secret Registry backup.

However, there is one caveat, since the operating system no longer creates these backups automatically, you have to re-enable it manually before you can use it.

In this guide, you will learn the steps to restore the previous version of the Registry manually from its automated backup on Windows 10.

Important: Remember that modifying system files can further damage the installation if it is not done correctly. It is assumed that you know what you’re doing and that you have previously created a full backup of your computer. Use these steps at your own risk.

Restore Registry manually on Windows 10

To manually restore the Registry on Windows 10, use these steps:

    1. Start computer with the Advanced startup options.
    2. Click on Troubleshoot.
    3. Click on Advanced options.
    4. Click on Command Prompt.

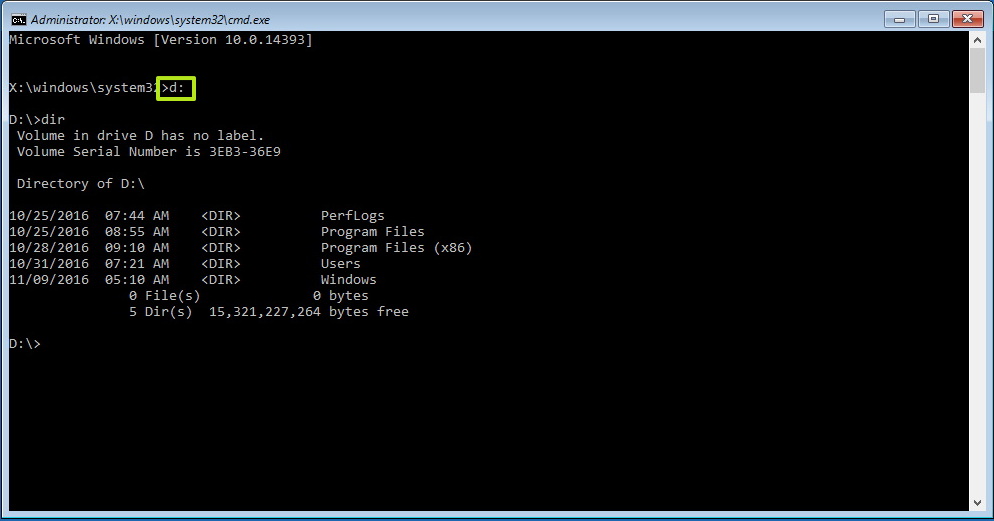
When your device starts in Command Prompt, it will start on X:WindowsSystem32. Now you need to move to the drive letter where Windows is installed. While the operating system is installed on the C: drive, when you boot your computer on recovery mode, this drive letter could change to something else. However, in most cases, the drive letter is D:. Type the following command to enter into the correct drive where Windows 10 is installed and press Enter:

  1. d:
  2. Type the following command to verify you are in the correct drive and press Enter:
    dir
    Command Prompt in Advanced startupCommand Prompt in Advanced startup
    If you see the Windows folder, you are in the correct drive letter. If not, return to step No. 5 and try another letter.
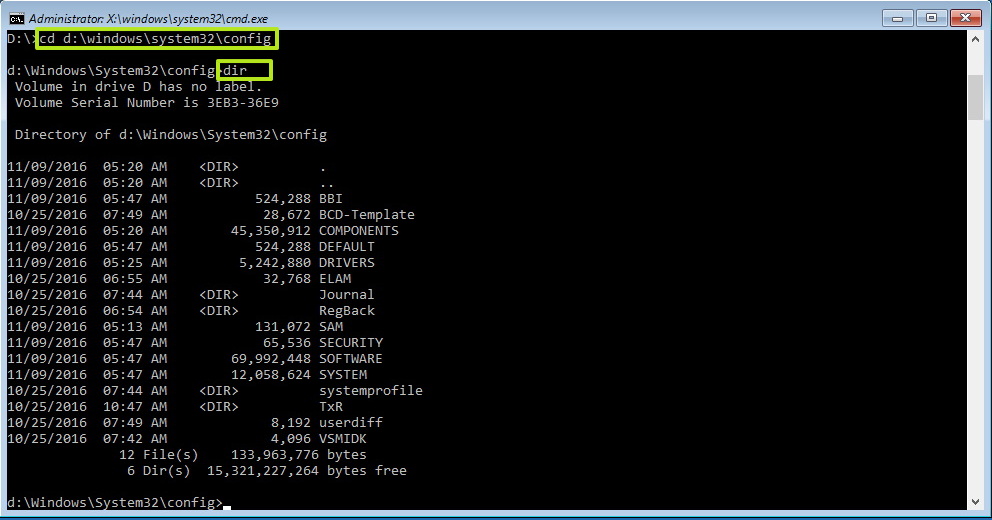
  3. Type the following command to enter into the System32 folder and press Enter:
    cd d:windowssystem32
    Change D in the command with the correct drive letter for your scenario.
    Windows 10 Config folderWindows 10 Config folder
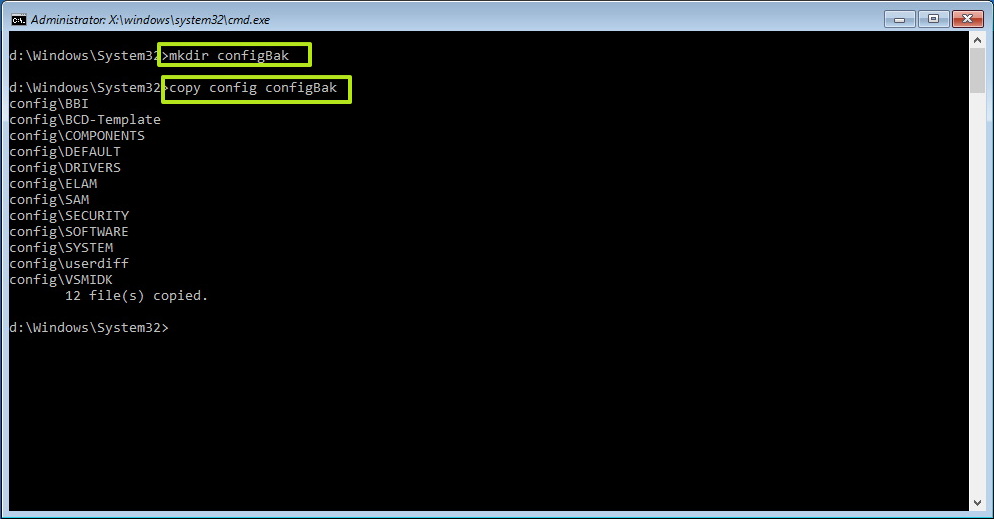
  4. Type the following command to create a folder to temporary backup of files on the config folder, which also happens to store a copy of the Registry, and press Enter:
    mkdir configBak
  5. Type the following command to create a temporary backup of the files in the config folder, and press Enter:
    copy config configBak
    Making a backup copy of the Registry on Windows 10Making a backup copy of the Registry on Windows 10
  6. Type the following command to move inside the RegBack, which contains a backup of the Registry, and press Enter:
    cd configRegBack
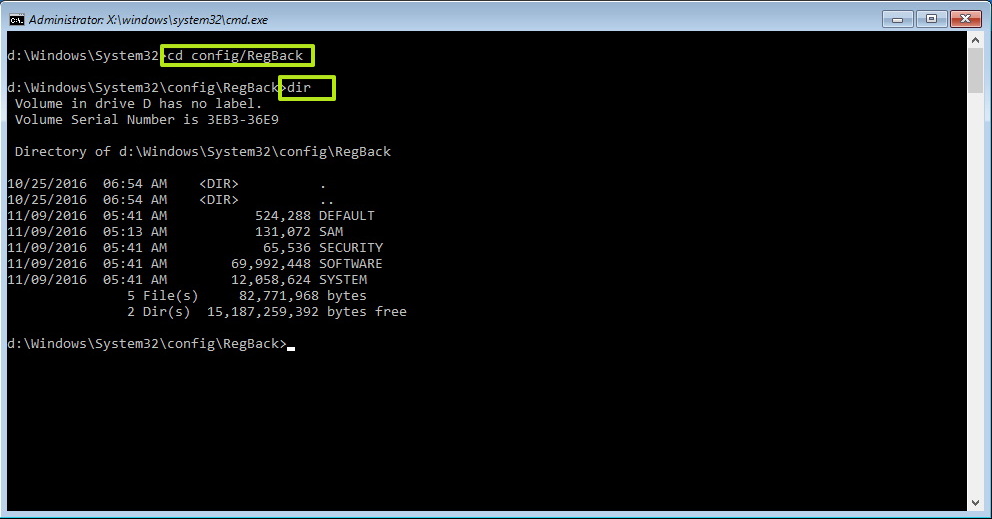
  7. Type the following command to verify the content of the RegBack folder and press Enter:
    dir
    RegBack folder contentRegBack folder content


    Warning: After running the dir command, the files’ size (SYSTEM, SOFTWARE, SAM, SECURITY, DEFAULT) should be similar to the ones you see in the screenshot. If any of the files shows 0, do NOT continue as you won’t be able to repair your Windows 10 installation, and your device may stop booting.
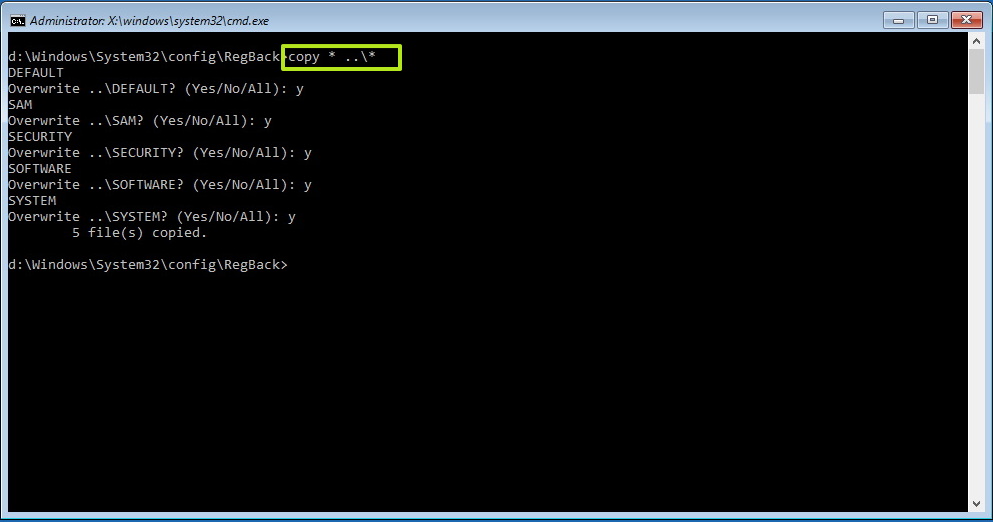
  8. Type the following command to copy the files from the RegBack folder to the config folder and press Enter and the Y key on every question to confirm:
    copy * ..*
    Restoring Registry from its backupRestoring Registry from its backup on Windows 10
  9. Click the Close (X) button from the top-right.

Once you complete the steps, the computer will reboot, and Windows 10 should start correctly.

We are focusing this guide on Windows 10, but the concept also should work on Windows 8.1 and Windows 7.

How to Register Active Directory Schema MMC Snap-In

By default, the Active Directory Schema MMC snap-in is not registered on domain controllers or machines with the Remote Server Administration Tools (RSAT) installed. To use the snap-in for the first time on a new machine, you’ll need to register the DLL. To do this, follow the steps below:

  1. Open an elevated command prompt
  2. Run the following command: regsvr32 schmmgmt.dll
  3. You should receive a success message:
DllRegisterServer in schmmgmt.dll succeeded.

Once you have registered the snap-in, you can add it to an MMC by following these steps:

  1. Open a new MMC Console (Start>Run>mmc)
  2. In the MMC Console, go to File>Add/Remove Snap-in
  3. Add the Active Directory Schema snap-in as shown below:

Once you click OK, you’ll be able to access the snap-in through the MMC Console

Dateisortierung nach Sonderzeichen

_ Unterstrich
۞ Stern mit Loch ?

a A-Z
z Lower case Z

ι Greek letter
Ι Greek letter, capital version of above character, not an „I“)
α alpha U+03B1 Alt 224
Γ gamma U+0393 Alt 226
δ delta U+03B4 Alt 235
ε epsilon U+03B5 Alt 238
Θ theta U+0398 Alt 233
π pi U+03C0 Alt 227
Σ sigma upper U+03A3 Alt 228
σ sigma lower U+03C3 Alt 229
τ tau U+03C4 Alt 231
Φ phi upper U+03A6 Alt 232
φ phi lower U+03C6 Alt 237
Ω omega U+03A9 Alt 234
一 Japanese Character? (Thanks, Jam)
口 Japanese character? (Thanks, Jam)
末 Japanese character „End“ (Thanks, Jam)
 (a private use character) (Thanks, Peter O.)

Und man kann auch tatsächlich (fast) alle Sonder-Zeichen außer \ / : * ? “ < > | verwenden.

So, jetzt zum wirklich Wichtigen, die Buchstaben nach „Z“.

Zuerst habe ich das Ohm-Zeichen Ω gefunden (das griechische Omega).

Dann herausgefunden das alle griechischen Buchstaben α β γ δ ε … φ χ ψ ω nach den deutschen Buchstaben kommen
und danach die kyrillischen Buchstaben Ё Ђ Ѓ Є … Ҳ Ҹ Һ Ә Ө .

Vor der Null kommen anscheinend nur Satzzeichen und Symbole,
den Anfang macht das ! dann # $ % & irgendwann kommt das @ ,
Plus, Minus und Underline sind auch vor Null.

Ein paar schöne Symbole vor Null sind Pik, Kreuz, Herz und Karo ♠ ♣ ♥ ♦ ,
sowie ■ ▲ ▼ ► ◄ wobei diese komischer Weise im Explorer unterschiedlich groß dargestellt werden.

Und noch ein ganz Spezielles, weil ja * nicht erlaubt ist, kann man alternativ den arabischen Stern ٭ verwenden,
der aber hier im Textfenster etwas Probleme macht, ist wohl ein Steuerzeichen für irgend was,
er schaut hier im Text auch nicht so schön aus wie im Explorer.

Die Sortierreihenfolge nach unterschiedlichen Sonderzeichen, speziell Minus, bleibt wohl für ewig ein Rätsel,
hier ein Beispiel:


+
-+
+-
++

Unicode Chart:
https://unicode.org/charts/collation/

Windows Server 2019: Zeitquelle konfigurieren

Den Windows-Dienst W32Time unter Windows Server 2019 konfigurieren und als Zeitquelle innerhalb einer Active Directory Domäne anbieten.


Inhaltsverzeichnis


  • Vorabinformationen
    • Die richtige Uhrzeit
    • Domänencontroller und Zeitquellen
    • Domänencontroller mit PDC-Betriebsmaster finden
    • Virtuelle Domänencontroller und Hypervisor-Zeitsynchronisation
    • Netzwerkanforderungen
    • Uhrzeit auf einem Core Server anzeigen
  • Zeitquelle auf dem PDC-Betriebsmaster konfigurieren
  • Zeit in der Domäne verteilen
  • Zeit für mobile Geräte verteilen

Vorabinformationen

Die richtige Uhrzeit

Neben dem offensichtlichen praktischen Nutzen einer möglichst korrekten Uhrzeit, gibt es auch eine technische Notwendigkeit. So ist in einer Active-Directory-Domäne das zeitabhängige „Kerberos“ im Hintergrund für die Authentifizierung zuständig. Kerberos erstellt für jede Authentifizierungsanforderung (z.B. Zugriff auf Dateifreigabe) zeitlich begrenzt gültige Tickets, die den angeforderten Vorgang innerhalb weniger Minuten erlauben. Bei entsprechender Zeitdifferenz schlagen die Authentifizierungen fehl und der Zugriff wird blockiert.

Domänencontroller und Zeitquellen

Der Domänencontroller der den PDC-Betriebsmaster ausführt, dient innerhalb einer Active-Directory-Domäne als Zeitquelle für alle anderen Windows Server und Clients. Dadurch genügt es die Zeitquelle auf dem Domänencontroller zu konfigurieren.

Domänencontroller mit PDC-Betriebsmaster finden

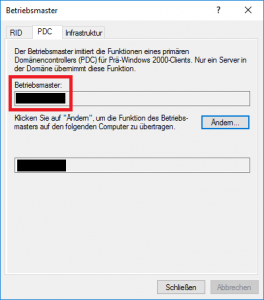
Da typischerweise mehrere Domänencontroller in einem Netzwerk ausgeführt werden, kann der Domänencontroller mit dem PDC-Betriebsmaster wie folgt gefunden werden:

  • „Active Directory-Benutzer und -Computer“ öffnen
  • Rechtsklick auf die Domäne → Betriebsmaster
  • Registerblatt PDC anklicken:
    PDC-Betriebsmaster

Virtuelle Domänencontroller und Hypervisor-Zeitsynchronisation

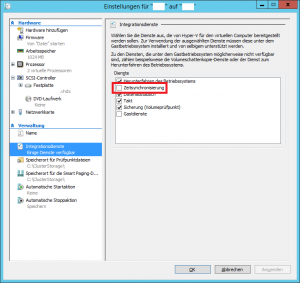
Bei virtuellen Domänencontrollern besteht die Gefahr, dass von außen der jeweilige Hypervisor eine andere falsche Zeit vorgibt. Bei Hyper-V kann dies in den Einstellungen der virtuellen Maschine unter dem Menüpunkt Integrationsdienste → Zeitsynchronisierung deaktiviert werden:

Hyper-V Zeitsynchronisierung

Netzwerkanforderungen

Der Windows Zeitdienst folgt dem NTP-Standard und verwendet für die Synchronisation den UDP Port 123. In restriktiv konfigurierten Netzwerk-Firewalls muss dieser Port daher zumindest vom Domänencontroller ausgehend ins Internet erlaubt werden.
In vielen Fällen kann aber auch die Firewall selbst einen NTP-Zeitserver anbieten und mit einem Internet-NTP-Server abgleichen. In diesem Fall könnte dann der Domänencontroller mit PDC-Rolle die Firewall als Zeitquelle nutzen.

Uhrzeit auf einem Core Server anzeigen

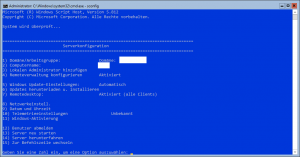
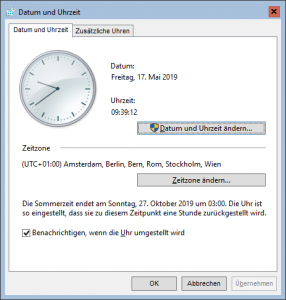
Die Uhrzeit kann über den Befehl sconfig„9) Datum und Uhrzeit“ angezeigt werden:

Datum und Uhrzeit

Datum und Uhrzeit

Zeitquelle auf dem PDC-Betriebsmaster konfigurieren

Eingabeaufforderung als Administrator öffnen und mit folgendem Befehl den öffentlichen NTP-Serverpool „at.pool.ntp.org“ als Zeitquelle festlegen:
w32tm /config /manualpeerlist:“at.pool.ntp.org,0x8″ /syncfromflags:manual /reliable:yes /update net stop w32time && net start w32time
Ein erneuter Zeitabgleich wird mit folgendem Befehl initiiert:
w32tm /resync
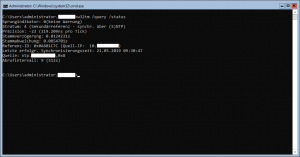
Der W32TM-Status kann wie folgt ermittelt werden:
w32tm /query /status

w32tm query status

w32tm /query /status

Zeit in der Domäne verteilen

Im Normalfall verteilt sich die neue Uhrzeit relativ schnell von selbst. Wenn ein Windows Desktop oder Server die Zeit scheinbar nicht übernimmt, ist möglicherweise eine andere Zeitquelle konfiguriert. Mit diesen Befehlen wird wieder der Domänencontroller als Zeitquelle konfiguriert:
w32tm /config /syncfromflags:domhier /update net stop w32time && net start w32time
Ein erneuter Zeitabgleich wird mit folgendem Befehl initiiert:
w32tm /resync

Zeit für mobile Geräte verteilen

Wenn mobile Windows Clients auch extern einen Zeitabgleich mit öffentlichen NTP-Servern durchführen sollen, kann das wie folgt konfiguriert werden:
w32tm /config /manualpeerlist:“at.pool.ntp.org,0x8″ /syncfromflags:manual,domhier /update net stop w32time && net start w32time
Mehr auf Microsoft.com


Content retrieved from: https://www.anreiter.at/windows-server-2019-zeitquelle-konfigurieren/.

Automatically Log off Disconnected User Sessions on Windows

Many times users connect to remote Windows systems, do work and close the remote session without properly logoff the account. In that case multiple applications, which are still running with that login session uses system resources. Some times it causes slow response of our servers and create pain for us. So this will be good to auto log off disconnected sessions from Windows system.

This tutorial will help you to log all the disconnected remote sessions on the Windows system. This tutorial has been tested with Windows Server 2019.

Setup Auto Log Off Disconnected Sessions

We are making changes in Local group policy of systems. So be careful with the changes.

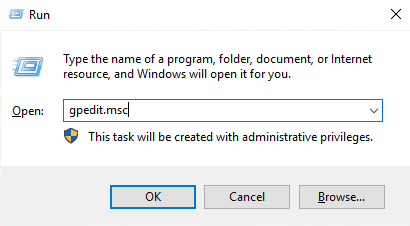
First of all, open the ‘Group Policy Editor‘ on your server. Start run window by pressing “Win + R” and type gpedit.msc on run window.

The local group policy editor will be opened on your system. Then navigate to the following location as the below given instructions:
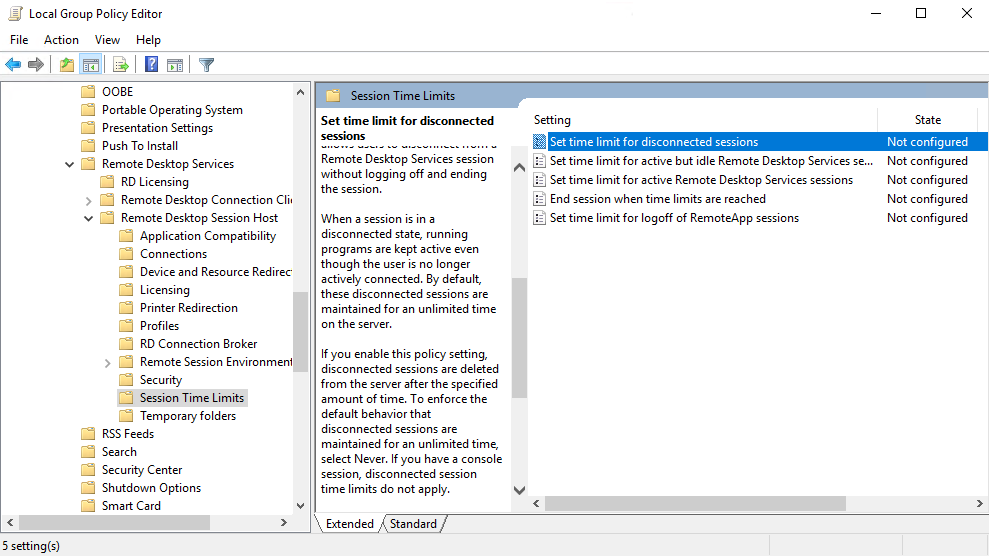
Local Computer Policy => Computer Configuration => Administrative Templates => Windows Components => Remote Desktop Services => Remote Desktop Session Host => Session Time Limits
Windows remote session timeout limit

You will find a list of options on the right-side. Then Double click on “Set time limit for disconnected sessions” to open it.

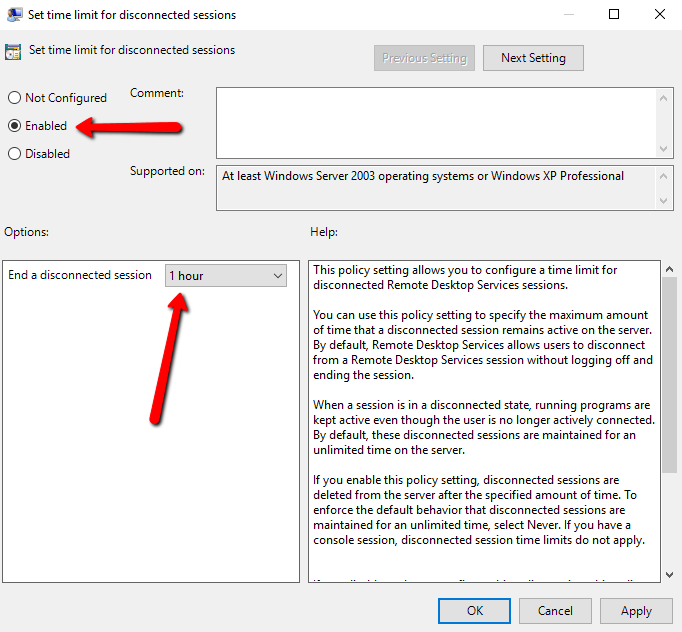
Disconnected User Sessions on Windows

By default, it is configured a ‘Not configured. Change this to ‘Enabled. Now you will see an option “End a disconnected session” in the lower-left side. Set this value to the desired time. I have set this to 1 hour, so any disconnected user is logged off after 1 hour.

Conclusion

In this tutorial, you have learned to configure your Windows system to auto logout disconnected remote sessions.

Content retrieved from: https://tecadmin.net/windows-logoff-disconnected-sessions/.

Make Device Manager show Non present devices in Windows

  1. CMD als Admin
  2. set devmgr_show_nonpresent_devices=1
  3. start devmgmt.msc
  4. Device Manager Ausgeblendete Geräte anzeigen

Problembeschreibung


Der Geräte-Manager zeigt nur Plug&Play-Geräte, -Treiber und -Drucker an, wenn Sie im Menü Ansicht auf Ausgeblendete Geräte anzeigen klicken. Nicht an den Computer angeschlossene Geräte, die Sie installieren (z. B. USB-Geräte oder „verwaiste“ Geräte), werden im Geräte-Manager nicht angezeigt, auch dann nicht, wenn Sie auf Ausgeblendete Geräte anzeigen klicken.

Abhilfe


Gehen Sie folgendermaßen vor, um dieses Verhalten zu umgehen und Geräte mit der Option Ausgeblendete Geräte anzeigen anzuzeigen:

  1. Klicken Sie auf Start, zeigen Sie auf Alle Programme, zeigen Sie auf Zubehör, und klicken Sie anschließend auf Eingabeaufforderung.
  2. Geben Sie an der Eingabeaufforderung den folgenden Befehl ein, und drücken Sie anschließend die EINGABETASTE:set devmgr_show_nonpresent_devices=1
  3. Geben Sie an der Eingabeauforderung den folgenden Befehl ein, und drücken Sie dann die EINGABETASTE:start devmgmt.msc
  4. Führen Sie eine Problembehandlung für die Geräte und Treiber im Geräte-Manager durch.

    HINWEIS: Klicken Sie im Menü Ansicht im Geräte-Manager auf Ausgeblendete Geräte anzeigen, um Geräte sehen zu können, die nicht an den Computer angeschlossen sind.
  5. Wenn Sie die Problembehandlung abgeschlossen haben, schließen Sie den Geräte-Manager.
  6. Geben Sie an der Eingabeaufforderung exit ein.

    Wenn Sie das Eingabeaufforderungsfenster schließen, deaktiviert Windows die Variable devmgr_show_nonpresent_devices=1 zurück, die Sie in Schritt 2 erstellt haben, und verhindert, dass verwaiste Geräte bei Anklicken von Ausgeblendete Geräte anzeigen angezeigt werden.

[Fix] Remote Desktop DPI scaling issues

Do you have a computer with High-DPI screen? A very high resolution display? And is everything too small to see within your Remote Desktop Connection, try this solution…

screreso

This issue is caused by lack of not being DPI scaling aware of the Remote Desktop Client. If you open a Remote Desktop connection to a server or other computer the native resolution of the computer is used instead of the scaling to 1920×1080, so you’ll get very small icons etc.

Some other blogs mention to fix the issue with using Remote Desktop Connection Manager 2.7 or using RD Tabs.

Another solution where you don’t need extra tools or programs is to make a manifest file, see the steps below.

First tell Windows to look for a manifest file for an application by default. This can be done by setting a registry entry.

Open regedit and navigate to the registry key:
HKLMSOFTWAREMicrosoftWindowsCurrentVersionSideBySide
Right-click, select NEW -> DWORD (32 bit) Value
Type PreferExternalManifest and then press ENTER.
Right-click PreferExternalManifest, and then click Modify.
Enter Value Data 1 and select Decimal.
Click OK. Exit Registry Editor.

Next step is to make the manifest file, mstsc.exe.manifest. Copy the contents below and put it in Notepad or similar tool and save it to a file as %SystemRoot%System32mstsc.exe.manifest. Download of the file is also available, here. Important is that you save the file in the same directory as the Remote Desktop Client executable (mstsc.exe).
<?xml version=“1.0″ encoding=“UTF-8″ standalone=“yes“?> <assembly xmlns=“urn:schemas-microsoft-com:asm.v1″ manifestVersion=“1.0″ xmlns:asmv3=“urn:schemas-microsoft-com:asm.v3″> <dependency> <dependentAssembly> <assemblyIdentity type=“win32″ name=“Microsoft.Windows.Common-Controls“ version=“6.0.0.0″ processorArchitecture=“*“ publicKeyToken=“6595b64144ccf1df“ language=“*“> </assemblyIdentity> </dependentAssembly> </dependency> <dependency> <dependentAssembly> <assemblyIdentity type=“win32″ name=“Microsoft.VC90.CRT“ version=“9.0.21022.8″ processorArchitecture=“amd64″ publicKeyToken=“1fc8b3b9a1e18e3b“> </assemblyIdentity> </dependentAssembly> </dependency> <trustInfo xmlns=“urn:schemas-microsoft-com:asm.v3″> <security> <requestedPrivileges> <requestedExecutionLevel level=“asInvoker“ uiAccess=“false“/> </requestedPrivileges> </security> </trustInfo> <asmv3:application> <asmv3:windowsSettings xmlns=“http://schemas.microsoft.com/SMI/2005/WindowsSettings“> <ms_windowsSettings:dpiAware xmlns:ms_windowsSettings=“http://schemas.microsoft.com/SMI/2005/WindowsSettings“>false</ms_windowsSettings:dpiAware> </asmv3:windowsSettings> </asmv3:application> </assembly>
Note that you can use the manifest for other applications also that aren’t scaling aware.


Siehe auch https://www.brankovucinec.com/fix-remote-desktop-dpi-scaling-issues/

oder https://www.windowspro.de/wolfgang-sommergut/anzeige-rdp-sitzungen-fuer-hochaufloesende-monitore-anpassen

Content retrieved from: https://www.brankovucinec.com/fix-remote-desktop-dpi-scaling-issues/.

Active Directory und gängige Ports

Hier eine Auflistung der gängigsten Active Directory Ports sowie gängiger Ports für Paketfilter in Firewalls.

tcp/53 DNS
tcp/88 Kerberos
tcp/135 RPC
tcp/445 sysvol share
tcp/389 LDAP
tcp/464 Kerberos password (Max/Unix clients)
tcp/636 LDAP SSL (if the domain controllers have/need/use certificates)
tcp/1688 KMS (if KMS is used. Not necessarily AD, but the SRV record is in AD and clients need to communicate with the KMS).
tcp/3268 LDAP GC
tcp/3269 LDAP GC SSL (if the domain controllers have/need/use certificates)
tcp/49152 through 65535 (Windows Vista/2008 and higher) aka “high ports”

udp/53 DNS
udp/88 Kerberos
udp/123 time
udp/135 RPC
udp/389 LDAP
udp/445 sysvol share

You can minimize the high-port range by configuring a static RPC port for Active Directory.

Restricting Active Directory RPC traffic to a specific port
https://support.microsoft.com/en-us/kb/224196

It’s usually a good idea to force Kerberos to use only tcp/ip, particularly if you have a large, complex network, or accounts are members of large number of groups/large token size.

How to force Kerberos to use TCP instead of UDP in Windows
https://support.microsoft.com/en-us/kb/244474

Active Directory Ports

DienstebeschreibungTCP/UDPPortnummern, Beschreibung
DNSTCP/UDP53
KerberosTCP/UDP88
LDAPTCP/UDP389 (LDAP, 389/TCP, LDAP Ping 389/UDP)
LDAP-SSLTCP686
Microsoft-DSTCP/UDP445
UPnPTCP/UDP1900, 2869 (UPnP Framwework für Netzwerkkommunikation unter Windows
WINSTCP/UDP1512
NetBIOSTCP/UDP137
NetBIOS DatagrammUDP138
NetBIOS Session ServiceTCP139
WINS ReplikationTCP/UDP42

Active Directory KommunikationNotwendiger Datenverkehr
Netzwerkanmeldung eines Benutzers über eine Firewall Microsoft-DS-Datenverkehr (445/TCP, 445/UDP)
Kerberos-Authentifizierungsprotokoll (88/TCP,88/UDP)
LDAP-Ping (389/UDP)
DNS (53/TCP, 53/UDP)
Computeranmeldung an einem Domänencontroller Microsoft-DS-Datenverkehr (445/TCP, 445/UDP)
Kerberos-Authentifizierungsprotokoll (88/TCP,88/UDP)
LDAP-Ping(389/UDP)
DNS (53/TCP, 53/UDP)
Herstellen einer Vertrauensstellung zwischen Domänencontrollern in verschiedenen Domänen Microsoft-DS-Datenverkehr (445/TCP, 445/UDP)
Kerberos-Authentifizierungsprotokoll (88/TCP,88/UDP)
LDAP-Ping (389/UDP)
DNS (53/TCP, 53/UDP)
LDAP (389/TCP; 686/TCP bei Verwendung von SSL)
Verifizierung einer Vertrauensstellung zwischen zwei Domänencontrollern Microsoft-DS-Datenverkehr (445/TCP, 445/UDP)
Kerberos-Authentifizierungsprotokoll (88/TCP,88/UDP)
LDAP-Ping (389/UDP)
DNS (53/TCP, 53/UDP)
LDAP (389/TCP; 686/TCP bei Verwendung von SSL)
Netlogon

Microsoft SQL Server Ports

DienstebeschreibungTCP/UDPPortnummern, Beschreibung
SQL AbfragenTCP1433
SQL MonitorTCP1434

Microsoft Exchange Server Ports

NetzwerkkommunikationNotwendiger Datenverkehr
Kommunikation mit Domänen-
controllern
LDAP-Standardprotokoll (389/TCP; 636/TCP bei Verwendung von SSL)
LDAP-Kommunikation für Standortreplikationsdienst (379/TCP)
LDAP-Kommunikation für globalen Katalog (3368/TCP; 3269/TCP bei Verwendung von SSL)
Ausgehende DNS-Anforder-ungen an einen DNS Server DNS (53/TCP und 53/UDP)
Nachrichtenaustausch zwischen Servern SMTP Datenverkehr (25/TCP; 465/TCP bei Verwendung von TLS)
SMTP Verbindungsalgorithmus (691/TCP)
Clients, die E-Mail über POP3 herunterladen POP3 (110/TCP; 995/TCP bei Verwendung von SSL)
Clients, die E-Mail über IMAP4 herunterladen IMAP4 (143/TCP; 993/TCP bei Verwendung von SSL)
Client, der Newsreader einsetzt NNTP (119/TCP; 563/TCP bei verwendung von SSL)
Webbrowser, der E-Mail von OWA herunterlädt HTTP-Protokoll (80/TCP; 443/TCP bei Verwendung von SSL)
Clients, die Sofortnachrichten verwenden RVP (80/TCP sowie Anschlüsse über 1024/TCP)
Clients, die ein Chatprotokoll verwenden IRC/IRCX (6667/TCP; 994/TCP bei Verwendung von SSL

Internetauthentifizierungsdienst (RADIUS)

DienstebeschreibungTCP/UDPPortnummern, Beschreibung
Authentifizierungsdaten-verkehrUDP1645, 1812
KontoführungsdatenverkehrUDP1813, 1646
Benachrichtigungs- und Über-wachungsdatenverkehr der QuarantänesteuerungUDP7250

Diverse gängige Netzwerkports

DienstebeschreibungTCP/UDPPortnummern, Beschreibung
PPTP VPNTCP1723 (GRE, IP/47)
L2TP VPNTCP1701, sowie IKE Port 500/UDP
SSHTCP22
HTTPTCP80
HTTPSTCP443
RDPTCP3389, Microsoft Remote Desktop Protocol
iSCSITCP3260, 860
RPC LocatorTCP/UDP135, Remote Procedure Call
Microsoft Operations ManagerTCP/UDP1270
WINSTCP/UDP1512
Microsoft Message QueueTCP/UDP1801
Microosft Desktop Air Sync ProtocollTCP/UDP2175
Microsoft Active Sync Remote APITCP/UDP2176
Microsoft OLAP3TCP/UDP2382
Microsoft OLAP4TCP/UDP2383
Microsoft .NETsterTCP/UDP3126
Microsoft Business Rule Engine Update ServiceTCP/UDP3132
Microsoft Globaler KatalogTCP/UDP3268
Microsoft Globaler Katalog mit LDAP/SSLTCP/UDP3269
Microsoft Windows File System (WINFS)TCP/UDP5009
Microsoft Small BusinessTCP/UDP5356
Microsoft DFS ReplikationTCP/UDP5722
Microsoft maxTCP/UDP6074
NTPTCP/UDP123, Network Time Protocol
NetBIOSTCP/UDP137
NetBIOS DatagrammUDP138
NetBIOS Session ServiceTCP139
RPC Dynamic AssignmentTCP1024-65535
Server Message Block, SMB over IP (Microsoft-DS)TCP/UDP445
GRE, generic routing encapsulation (if using PPTP)IP47
IPSec ESPIP50, Encapsulated Security Payload
IPSec AHIP51, Authenticated Header
EmuleTCP4661, Ausgehend
EmuleTCP4662, Eingehend
EmuleUDP4665, Ausgehend
EmuleUDP4672, Eingehend
MSN MessengerÄltere Messenger Versionen:
IN TCP 6891 – 6900
IN TCP 1863
IN UDP 1863
IN UDP 5190
IN UDP 6901
IN TCP 6901 Neue Messenger Versionen:
UDP Ports: 135, 137, 138
TCP Ports: 135, 139, 445
Ältere MSN Messenger:
(Achtung!! Alte Messenger benötigen einen großen Portbereich!!)

Ports 6891-6900 erlauben Datei Sendungen
Port 6901 ist für Audio Kommunikation
Allows Voice, PC to Phone, Messages, and Full File transfer capabilities.
Thnx to Brad King & Bill Finch Jr.
Neue MSN Messenger:
UDP Ports: 135, 137, 138,
TCP Ports: 135, 139, 445

Die gesamten Well Known Ports und Registered Ports sind auf der Homepage der IANA auf: http://www.iana.org/assignments/port-numbers zu finden.

Proudly powered by WordPress | Theme: Baskerville 2 by Anders Noren.

Up ↑