enable ping requests on Windows.
CMD als Admin:
netsh advfirewall firewall add rule name=“ICMP Allow incoming V4 echo request“ protocol=icmpv4:8,any dir=in action=allow
There are a couple of ways to open the blocked ping request in Windows 10 by configuring a firewall. It can be using the graphical user interface or via the command line PowerShell or centrally via group policies. By default, Windows 10 not allows other computers in the network to ping due to security concerns. After all, the service is often misused for attacks, preferably for denial-of-service attacks, thus Microsoft decided to turn it off, out of the box.
Well, still many times we need the pining facility to solve the network connectivity problems and for that newbies usually turn off the Firewall completely. However, we can manually allow Windows 10 Ping in its firewall, whereas those who concern about security risks they can mitigate it by activating the predefined firewall rule only for the domain profile or by restricting permissible requests to certain IP addresses.
Allow Windows 10 ping through Firewall GUI
One of the easiest ways to allow ping is by activating the pre-configured firewall in Windows via a graphical user interface with the help of the Advanced Security option. However, you should have admin access to enable or disable firewall rules. Here are the steps to follow:
- Go to Windows 10 or 7 Search box.
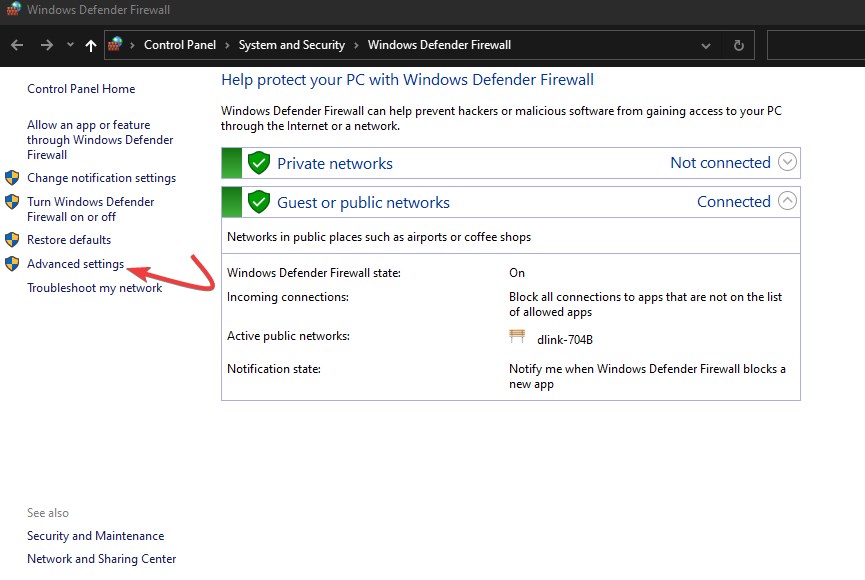
- Type- Windows Defender firewall, as its icon appears, click to open it.
- From the left side panel select “Advanced Settings“.
- On Windows Defender Firewall with Advanced Security select Inbound Rule from the left side panel.
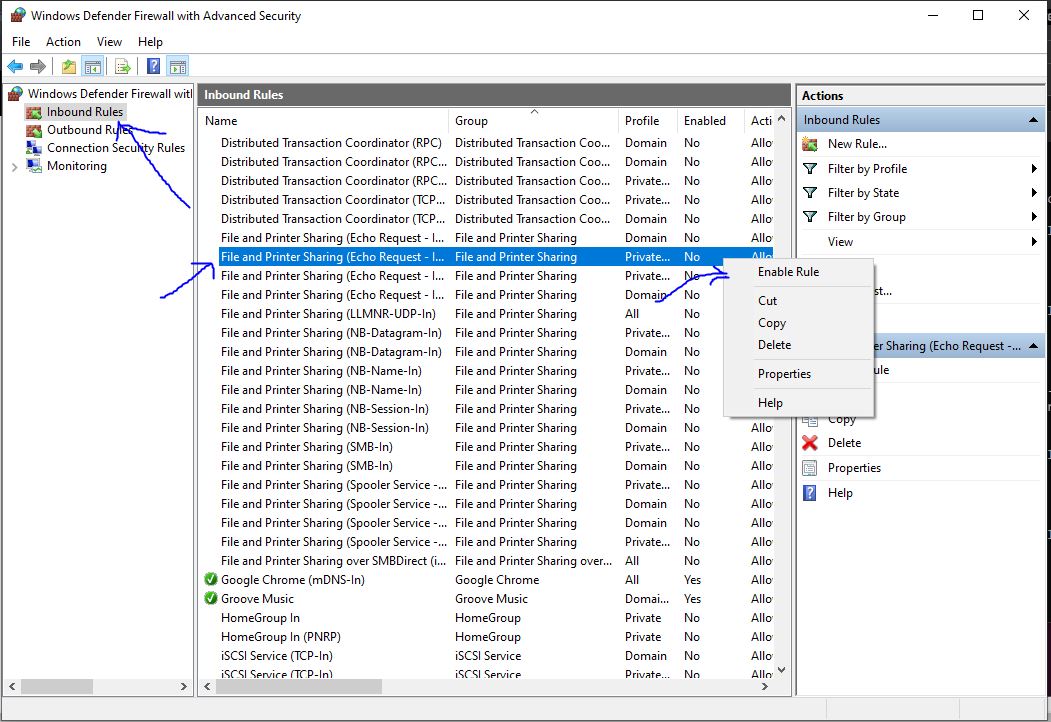
- Now, in the Inbound Rules area search for “File and Printer Sharing (Echo Request ICMPv4-In). This rule exists in versions for the profile domain as well as for public and private. They can be activated for a specific profile or several profiles as required. In this option, the private profile allows pining through IP V4 address”.
- Once you find this predefined rule, right-click on it and select “Enable rule“.
- After that Windows 10 system could be pinged from a remote or local PC.
- In the same way, if you are interested in pinging Windows through Domain or IPv6, then select Echo Request ICMPv6 for IP version 6 whereas the same option with Domain Profile will the pinging through the domain name.
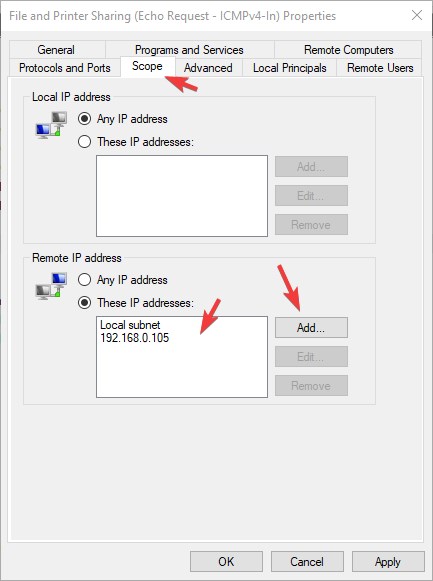
Furthermore, if you want to secure pining by restricting it to some particular IP address then after enabling the rule, again right-click on the same and select Properties.
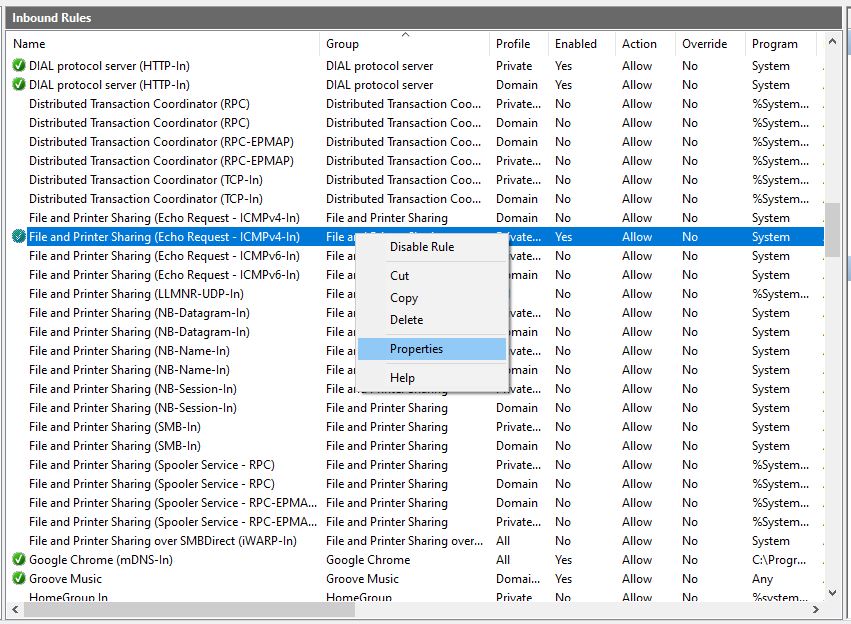
In the Properties dialog select the Scope Tab and to restrict all clients from sending ping requests, click on the Add button and mentioned the Remote IP Address of the only those machines that you want to allow to ping your Windows 10 PC. If there are several NICs on the computer, it is also possible to use local IP addresses to specify those to which requests are allowed.
Allow Windows ping with PowerShell or Command-line Prompt
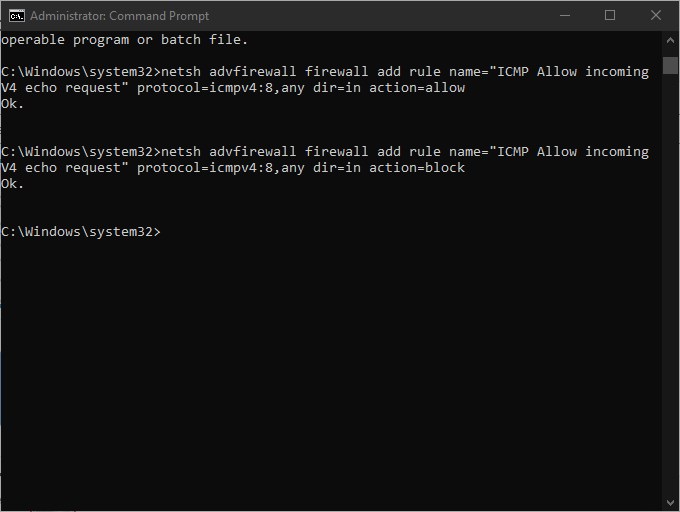
Those who don’t want to use the GUI method because of the multiple steps involved to allow Ping on Windows can go for command-line one. In which, we just need to run Powershell or Command prompt with Administrative right and after that copy-paste the command given here.
- Click in Windows 10 or 7 search box.
- Type- Powershell or Command prompt
- Then as per your selection of command-line tool, run it as administrator.
- After that simply run the below netsh command to enable ping requests on Windows.
netsh advfirewall firewall add rule name=“ICMP Allow incoming V4 echo request“ protocol=icmpv4:8,any dir=in action=allow
In the same way, if you want to disable Windows 10 Ping then use this command:
netsh advfirewall firewall add rule name=“ICMP Allow incoming V4 echo request“ protocol=icmpv4:8,any dir=in action=block
Content retrieved from: https://www.how2shout.com/how-to/allow-windows-10-ping-through-firewall-gui-powershell-netsh-command.html.
 Command Prompt in Advanced startup
 Windows 10 Config folder
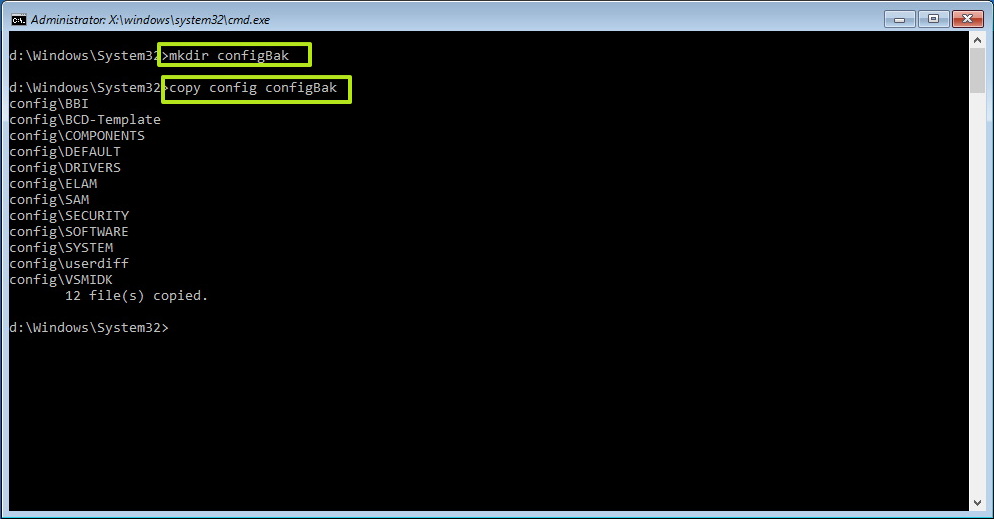 Making a backup copy of the Registry on Windows 10
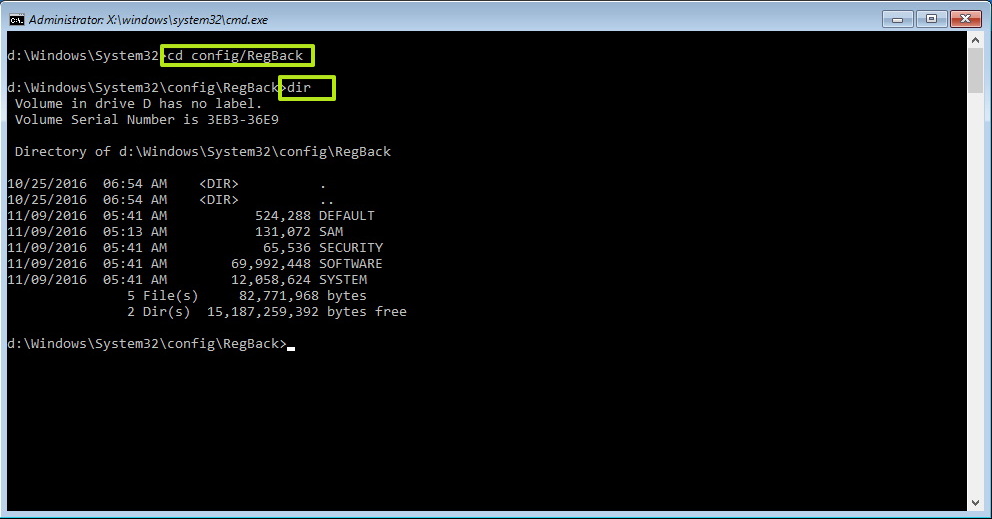 RegBack folder content
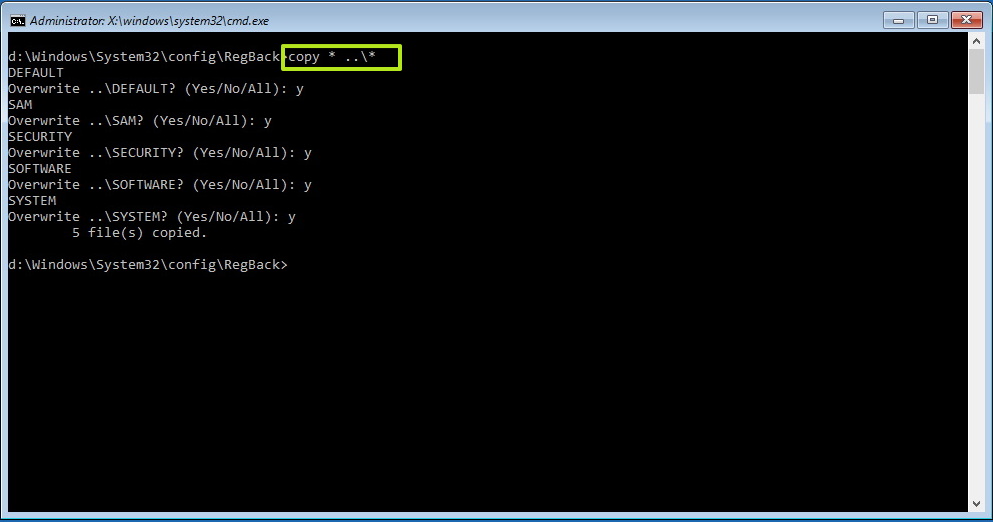 Restoring Registry from its backup on Windows 10
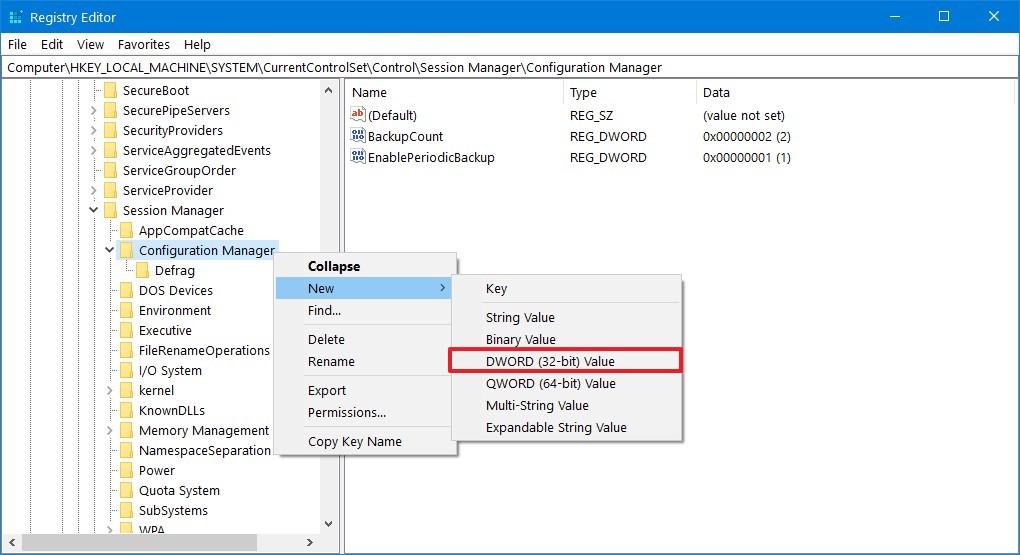 Configuration Manager registry
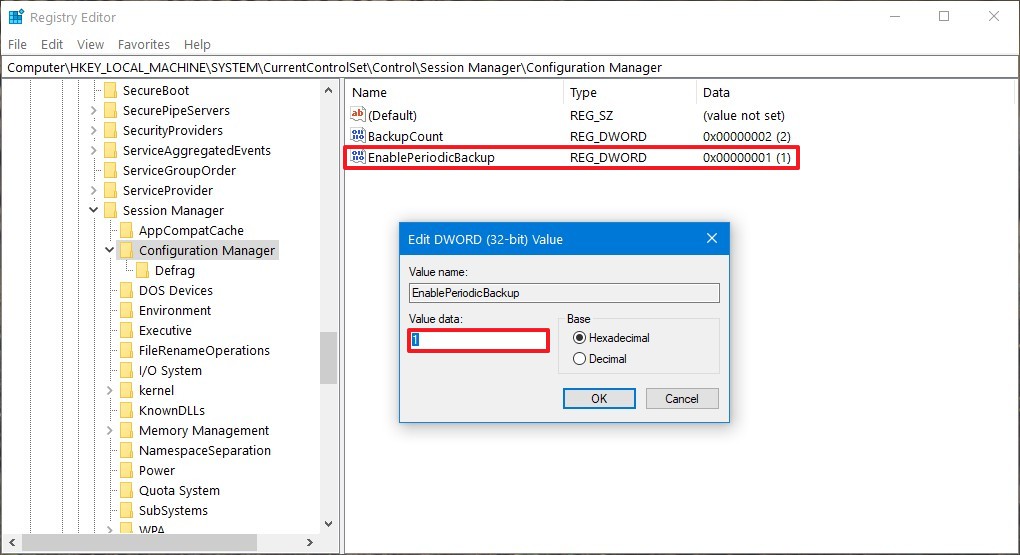 Configuring EnablePeriodicBackup for automatic Registry backups on Windows 10
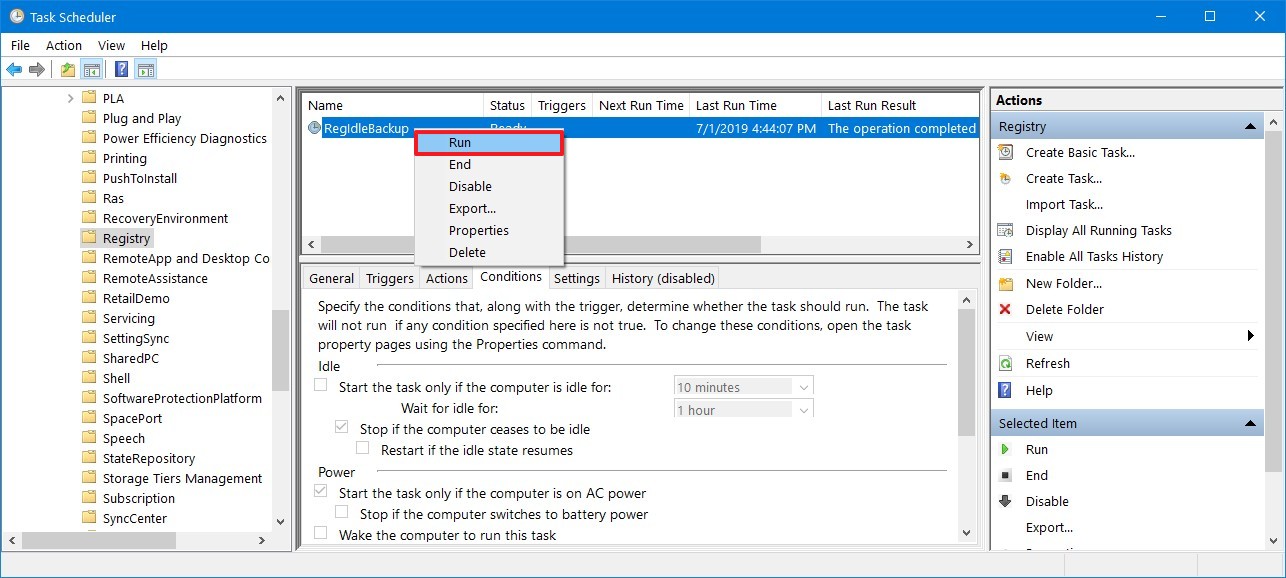 Running RegIdleBackup task on Windows 10