Windows Server GUI auf Server Server Core wechseln

Windows Server Core Mode Performance Benefits

The most obvious reason for converting to Core is performance: you get more bang for your buck on the same hardware by reducing unused operating-system components from running. Performance benefits include:

  • Fewer RAM requirements
  • Fewer CPU requirements
  • Fewer patches
  • Faster operation
  • Faster boot time
  • Better Uptime

For Fastvue Reporter running as a syslog server, the uptime is vital because messages can be missed and only caught much later when the historical log archive rolls over at midnight. The more stable and robust your platform is, the lower the potential for lost log data.

Windows Server Core Mode Security Benefits

The additional performance gains and improved uptime is nice, but even without these benefits, some still prefer to run Core from a security perspective. Having less code and tools on a system makes it harder to attack, and once compromised, it makes it less useful to the attacker.

Security benefits of this switch include:

  • Smaller attack surface
  • Windows server RSAT
  • Easily switch from full GUI to Core

Managing Windows Server Core Mode

There are many compelling reasons to switch from Full GUI to Core, but the question that comes up most often involves management. „How would I manage the switch to Core?“. This is normally followed closely by „My staff only know how to use the GUI. What if we need need it for some reason?“.

Back in Windows Server 2008, you selected whether you want Core or Full GUI. It was a one-way trip.

But now in Windows Server 2012, you have the option of switching between modes. Depending on how you switch, your experience is either simple, or requires a bit more time and effort.

Switching Between Modes

I am going to show you how to switch between Windows Server Core Mode and the full GUI mode the easy way, Based on my several years of experience to figuring out the „best way“ of doing it.

The steps include:

  • Configuring your server to take advantage of the reduced requirements
  • Switch to Core mode using PowerShell
  • Manage your core server from a machine with Full GUI using RSAT
  • Switch from Core back to Full GUI mode

Step 1: Configure your server

I am going to configure my Fastvue Reporter Server as a Hyper-V Virtual Machine with dynamic RAM in order to take advantage of the reduced requirements of Windows Core Mode.

Fastvue Reporter is a good candidate for virtualisation and running Windows Core Mode because of its predictable CPU and RAM requirements. It is also more resource-hungry when other servers are typically not because Fastvue Reporter generates reports on a schedule at midnight each day, week, and end of the month.

This works best on host and guest OS of Windows Server 2012 R2. To configure your server:

  1. Open Hyper-V Manager and select the Virtual Server and go to Settings
  2. Enable Dynamic RAM
  3. Set the Minimum RAM to something realistically low (2048)
  4. Set the Maximum RAM to something nice and high
  5. Ensure that Memory Buffer is around 20% because of the predictable resource requirements
  6. Designate the CPU to allocate at least 3 Cores

You may also like to see our article on Understanding Hyper-V Dynamic Memory (Dynamic RAM).

Step 2: Switch from using Full GUI to Core Mode – The Easy Way

Don’t worry. Switching from the full GUI to Windows Core Mode is a reversible step. You can always bring the GUI back.

There are two ways to remove the GUI and switch to Core Mode:

  1. Via the Windows Server GUI using the ‚Remove Roles and Features‘ wizard, or
  2. Using PowerShell

I recommend using PowerShell, as when you use the ‚Remove Roles and Features‘ wizard, it also removes all the binary components instead of simply disabling them. This makes switching back to the full GUI version much more difficult as you need to provide the installation source media.

To switch to Windows Core Mode using PowerShell, open a PowerShell Console as Administrator and execute these two commands

Uninstall-WindowsFeature Server-Gui-Shell Uninstall-WindowsFeature Server-Gui-Mgmt-Infra –Restart
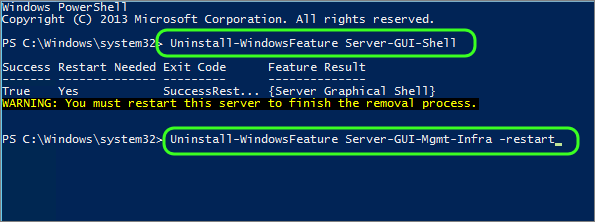
The server will reboot and everything will look normal until you log on. When you log on, you get a command shell, nothing more. Welcome to Windows Server Core!
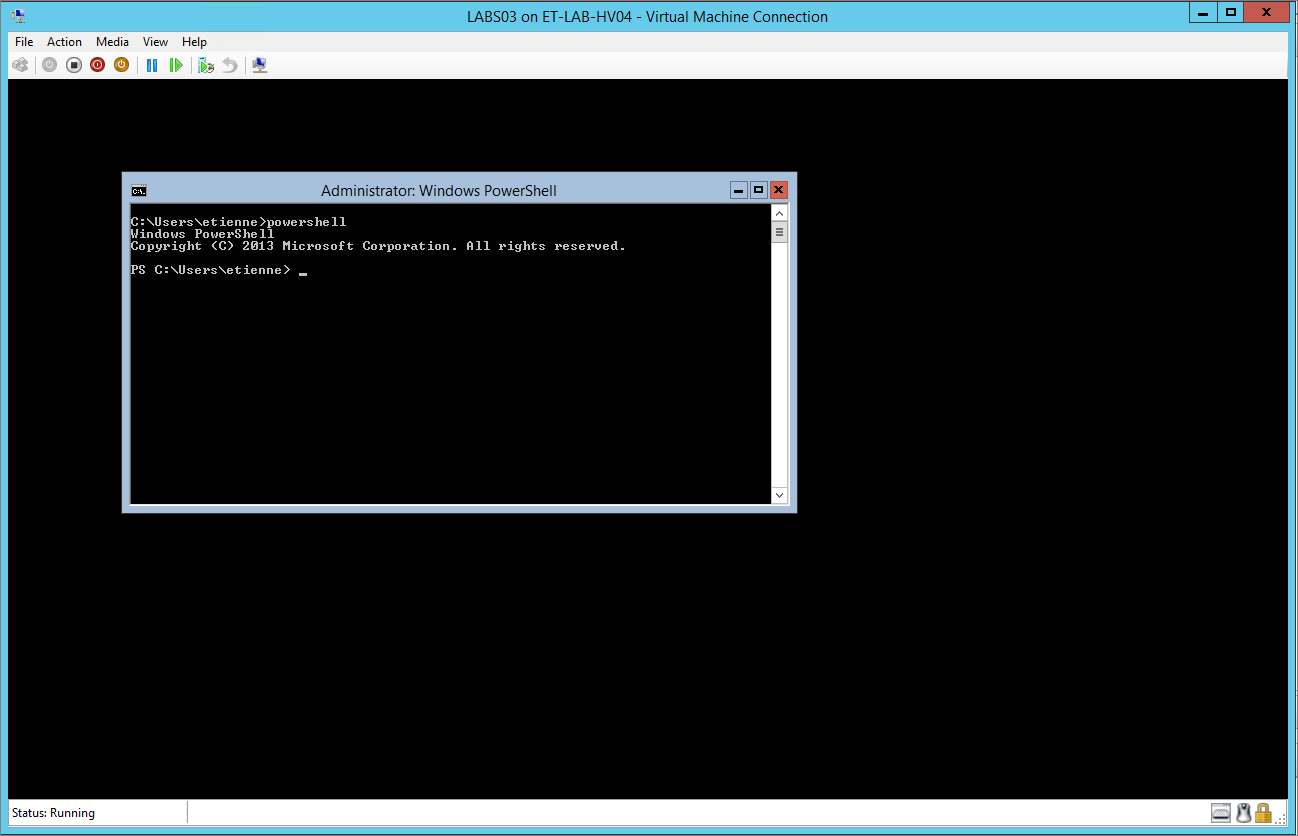
Step 3: Remotely Managing Windows Server Core using RSAT

You should be using this method for administering your servers already. If you are not, here is a quick intro to using the Windows Remote Server Administration Tools (RSAT). Various RSAT snap-ins can be added to a machine at any stage.

  1. From your management server, open Server Manager
  2. From the Dashboard page, select Add servers to manage
  3. Add your Core server, which is now a manageable object from this server

You can also elect to use a Windows client machine as your management station. If so, download and install the RSAT tools for Windows.

Step 4: Re-enabling the Windows GUI

If you ever need to restore the GUI onto the server, simply reverse the commands we issued earlier at any stage. This works because we did not explicitly use the –Remove flag, like the GUI method would have.

You can do this remotely or by logging onto the server and using the following steps:

To switch back to Full FUI mode, open a PowerShell Console as Administrator and execute these commands:

Install-WindowsFeature Server-Gui-Shell, Server-Gui-Mgmt-Infra –Restart

Then wait for reboot.

Your machine will now boot back with the full Windows GUI.

Conclusion

Using Windows Server Core for back-end infrastructure without requiring a user to login on a console is a great way to maximise your performance on a shared infrastructure. Thanks to the tools available now, it is easier than ever to manage Core through PowerShell or remotely via RSAT.

Using the PowerShell method in this article makes switching back and forth between Core and GUI simple.

How to export your computers using the TeamViewer API

Step 1: Create an api token in the Management Console

1) Click on your Username on the top right corner and click Edit Profile

2021-07-02 12_56_04-TeamViewer Management Console.png

2) Go to Apps and click Create script token

2021-01-15 11_56_00-TeamViewer Management Console.png

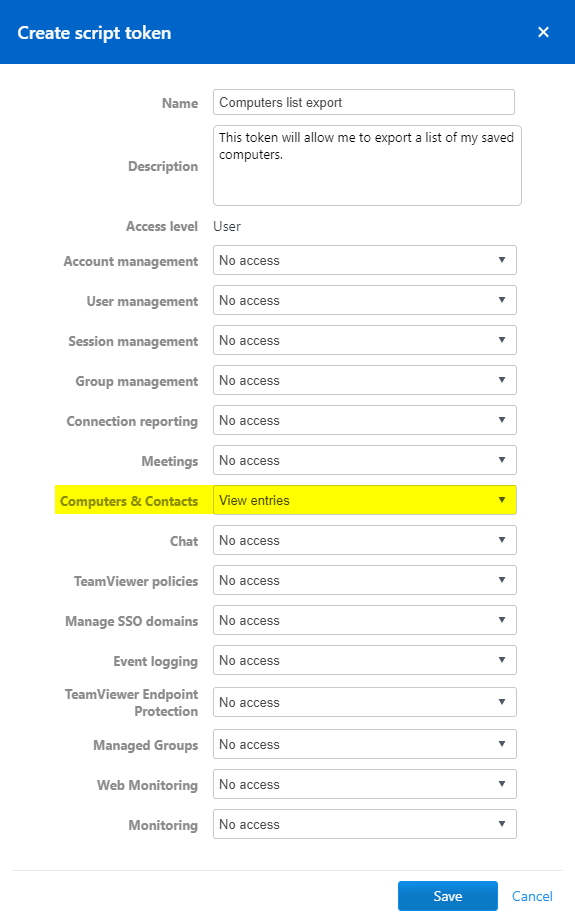
3) Give the token a name and select the parameter Computers & Contacts with the setting View entries and click Save.

2021-01-15 11_59_11-TeamViewer Management Console.png

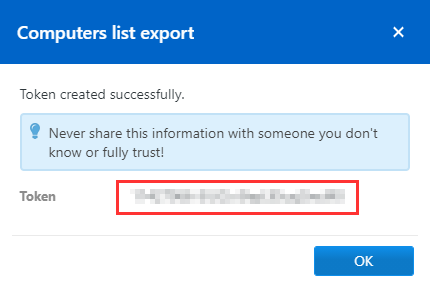
4) This will generate the token. Please copy this token and save it for later.

2021-01-15 11_59_59-TeamViewer Management Console.png

Step 2: Run the export script in PowerShell ISE

1) Open PowerShell ISE as administrator and type the following code and press Enter

$jsonFile = "YOURPATH\Computers export.json"
$csvFile = "YOURPATH\Computers export.csv"
$tvAccessToken = read-host "Please type your token "​
$devicesResponse = Invoke-RestMethod -Uri "https://webapi.teamviewer.com/api/v1/devices?full_list=true" -Method Get -Headers @{authorization = "Bearer $tvAccessToken"}
$devicesResponse.devices | ConvertTo-Json | Out-File $jsonFile
$devicesResponse.devices | Export-Csv -Path $csvFile -Delimiter ',' -NoTypeInformation

📌Note: Don’t forget to replace YOURPATH with the path you want the export to be generated to.

2) It will ask you to enter your token. Please paste your token you have saved earlier and press Enter

2021-01-15 12_49_22-Windows PowerShell ISE (x86).png

3) You are done. The script will automatically generate the export in the folder you have selected as [YOURPATH].

How to Install & Update Proxmox Without Subscription

It turns out that getting Proxmox to update from the “Non-Enterprise” repositories is pretty easy, just follow these methods:

Access the console through the web interface, User: root and make a copy of the pve-enterprise.list sources file, like so:

cd /etc/apt/sources.list.d/

cp pve-enterprise.list pve-no-subscription.list

Ok, so now we have a copy of the original file. If we ever purchase a subscription later and want to use the enterprise repositories, we will be able to revert what we’ve done very easily. For now, edit the original file and edit its one line and replace it with the following code.

# deb https://enterprise.proxmox.com/debian/pve bullseye pve-enterprise

Save and close the file.

Next, open the copied file, pve-no-subscription.list.

nano pve-no-subscription.list

Now change the pve-no-subscription.list with the following lines.

deb http://ftp.debian.org/debian bullseye main contrib
deb http://ftp.debian.org/debian bullseye-updates main contrib

# PVE pve-no-subscription repository provided by proxmox.com,
# NOT recommended for production use
deb http://download.proxmox.com/debian/pve bullseye pve-no-subscription

# security updates
deb http://security.debian.org/debian-security bullseye-security main contrib

Save and close the file. Now, update the package lists:

apt update

And when that’s done, run software upgrades!

apt dist-upgrade

Note: Always run dist-upgrade, not just “apt-get upgrade.” Dist-upgrade ensures that all the packages and their dependencies are updated. If you just run “apt-get upgrade” things may break.

That’s it, now you have installed Proxmox and updated it to the latest version. Now you can deploy your virtual machines directly from the web interface https://ip:8006.

Weitere Infos siehe https://pve.proxmox.com/wiki/Package_Repositories

Synology DSM7

SSH:
Windows cmd
ssh admin@ip-addr password

Admin-Warnung auschalten:
https://crieder.com/synology-admin-warnung-ausschalten/

Paketquelle:
packages.synocommunity.com
synocli Filetools enthält nano

Passwort ändern:
sudo synouser –setpw admin newpass

Try with „synouser –setpw admin “ root@synology:~# synouser Copyright (c) 2003-2012 Synology Inc. All rights reserved. Usage: synouser (Version 3810) –help –rebuild {all|(domain Force{0|1})|(ldap Force{0|1})} –enum {local|domain|ldap|all|domain_used} –enumpre {local|domain|all|domain_used} prefix Caseless{0|1} –enumsub {local|domain|all|domain_used} substr Caseless{0|1} –get username –getuid UID –add [username pwd „full name“ expired{0|1} mail privilege] –modify username „full name“ expired{0|1} mail –rename old_username new_username –setpw username newpasswd –del username1 username2 … –login username pwd –dbopen2 username –filesetpw filename –create_homes {domain|ldap} Note: if you are using built-in telnet/ssh services, you don’t need to change root password, as Synology is using modified binaries that check admin’s password field when logging as root.

Kennwortrichtlinien (greifen scheinbar nicht bei ssh-Passwortänderung)
Systemsteuerung – Benutzer/Gruppe – Erweitert – Regeln anwenden, Namen ausschließen

Passwort vergessen:
https://kb.synology.com/de-de/DSM/tutorial/How_do_I_log_in_if_I_forgot_the_admin_password

  1. Suchen Sie die RESET-Taste auf Ihrem Synology-Gerät. Die Position der RESET-Taste auf Ihrem Gerät können Sie der Hardware-Installationsanleitung entnehmen. 1
  2. Halten Sie die RESET-Taste mit einer Büroklammer leicht gedrückt, bis Sie einen Signalton hören. Lassen Sie die Taste dann sofort los. 2 3 4
  3. Gerät und Kennwort sind jetzt zurückgesetzt.
  4. Geben Sie find.synology.com in der Adresszeile Ihres Webbrowsers ein und suchen Sie Ihr Synology-Gerät auf der Web Assistant- Seite oder suchen Sie Ihr Synology-Gerät über das Synology Assistant- Desktop-Dienstprogramm. 1
  5. Doppelklicken Sie auf Ihr Synology-Gerät. Geben Sie den Standard-Benutzernamen admin ein und lassen Sie das Kennwortfeld leer.
  6. Klicken Sie auf Anmelden. Befolgen Sie diese Schritte, um das Zurücksetzen Ihres Kennworts für Ihr Administratorkonto abzuschließen.
    • Für DSM 6.2.3 und früher:
      1. Erstellen Sie ein sicheres Kennwort und melden Sie sich dann mit dem Benutzernamen admin und dem eben erstellten Kennwort bei DSM an.
      2. Gehen Sie zu Systemsteuerung > Benutzer > Registerkarte Benutzer und doppelklicken Sie auf das Administratorkonto, das Sie verwenden möchten. Unter der Registerkarte Info können Sie Ihr Kennwort zurücksetzen und auf OK klicken.
      3. Deaktivieren Sie das Admin- Konto, indem Sie sich zuerst mit Ihrem Administrator-Konto anmelden und dann zu Systemsteuerung > Benutzer > Registerkarte Benutzer gehen. Doppelklicken Sie auf admin und aktivieren Sie das Kontrollkästchen Dieses Konto deaktivieren. Klicken Sie auf OK (Detaillierte Anweisungen finden Sie in diesem Artikel).
    • Für DSM 6.2.4 und höher:
      1. Setzen Sie das Kennwort für Ihr Konto zurück und klicken Sie auf Absenden.
        • Wenn nur ein Administratorkonto vorhanden ist, trägt das System automatisch den Namen admin in das Feld Benutzername ein.
        • Wenn mehrere Administratorkonten vorhanden sind, wählen Sie eines aus dem Dropdown-Menü aus, um das Kennwort zu ändern.
      2. Klicken Sie auf Jetzt anmelden und melden Sie sich mit dem eben erstellten Kennwort bei DSM an (detaillierte Anweisungen finden Sie in diesem Artikel).

Wenn die oben beschriebene Methode Ihr Administrator-Kennwort nicht zurücksetzen konnte, kann dies zwei mögliche Gründe haben:

  1. Ihr Browser hat Ihr altes Kennwort gespeichert. Versuchen Sie es mit einem anderen Browser oder öffnen Sie ein InPrivate-Fenster (für Edge), ein Inkognito-Fenster (für Chrome) oder ein Privates Fenster (für Firefox und Safari), um sich mit dem neuen Kennwort anzumelden.
  2. Die folgenden Optionen waren zuvor aktiviert. In diesem Fall müssen Sie die Schritte unter „Modus 2: Synology NAS zurücksetzen und DSM“ in diesem Artikel (für DSM 6.2.3 und früher) bzw. in diesem Artikel (für DSM 6.2.4 und höher) befolgen ) .
    • Für DSM 6.2.3 und früher: Die Option Aktuelles Admin-Kennwort beibehalten ist unter Systemsteuerung > Aktualisieren und Wiederherstellen > Zurücksetzen aktiviert.
    • Für DSM 6.2.4 und höher: Die Option Admin-Kennwort beibehalten ist unter Systemsteuerung > Aktualisieren und Wiederherstellen > System zurücksetzen aktiviert.

Wenn Sie Ihr Administratorkennwort immer noch nicht zurücksetzen können, wenden Sie sich für weitere Unterstützung bitte an den technischen Support von Synology.

Anmerkungen:

  1. Die Hardware-Installationsanleitung und das Desktop-Dienstprogramm Synology Assistant finden Sie beide im Synology Download-Zentrum.
  2. Wenn Ihr Synology NAS keinen Signalton abgibt, wenn Sie die RESET-Taste gedrückt halten, kann dies an einem Hardwarefehler liegen. Wenden Sie sich für einen Rücksendungsservice (RMA) bitte an Ihren örtlichen Händler, wenn sich Ihr Synology NAS noch in der Garantiezeit befindet.
  3. Nach dem Zurücksetzen Ihres Synology NAS kann sich die LAN IP -Adresse ändern. Siehe Schritt 4 oben, um die IP -Adresse zu bestätigen.
  4. SieheAnmerkung 1 in diesem Artikel für Einstellungen, die durch diese Zurücksetzung auf Modus 1 geändert werden.
  5. Dadurch wird ein neues DSM auf Ihrem Synology NAS installiert. Alle vorhandenen Systemkonfigurationen und Paketeinstellungen werden gelöscht. Die Daten in Ihren freigegebenen Ordnern bleiben jedoch erhalten.

Outlook-ModernAuth

Windows Registry Editor Version 5.00

[HKEY_CURRENT_USER\Software\Microsoft\Exchange]
„AlwaysUseMSOAuthForAutoDiscover“=dword:00000001

[HKEY_CURRENT_USER\Software\Microsoft\Office\15.0\Common]

[HKEY_CURRENT_USER\Software\Microsoft\Office\15.0\Common\Identity]
„EnableADAL“=dword:00000001
„Version“=dword:00000001

Convert pfx file to pem file

Convert pfx file to pem file

Conversion to a combined PEM file

To convert a PFX file to a PEM file that contains both the certificate and private key, the following command needs to be used:
# openssl pkcs12 -in filename.pfx -out cert.pem -nodes

Conversion to separate PEM files

We can extract the private key form a PFX to a PEM file with this command:
# openssl pkcs12 -in filename.pfx -nocerts -out key.pem

Exporting the certificate only:
# openssl pkcs12 -in filename.pfx -clcerts -nokeys -out cert.pem

Removing the password from the extracted private key:
# openssl rsa -in key.pem -out server.key

Windows 10 ping through firewall- GUI, PowerShell netsh command

enable ping requests on Windows.
CMD als Admin:
netsh advfirewall firewall add rule name=“ICMP Allow incoming V4 echo request“ protocol=icmpv4:8,any dir=in action=allow
 

There are a couple of ways to open the blocked ping request in Windows 10 by configuring a firewall. It can be using the graphical user interface or via the command line PowerShell or centrally via group policies. By default, Windows 10 not allows other computers in the network to ping due to security concerns. After all, the service is often misused for attacks, preferably for denial-of-service attacks, thus Microsoft decided to turn it off, out of the box.

Well, still many times we need the pining facility to solve the network connectivity problems and for that newbies usually turn off the Firewall completely. However, we can manually allow Windows 10 Ping in its firewall, whereas those who concern about security risks they can mitigate it by activating the predefined firewall rule only for the domain profile or by restricting permissible requests to certain IP addresses.

Allow Windows 10 ping through Firewall GUI

One of the easiest ways to allow ping is by activating the pre-configured firewall in Windows via a graphical user interface with the help of the Advanced Security option. However, you should have admin access to enable or disable firewall rules. Here are the steps to follow:

  1. Go to Windows 10 or 7 Search box.
  2. Type- Windows Defender firewall, as its icon appears, click to open it.
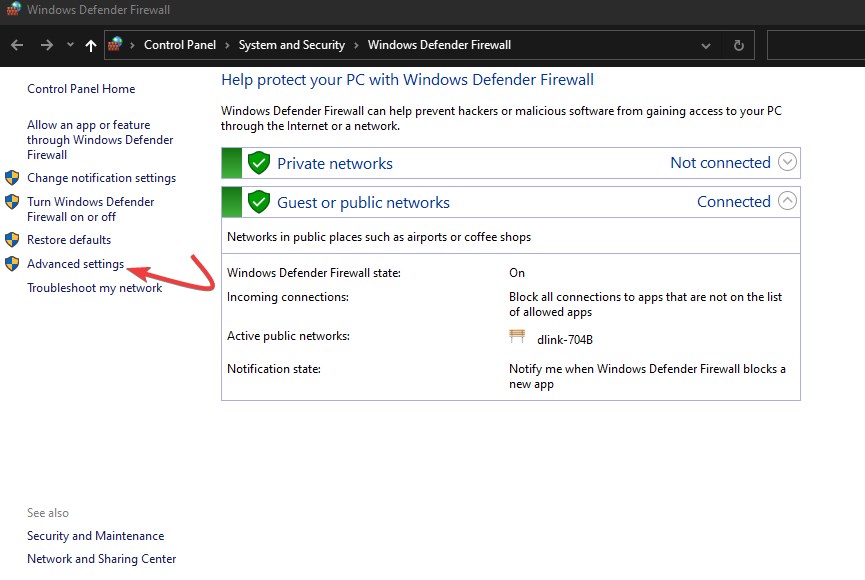
  3. From the left side panel select “Advanced Settings“.
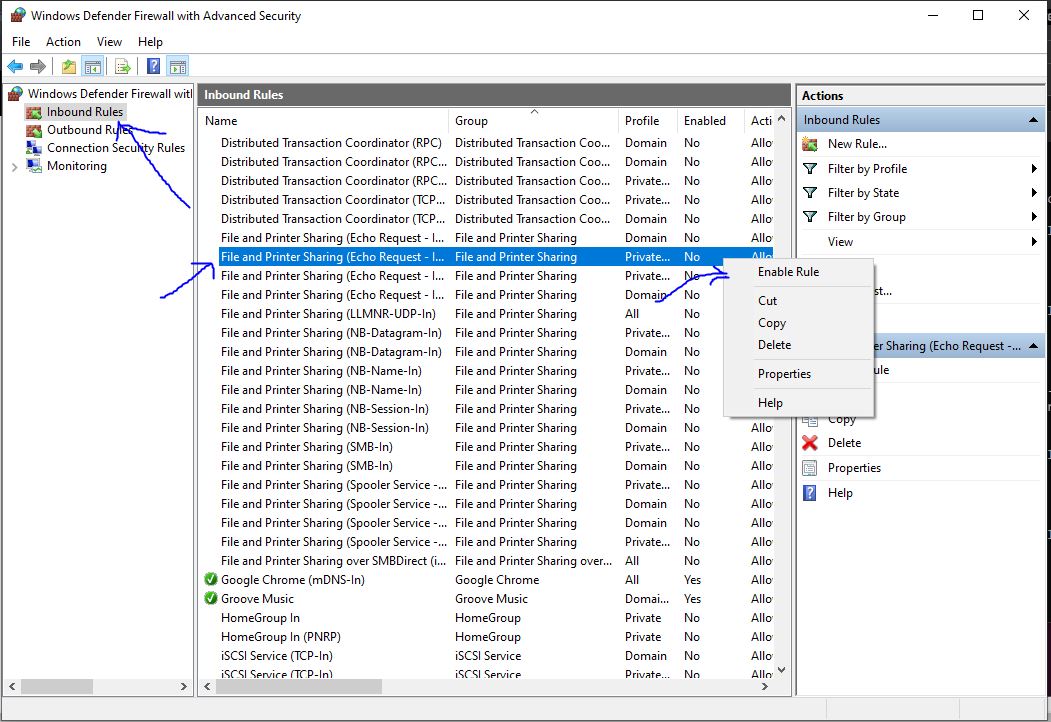
  4. On Windows Defender Firewall with Advanced Security select Inbound Rule from the left side panel.
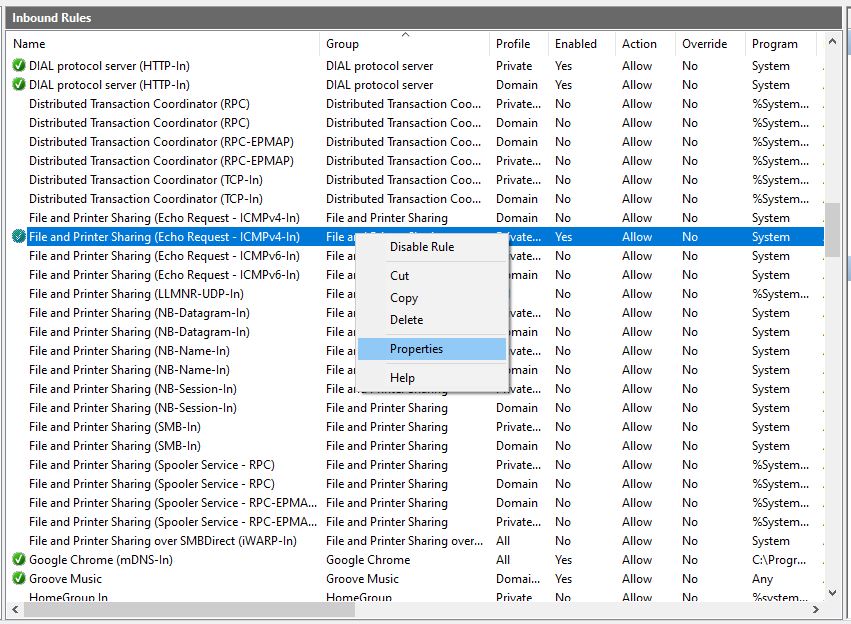
  5. Now, in the Inbound Rules area search for “File and Printer Sharing (Echo Request ICMPv4-In). This rule exists in versions for the profile domain as well as for public and private. They can be activated for a specific profile or several profiles as required. In this option, the private profile allows pining through IP V4 address”.
  6. Once you find this predefined rule, right-click on it and select “Enable rule“.
  7. After that Windows 10 system could be pinged from a remote or local PC.
  8. In the same way, if you are interested in pinging Windows through Domain or IPv6, then select Echo Request ICMPv6 for IP version 6 whereas the same option with Domain Profile will the pinging through the domain name.

Open WIndows 10 firewall advance settings Enable WIndows 10 ping through firewall advance rule

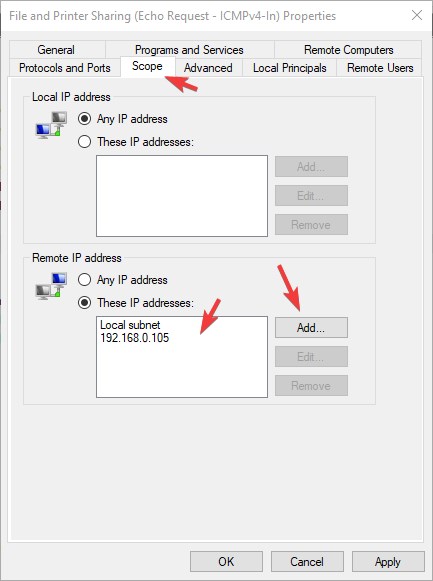
Furthermore, if you want to secure pining by restricting it to some particular IP address then after enabling the rule, again right-click on the same and select Properties.

Open Firewall Rule properties min

In the Properties dialog select the Scope Tab and to restrict all clients from sending ping requests, click on the Add button and mentioned the Remote IP Address of the only those machines that you want to allow to ping your Windows 10 PC. If there are several NICs on the computer, it is also possible to use local IP addresses to specify those to which requests are allowed.

Secure Ping by adding remote ip address

Allow Windows ping with PowerShell or Command-line Prompt

Those who don’t want to use the GUI method because of the multiple steps involved to allow Ping on Windows can go for command-line one. In which, we just need to run Powershell or Command prompt with Administrative right and after that copy-paste the command given here.

  • Click in Windows 10 or 7 search box.
  • Type- Powershell or Command prompt
  • Then as per your selection of command-line tool, run it as administrator.
  • After that simply run the below netsh command to enable ping requests on Windows.

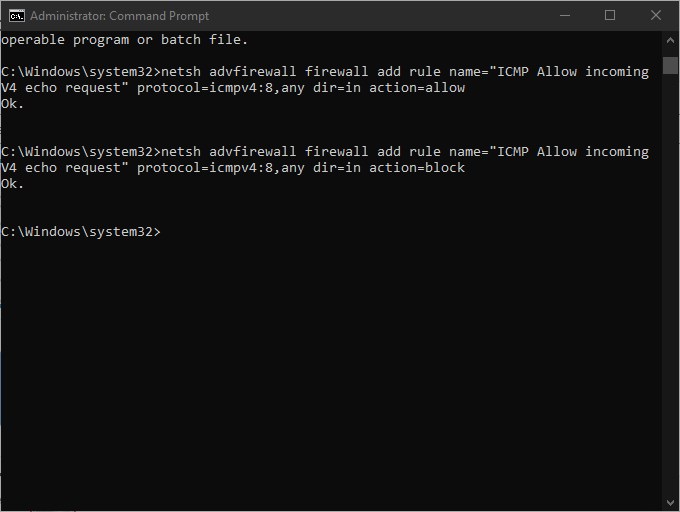
netsh advfirewall firewall add rule name=“ICMP Allow incoming V4 echo request“ protocol=icmpv4:8,any dir=in action=allow
In the same way, if you want to disable Windows 10 Ping then use this command:
netsh advfirewall firewall add rule name=“ICMP Allow incoming V4 echo request“ protocol=icmpv4:8,any dir=in action=block
Command to enable or disable windows 10 ping


Content retrieved from: https://www.how2shout.com/how-to/allow-windows-10-ping-through-firewall-gui-powershell-netsh-command.html.

RTSP Stream als MJPEG in Netz streamen

http://192.168.x.xx:5000/webapi/entry.cgi?api=SYNO.SurveillanceStation.Stream.VideoStreaming&version=1&method=Stream&format=mjpeg&cameraId=xxxxxxxxxxxxxxxxxxxxxxxxxxxxxxxxxxx%22

Dazu geht man zunächst in die Einstellungen für die RTSP-Kamera und stellt die Kamera kurzeitig auf „MJPEG“ um. Der Stream wird dann in der Regel unterbrochen, aber das ist erst mal nicht weiter tragisch, da man am Ende wieder alles auf „H.264“ zurückstellt.

— Surveilance Station Camer Einstellungen

Nun klickt man mit der rechten Maustaste auf die betreffende Kamera und dann auf „Stream-Pfad freigeben“. Dann werden einem die Daten der Kamera, die man für die nachfolgenden Befehle benötigt, angezeigt. Neben der IP-Adresse der DiskStation (1) findet man hinter „cameraID=“ die wesentlichen ID-Daten der Kamera (2).

Mit folgendem Shellskript (Achtung: es dürfen keine CR am Zeilenende enthalten sein) kann man sich dann einen Snapshot holen.


#!/bin/bash

# +++++ Pfad und Name eines zu speichernden Bildes +++++
pictPath='/tmp/Bildname.jpg'

# +++++ Zugriffsdaten der Synology DiskStation +++++
ipDiskStation='xxx.xxx.xxx.xxx:5000' # IP:PORT der DiskStation
account='admin' # Admin-Name auf der DiskStation
password='xxxxxxxxxx' # Admin-Passwort
cameraId='xx&StmKey=xxxxxxxxxxxxxxxxxxxxxxxxx'

# +++++ Snaphshot holen +++++
wget -q --keep-session-cookies --save-cookies cookies.txt -O- "http://"$ipDiskStation"/webapi/entry.cgi?api=SYNO.API.Auth&version=3&method=login&account="$account"&passwd="$password

wget -q --load-cookies cookies.txt -O $pictPath "http://"$ipDiskStation"/webapi/entry.cgi?api=SYNO.SurveillanceStation.Camera&method=GetSnapshot&version=1&cameraId="$cameraId

exit 0

Siehe auch https://www.synology-forum.de/threads/rtsp-stream-als-mjpeg-in-netz-streamen.109971/

SBS 2011 und Zertifikate

Problem:

Sie betreiben einen SBS 2011 mit einem selbstsigniertem Zertifikat (z.B. weil der Server nur intern betrieben wird). Das erstellte (Webserver) Zertifikat hat eine Gültigkeitsdauer von 2 Jahren und steht vor dem Ablauf.

Im Systemprotokoll erhalten Sie u.a. folgende Meldungen:

  • MSExchangeTransport (12018): Das STARTTLS-Zertifikat läuft in Kürze ab. Betreff: <Domain>, Fingerabdruck: <Schlüssel>, verbleibende Stunden: xxx. Führen Sie das Cmdlet “New-ExchangeCertificate“ aus, um ein neues Zertifikat zu erstellen.
  • MSExchangeTransport (12017): Ein internes Transportzertifikat läuft in Kürze ab. Fingerabdruck: <Schlüssel>, verbleibende Stunden: xxx

Das Zertifikat stammt vom Webserver (IIS) und ist u.a. für OWA zuständig.

Lösung:

Um das Zertifikat für weitere zwei Jahre zu erneuern und im kompletten SBS 2011 synchronisiert zu bekommen, gehen Sie wie folgt vor:

  • Öffnen Sie die SBS 2011 Konsole
  • Gehen Sie dort auf Netzwerk und wählen Sie den Punkt Konnektivität
  • Führen Sie unter Tasks den Punkt Internetadresse einrichten aus
  • Lassen Sie den Wizard durchlaufen und tragen Sie die gleichen Daten wie zuvor ein
  • Warten Sie, bis der Wizard fertig ist (kann einige Zeit dauern)
  • Wenn der Wizard fertig ist und Sie nun das Zertifikat doppelt klicken, sollte dort der neue Gültigkeitszeitraum zu sehen sein (ab heute / bis in zwei Jahren)

Danach können Sie Ihren SBS 2011 wie gewohnt weiter verwenden.

Nachtrag:

Sollte Sie danach im Protokoll weiterhin Meldungen haben, dass das Zertifikat abgelaufen, oder nicht mehr gültig ist, machen Sie am besten folgendes:

  • Löschen Sie zunächst in der Exchange Management Konsole das abgelaufene Zertifikat
  • Öffnen Sie danach die zentrale Zertifikatverwaltung und sperren Sie das abgelaufene Zertifikat.

Durch die Sperrung haben Sie zusätzlich alles besser im Überblick.

Variante 2:

Wenn Sie den Einrichtungswizard nicht nutzen wollen, oder falls es dort zu einem Problem kam, können Sie versuchen die Zertifikate auch direkt über den IIS zu erneuern. Hierfür gehen Sie wie folgt vor:

  • Im Menü Verwaltung öffnen Sie dem Internetinformationsdienste (IIS)-Manager
  • Wählen Sie links Ihren Server aus (Domainserver)
  • Rechts daneben (im Fenster mittig) sehen Sie nun diverse Symbole. Wählen Sie unterhalb von IIS den Punkt Serverzertifikate aus.
  • Im darauf folgenden Fenster sehen Sie nun eine Übersicht aller Zertifikate. Wählen Sie hier nun das entsprechende Zertifikat aus! Achten Sie dabei auf Ablaufdatum und Fingerabdruck (Zertifikathash), damit Sie auch das richtige Zertifikat gewählt haben.
  • Wählen Sie nun über das Aktionsmenü rechts, oder über das Kontextmenü der rechten Maustaste den Punkt Erneuern aus
  • Wählen Sie den Punkt Vorhandenes Zertifikat erneuern aus, klicken Sie auf weiter und im nächsten Fenster auf Auswahl. Wählen Sie dort nun Zertifizierungsserver (Ihr Server) aus und klicken Sie auf Fertig.

Das Zertifikat sollte nun erneuert werden, was Sie direkt am neuen Ablaufdatum und dem neuen Hashwert sehen. Prüfen Sie dies aber bitte zusätzlich durch die Zertifizierungsstelle (unter Verwaltung), sowie innerhalb der Exchange-Verwaltungskonsole (unter Serverkonfiguration).

Damit die Zuweisungen für Remote Web und diverse Dienste noch stimmen, müssen Sie ggf. im Anschluss noch in der SBS Konsole unter Konnektivität das Webserverzertifikat, welches Sie verlängert haben, neu hinzufügen. Der Assistent regelt bei Bedarf dann den Rest.

Hinweis:

Sollte sich das Zertifikat nicht verlängern lassen (Anforderung abgelehnt o.ä.), bzw. nach der Verlängerung/Erneuerung der Zeitraum ungewöhnlich kurz sein, so müssen Sie ggf. zunächst das Zertifizierungsstellenzertifikat erneuern:

  • Im Menü Verwaltung öffnen Sie die Zertifizierungsstelle
  • Wählen Sie Ihre Zertifizierungsstelle
  • Klicken Sie sie mit der rechten Maustaste an und wählen Sie Alle Aufgaben > Zertifizierungsstellenzertifikat erneuern
  • Sollte nicht ein zwingender Grund vorliegen, können Sie den alten Signaturschlüssel behalten (nein anwählen)
  • Zertifikat erneuern lassen

Danach können Sie mit den obigen Schritten fortfahren.

Server 2011 SBS Stammzertifikat erneuern

So installieren wir ein vertrauenswürdiges Zertifikat

  1. Wir bzw. der Kunde kauft ein SSL-Zertifikat.
  2. Wir öffnen die Windows SBS-Konsole.
  3. Klicken auf der Navigationsleiste auf Netzwerk, und dann auf Konnektivität.
  4. Klicken im Aufgabenbereich auf Vertrauenswürdiges Zertifikat hinzufügen und anschließend auf Weiter.
  5. Klicken auf Ich verfüge über ein Zertifikat von meinem Zertifikatanbieter, und dann auf Weiter.
  6. Fügen auf der Seite Vertrauenswürdiges Zertifikat importieren die Information ein, die wir vom Anbieter erhalten haben, oder navigieren zum Speicherort der Datei mit dem vertrauenswürdigen Zertifikat, und klicken dann auf Weiter.
  7. Dann klicken wir auf der Seite Die Zertifikatdatei wird installiert auf Fertig stellen.

Selbst erstelltes Zertifikat (nicht gekauft) durch reparieren verlängern

  1. Wir öffnen die Windows SBS-Konsole.
  2. Klicken auf der Navigationsleiste auf Netzwerk, und dann auf Konnektivität.
  3. Klicken im Aufgabenbereich auf Beheben von Netzwerkproblemen und starte den Assistent der Probleme im Netzwerk ausfindig macht.
  4. Am Ende lasen wir das abgelaufene Zertifikat automatisch reparieren.
  5. Unter Systemsteuerung – Verwaltung – Zertifizierungsstelle sieht man nun in “Ausgestellte Zertifikate” einen neuen Eintrag mit dem neu ausgestellten Zertifikat.

Abgelaufene Zertifikate am Small Business Server 2011 erneuern

Wenn Sie einen Small Business Server 2011 (SBS 2011) mit einem selbstsigniertem Zertifikat betreiben, hat dieses Zertifikat hat eine Gültigkeitsdauer von 2 Jahren und muss daher regelmäßig erneuert werden.

Im Ereignisprotokoll in den Anwendungen auf dem SBS2011 erhalten Sie u.a. folgende Meldungen:

  • MSExchangeTransport (12018): Das STARTTLS-Zertifikat läuft in Kürze ab. Betreff: <Domain>, Fingerabdruck: <Schlüssel>, verbleibende Stunden: xxx. Führen Sie das Cmdlet “New-ExchangeCertificate“ aus, um ein neues Zertifikat zu erstellen.
  • MSExchangeTransport (12017): Ein internes Transportzertifikat läuft in Kürze ab. Fingerabdruck: <Schlüssel>, verbleibende Stunden: xxx
  • MSExchangeTransport (12016):Es ist kein gültiges SMTP-TLS-Zertifikat (Transport Layer Security) für den FQDN von ‚<Domain>‘ vorhanden. Das vorhandene Zertifikat für diesen FQDN ist abgelaufen. Die fortgesetzte Verwendung dieses FQDNs wird Nachrichtenübermittlungsprobleme verursachen. Ein neues Zertifikat, das den FQDN von ‚<Domain>‘ enthält, sollte so bald wie möglich auf diesem Server installiert werden. Sie können ein neues Zertifikat mithilfe des Tasks ‚New-ExchangeCertificate‘ erstellen.
  • MSExchange Web Services (25): Das Exchange-Zertifikat ‚[Subject]
    CN='<Domain>‘ [Thumbprint] läuft sehr bald ab
  • MSExchange Web Services (26): Das Exchange-Zertifikat ‚[Subject]
    CN='<Domain>‘ [Thumbprint] läuft am <Datum und Uhrzeit> ab.

Um das abgelaufene Zertifikat am Small Business Server 2011 für weitere zwei Jahre zu erneuern und im kompletten SBS 2011 synchronisiert zu bekommen, gehen Sie wie folgt vor:

  • Starten Sie die SBS 2011 Konsole
  • Gehen Sie dort auf Netzwerk und wählen Sie den Punkt Konnektivität
  • Führen Sie unter Tasks den Punkt Internetadresse einrichten aus
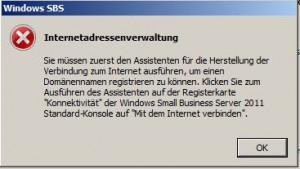
    Sollten Sie den Fehler:
    Windows SBS Internetadressenverwaltung
    Angezeigt bekommen, so führen Sie zuerst unter Task den Punkt Mit dem Internet verbinden aus
  • Lassen Sie den Assistenten durchlaufen und tragen Sie die gleichen Daten wie zuvor ein
  • Warten Sie, bis der Assistent fertig ist
  • Wenn der Assistent fertig ist und Sie nun das Zertifikat mit einem doppelklick öffnen, sollte dort der neue Gültigkeitszeitraum angezeigt werden (von heute / bis in zwei Jahren)

Anschließend können Sie Ihren Small Business Server 2011 wie gewohnt verwenden. Ein Neustart ist nicht notwendig.

Variante 2:

Wenn Sie den Einrichtungsassistent nicht nutzen wollen, oder falls es dort zu einem Problem gekommen ist, können Sie versuchen die Zertifikate auch direkt über den IIS-Manager zu erneuern. Hierfür gehen Sie wie folgt vor:

  • Im Menü Verwaltung öffnen Sie den Internetinformationsdienste (IIS)-Manager
  • Wählen Sie links Ihren Server aus
  • Rechts daneben (im Fenster in der Mitte) sehen Sie nun diverse Symbole. Wählen Sie unterhalb von IIS den Punkt Serverzertifikate aus.
  • Im darauf folgenden Fenster sehen Sie nun eine Übersicht aller Zertifikate. Wählen Sie hier nun das entsprechende Zertifikat aus! Achten Sie dabei auf das Ablaufdatum und Fingerabdruck (Zertifikathash), damit Sie auch das richtige Zertifikat ausgewählt haben.
  • Wählen Sie nun über das Aktionsmenü rechts, oder über das Kontextmenü der rechten Maustaste den Punkt Erneuern aus
  • Wählen Sie den Punkt Vorhandenes Zertifikat erneuern aus, klicken Sie auf weiter und im nächsten Fenster auf Auswahl. Wählen Sie dort nun Zertifizierungsserver (Ihr Server) aus und klicken Sie auf Fertig.
    Solltet Ihr bei diesem Vorgang den Fehler: „Die Zertifikatsanforderung wurde an die Online-Zertifizierungsstelle gesendet, das Zertifikat jedoch nicht ausgestellt.
    Die Anforderung wurde abgelehnt.“ erhalten, so können Sie versuchen die Uhrzeit auf Ihrem Server auf das Datum vor dem Ablauf des Zertifikates zurückzusetzen. In einigen Fällten konnte so dieses Problem umgangen werden.

Das Zertifikat sollte nun erneuert werden, was Sie direkt am neuen Ablaufdatum sowie dem neuen Hashwert sehen können. Überprüfen Sie dies jedoch bitte zusätzlich noch durch die Zertifizierungsstelle (unter Verwaltung), sowie innerhalb der Exchange-Verwaltungskonsole (unter Serverkonfiguration).

Damit die Zuweisungen für Remote Web und diverse Dienste noch stimmt, müssen Sie gegebenenfalls im Anschluss noch in der SBS Konsole unter Konnektivität das Webserverzertifikat, welches Sie verlängert haben, neu hinzufügen. Der Assistent regelt bei Bedarf dann den Rest.

Variante 3:

Sollten die beiden Varianten nicht funktionieren, so können Sie noch einen Assistenten starten. Gehen Sie dazu wie folgt vor:

  • Starten Sie die SBS 2011 Konsole
  • Gehen Sie dort auf Netzwerk und wählen Sie den Punkt Konnektivität
  • Führen Sie unter Tasks den Punkt Beheben von Netzwerkproblemen aus
  • Überprüfen Sie dass der Haken bei Das selbst ausgegebene Zertifikat ist abgelaufen gesetzt ist und lassen Sie den Wizard durchlaufen

Sollten Sie einen Exchange 2007 oder einen Small Business Server 2008 im Einsatz haben, dann schauen Sie einmal hier vorbei: msxfaq.de

HP / Aruba Procurve 2530/2500 Default Management IP, Username/Passwrods and Configurations

HP / Aruba Procurve 2530/2500 Default Management IP, Username/Passwrods and Configurations

Back-up of an existing config

If you are performing a backup a config from another switch, two ways of downloading the configuration is through GUI and CLI (via TFTP)

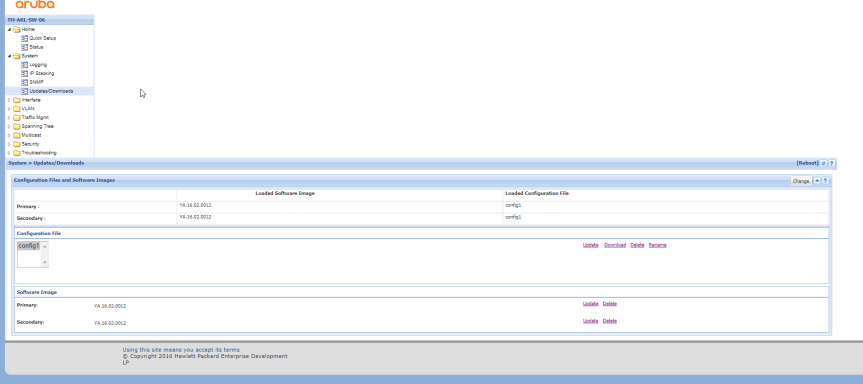
via GUI: (System -> Updates/Download -> Configuration File (Highlight config name and click Download)

2018-02-20 16_47_16-HP 2530-24G-PoEP Switch (J9773A).png

via CLI. (you need to set up a TFTP server on a machine)

switch# copy running-config tftp <IP Address of the TFTP Server> filename.pcc

==============
Default Settings and Configurations of an Aruba/HP Procurve switch

In the factory default configuration, the switch has no IP (Internet Protocol) address and subnet mask, and no passwords. In this state, it can be managed only through a direct CONSOLE connection (How to connect to Console? Click here). To manage the switch through inband (networked) access, you should configure the switch with an IP address and subnet mask compatible with your network. Also, you should configure a Manager password to control access privileges from the console and Web browser interface.

IP-Address

HP ProCurve Switch 2524# configure
HP ProCurve Switch 2524(config)# vlan 1
HP ProCurve Switch 2524(vlan-1)# ip address 10.0.0.1 255.255.255.0
HP ProCurve Switch 2524(vlan-1)# wr mem
HP ProCurve Switch 2524(vlan-1)# exit
HP ProCurve Switch 2524(config)# exit
HP ProCurve Switch 2524#

(Basically, from here you can now set your machine’s IP into the same network above and access the GUI from your browser, otherwise, you can proceed with the other commands below)

Also, by default, as mentioned there is no username/password for the switch and you have to configure that manually through GUi or CLI below.

Configure VLANs

HP ProCurve Switch 2524# configure
HP ProCurve Switch 2524(config)# vlan 1
HP ProCurve Switch 2524(vlan-1)# name „Default“
HP ProCurve Switch 2524(vlan-1)# untag 2-6
HP ProCurve Switch 2524(vlan-1)# vlan 10
HP ProCurve Switch 2524(vlan-10)# name „First“
HP ProCurve Switch 2524(vlan-10)# untag 7-12
HP ProCurve Switch 2524(vlan-10)# vlan 20
HP ProCurve Switch 2524(vlan-20)# name „Second“
HP ProCurve Switch 2524(vlan-20)# untag 13-18
HP ProCurve Switch 2524(vlan-20)# exit
HP ProCurve Switch 2524(config)# exit
HP ProCurve Switch 2524#

Set up trunk ports

HP ProCurve Switch 2524# config
HP ProCurve Switch 2524(config)# trunk 23-24 trk1
HP ProCurve Switch 2524(config)# vlan 10
HP ProCurve Switch 2524(vlan-10)# tagged trk1
HP ProCurve Switch 2524(vlan-10)# vlan 20
HP ProCurve Switch 2524(vlan-20)# tagged trk1
HP ProCurve Switch 2524(vlan-20)# wr mem
HP ProCurve Switch 2524(vlan-20)# exit
HP ProCurve Switch 2524(config)# exit
HP ProCurve Switch 2524#

Disable all (but trunk) ports

HP ProCurve Switch 2524# configure
HP ProCurve Switch 2524(config)# int 2-22 disable
HP ProCurve Switch 2524(config)# wr mem
HP ProCurve Switch 2524(config)# exit
HP ProCurve Switch 2524#

Enable only necessary ports

HP ProCurve Switch 2524# configure
HP ProCurve Switch 2524(config)# int 2-4 enable
HP ProCurve Switch 2524(config)# int 13-15 enable
HP ProCurve Switch 2524(config)# wr mem
HP ProCurve Switch 2524(config)# exit
HP ProCurve Switch 2524#

Set up speed etc.

HP ProCurve Switch 2524# configure
HP ProCurve Switch 2524(config)# int 2-4 speed-duplex 100-full
HP ProCurve Switch 2524(config)# int 13-15 speed-duplex auto
HP ProCurve Switch 2524(config)# wr mem
HP ProCurve Switch 2524(config)# exit
HP ProCurve Switch 2524#

Set time and date

Time and date on hh:mm and mm:dd:yyyy format

HP ProCurve Switch 2524# configure
HP ProCurve Switch 2524(config)# time 10:05
Mon Jan 1 10:05:28 1990
HP ProCurve Switch 2524(config)# time 08/24/2010
Tue Aug 24 10:05:41 2010
HP ProCurve Switch 2524(config)# wr mem
HP ProCurve Switch 2524(config)# exit
HP ProCurve Switch 2524#

Set hostname

HP ProCurve Switch 2524# configure
HP ProCurve Switch 2524(config)# hostname „ServerRoom1“
ServerRoom1(config)# wr mem
ServerRoom1(config)# exit
ServerRoom1#

Backup settings

After running “sh run” copy/paste all between line which start with “hostname” to “ServerRoom1#” example to notepad and save that file.

ServerRoom1# sh run
ServerRoom1#

Restore settings from backup

All you have to do is copy/paste all (except the first “Running configuration:” line) to notepad on “Backup settings” part to “HP ProCurve Switch 2524#”.
If you have set operator and/or manager passwords, don’t copy/paste the lines which start with password.

HP ProCurve Switch 2524# configure
HP ProCurve Switch 2524(config)#

Set manager and operator password

ServerRoom1# configure
ServerRoom1(config)# password all
New password for Operator: ********
Please retype new password for Operator: ********
New password for Manager: ********
Please retype new password for Manager: ********
ServerRoom1(config)#

Content retrieved from: https://marktugbo.com/2018/02/20/hp-aruba-procurve-2530-2500-default-configurations/.

Betrieben von WordPress | Theme: Baskerville 2 von Anders Noren.

Nach oben ↑