Windows Server Core Mode Performance Benefits
The most obvious reason for converting to Core is performance: you get more bang for your buck on the same hardware by reducing unused operating-system components from running. Performance benefits include:
- Fewer RAM requirements
- Fewer CPU requirements
- Fewer patches
- Faster operation
- Faster boot time
- Better Uptime
For Fastvue Reporter running as a syslog server, the uptime is vital because messages can be missed and only caught much later when the historical log archive rolls over at midnight. The more stable and robust your platform is, the lower the potential for lost log data.
Windows Server Core Mode Security Benefits
The additional performance gains and improved uptime is nice, but even without these benefits, some still prefer to run Core from a security perspective. Having less code and tools on a system makes it harder to attack, and once compromised, it makes it less useful to the attacker.
Security benefits of this switch include:
- Smaller attack surface
- Windows server RSAT
- Easily switch from full GUI to Core
Managing Windows Server Core Mode
There are many compelling reasons to switch from Full GUI to Core, but the question that comes up most often involves management. „How would I manage the switch to Core?“. This is normally followed closely by „My staff only know how to use the GUI. What if we need need it for some reason?“.
Back in Windows Server 2008, you selected whether you want Core or Full GUI. It was a one-way trip.
But now in Windows Server 2012, you have the option of switching between modes. Depending on how you switch, your experience is either simple, or requires a bit more time and effort.
Switching Between Modes
I am going to show you how to switch between Windows Server Core Mode and the full GUI mode the easy way, Based on my several years of experience to figuring out the „best way“ of doing it.
The steps include:
- Configuring your server to take advantage of the reduced requirements
- Switch to Core mode using PowerShell
- Manage your core server from a machine with Full GUI using RSAT
- Switch from Core back to Full GUI mode
Step 1: Configure your server
I am going to configure my Fastvue Reporter Server as a Hyper-V Virtual Machine with dynamic RAM in order to take advantage of the reduced requirements of Windows Core Mode.
Fastvue Reporter is a good candidate for virtualisation and running Windows Core Mode because of its predictable CPU and RAM requirements. It is also more resource-hungry when other servers are typically not because Fastvue Reporter generates reports on a schedule at midnight each day, week, and end of the month.
This works best on host and guest OS of Windows Server 2012 R2. To configure your server:
- Open Hyper-V Manager and select the Virtual Server and go to Settings
- Enable Dynamic RAM
- Set the Minimum RAM to something realistically low (2048)
- Set the Maximum RAM to something nice and high
- Ensure that Memory Buffer is around 20% because of the predictable resource requirements
- Designate the CPU to allocate at least 3 Cores
You may also like to see our article on Understanding Hyper-V Dynamic Memory (Dynamic RAM).
Step 2: Switch from using Full GUI to Core Mode – The Easy Way
Don’t worry. Switching from the full GUI to Windows Core Mode is a reversible step. You can always bring the GUI back.
There are two ways to remove the GUI and switch to Core Mode:
- Via the Windows Server GUI using the ‚Remove Roles and Features‘ wizard, or
- Using PowerShell
I recommend using PowerShell, as when you use the ‚Remove Roles and Features‘ wizard, it also removes all the binary components instead of simply disabling them. This makes switching back to the full GUI version much more difficult as you need to provide the installation source media.
To switch to Windows Core Mode using PowerShell, open a PowerShell Console as Administrator and execute these two commands
Uninstall-WindowsFeature Server-Gui-Shell Uninstall-WindowsFeature Server-Gui-Mgmt-Infra –Restart
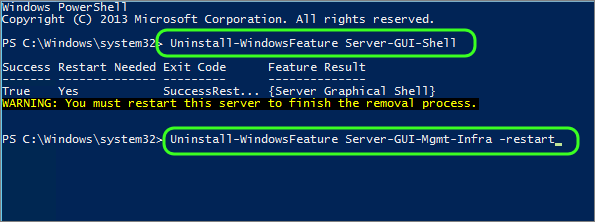
The server will reboot and everything will look normal until you log on. When you log on, you get a command shell, nothing more. Welcome to Windows Server Core!
Step 3: Remotely Managing Windows Server Core using RSAT
You should be using this method for administering your servers already. If you are not, here is a quick intro to using the Windows Remote Server Administration Tools (RSAT). Various RSAT snap-ins can be added to a machine at any stage.
- From your management server, open Server Manager
- From the Dashboard page, select Add servers to manage
- Add your Core server, which is now a manageable object from this server
You can also elect to use a Windows client machine as your management station. If so, download and install the RSAT tools for Windows.
Step 4: Re-enabling the Windows GUI
If you ever need to restore the GUI onto the server, simply reverse the commands we issued earlier at any stage. This works because we did not explicitly use the –Remove flag, like the GUI method would have.
You can do this remotely or by logging onto the server and using the following steps:
To switch back to Full FUI mode, open a PowerShell Console as Administrator and execute these commands:
Install-WindowsFeature Server-Gui-Shell, Server-Gui-Mgmt-Infra –Restart
Then wait for reboot.

Your machine will now boot back with the full Windows GUI.
Conclusion
Using Windows Server Core for back-end infrastructure without requiring a user to login on a console is a great way to maximise your performance on a shared infrastructure. Thanks to the tools available now, it is easier than ever to manage Core through PowerShell or remotely via RSAT.
Using the PowerShell method in this article makes switching back and forth between Core and GUI simple.