Geteilte Kontakte in Office 365

Wie teilt man Kontakte aus Office 365 mit anderen Usern?

Man kann in Office 365 Kontakte teilen, obgleich die dafür verfügbaren Optionen – gemessen an geteilten Kalendern – eingeschränkt sind.

Der größte Nachteil liegt darin, dass die Freigabe von Kontakteordnern nicht möglich ist, wenn man OWA nutzt. Um Ihre privaten Kontakte mit anderen teilen zu können, Sind Sie angewiesen auf MS Outlook. Der Vorgang ist ziemlich einfach:

  1. In Outlook klicken Sie mit der rechten Maustaste auf den Ordner, dessen Kontakte geteilt werden sollen.
  2. In dem Kontext-Menü gehen Sie auf Share und auf Share Contacts.
    1
  1. Die Freigabeeinladung wird angezeigt. In die Zeile To… tippen Sie den Namen oder die E-Mail-Adresse derjenigen User ein, mit denen Sie ihren Kontakteordner teilen möchten. Sie können die User dazu berechtigen, den Inhalt des Ordners zu bearbeiten – Hierzu markieren Sie einfach die Option Recipient can add, edit, and delete items in this contacts folder
    2
  1. Direkt darunter können Sie eine kurze Mitteilung verfassen.
  2. Klicken Sie auf Send.

Alle Empfänger dieser Einladung bekommen eine Nachricht mit dem Button Open this Contacts Folder oben links. Wenn sie ihn anklicken, erscheint der neue Ordner im Bereich Shared Contacts unter People. Der Ordner ist nach der freigebenden Person benannt.

3

Leider kann eine solche Einladung in OWA nicht geöffnet werden, denn das Öffnen freigegebener Kontakteordner wird hier nicht unterstützt.

Kontakte aus Office 365 via geteiltes Postfach freigeben

Die Freigabe Ihrer privaten Kontakte ist nicht die einzige Methode – Sie können auf ein geteiltes Postfach zurückgreifen. Die Erstellung eines geteilten Postfachs in Office 365 ist identisch mit der Erstellung eines Gruppenkalenders.

Hierfür benötigen Sie die administrativen Rechte:

  1. Melden Sie sich zu dem EAC (Exchange Admin Center) mit Ihren Office 365-Administratorzugangsdaten an.
  2. Gehen Sie auf Recipients und öffnen Sie den Tab Shared.
    4
  3. Klicken Sie auf das Plussymbol.
  4. In das Feld Display name tragen Sie einen Namen für das Postfach (z.B. Company Share) ein. Kopieren Sie diesen Namen in die E-Mail-Adresse (Sie können aber auch einen anderen Namen verwenden).
    5
  5. Zu der Liste Send as fügen Sie User hinzu, welche das Postfach zum Versenden von E-Mails nutzen werden.
  6. Klicken Sie auf Save.
  7. Klicken Sie zweimal auf das geteilte Postfach, um dessen Eigenschaftenfenster zu öffnen. Klicken Sie auf Mailbox delegation. Unter Full Access klicken Sie auf den Button Add und fügen Sie User hinzu, die uneingeschränkten Zugang zu dem geteilten Postfach bekommen sollen.
    6
  8. Ihre Auswahl bestätigen Sie mit Save.

Ein neues geteiltes Postfach wurde angelegt. Der Vorteil dieser Lösung ist, dass User mit uneingeschränktem Zugriff auf das Postfach, dessen Ordner gleich sehen können. Beim Öffnen des Bereichs People in Outlook wird dort ein Ordner mit graulichem Namen angezeigt.

7

Mit OWA funktioniert das leider nicht. Kontakteorder aus einem geteilten Postfach können dort nicht geöffnet werden. Outlook ist die einzige Option.

Kontakte mit einer anderen Office 365-Organisation teilen

Auch in diesem Szenario stolpert man über mehr Probleme als bei einem Kalender. Externe Freigabe ist möglich nur wenn beide Organisationen miteinander verbunden sind.

Zusammenfassung

Die Tatsache, dass man in Office 365 leichter Kalender teilen kann als Kontakte, überrascht wenig. Ein freigegebener Kalender kann in OWA geöffnet und bearbeitet werden. Man kann sogar Kalender eines geteilten Postfachs öffnen. Kontakteordner hat man in dieser Hinsicht links liegen lassen.

Content retrieved from: https://www.codetwo.de/blog/geteilte-kontakte-in-office-365/4720.

Outlook auf Deutsch umstellen

Bei der Neueinrichtung eines Benutzerprofils in Microsoft Outlook kann es mitunter vorkommen, dass die Namen mehrerer Standardordner nicht auf Deutsch angezeigt werden. So erscheint plötzlich der Name „Inbox“ statt Posteingang und die gesendeten Elemente nennen sich plötzlich „Sent Items“. Glücklicherweise kannst Du aber auch im Nachhinein noch Dein Outlook auf Deutsch umstellen.

Standardordner in Outlook auf Deutsch umstellen

Die Ursache für die verkehrten Spracheinstellungen sind leider nicht immer sofort ersichtlich. Microsoft Outlook übernimmt beim ersten Start des Benutzerprofils die zu diesem Zeitpunkt eingestellte Sprache der Benutzeroberfläche. Meinen Erfahrungen nach, kommt dieses Phänomen aber auch bei komplett deutschen Umgebungen vor, sogar wenn zudem einzig und allein die deutsche Tastatur verfügbar ist.

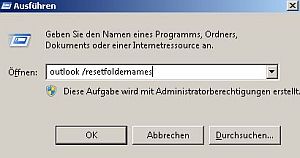
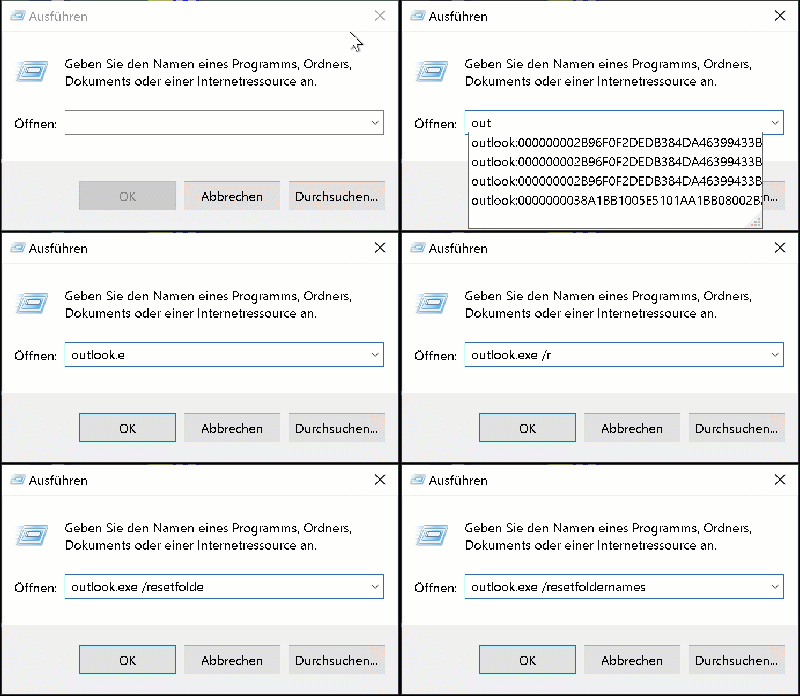
Um diesen Fehler zu beseitigen, muss Outlook lediglich einmal von der Kommandozeile aus mit dem Parameter /resetfoldernames gestartet werden: Start -> Ausführen (oder Windows-Taste + R) -> outlook.exe /resetfoldernames. Nach der Bestätigung mit „OK“ startet Outlook und die Standardordner werden wieder korrekt in der deutschen Sprache angezeigt. In der Praxis habe ich es bereits erlebt, dass nicht sofort alle Ordnernamen übersetzt wurden. Dann hilft es, Outlook zu schließen und den Befehl erneut auszuführen.
Outlook auf Deutsch umstellen

Wenn Standardordner nicht auf Deutsch angezeigt werden. Mit dem Parameter resetfoldernames lässt sich Outlook auf Deutsch umstellen.

Weitere wichtige Parameter von Outlook

Außer dem Parameter, mit dem Du Dein Outlook auf Deutsch umstellen kannst, gibt es noch jede Menge weiterer Startparameter von Microsoft Outlook. Hier einmal die hilfreichsten:

  • /resetfolders
    Durch diesen Befehl werden fehlende Standardordner wieder hergestellt
  • /resetnavpane
    Die Einstellungen Deiner Navigationsleiste werden zurückgesetzt.
  • /sniff
    Dieser Parameter hilft Dir weiter, wenn Besprechungsanfragen nicht mehr erkannt werden.
  • /safe
    Outlook wird im sicheren Modus gestartet. Es stehen Dir weder Addons noch der Lesebereich zur Verfügung.

Outlook auf Deutsch stellen

Mit dem Parameter „resetfoldernames“ lässt sich Outlook auf Deutsch umstellen
Eine Auflistung sämtlicher Parameter findest Du auf der Microsoft-Seite Befehlszeilenoptionen für Outlook 2010 (auch gültig für Versionen 2007-2016).

Auch interessant:

  • Outlook Abwesenheitsnotiz erstellen
  • Outlook Signatur ändern
  • Outlook Addins dauerhaft aktivieren
  • Outlook – Serientermin erstellen

Content retrieved from: https://www.tech-faq.net/outlook-auf-deutsch-umstellen/.

Probleme mit Standardordnern in Outlook

Es treten folgende Probleme auf, die sich auf Standardordner in Microsoft Outlook auswirken:
  • Ordnernamen werden nicht in der Standardsprache angezeigt.Dieses Problem tritt auf, wenn ein mobiles Gerät oder eine Serveranwendung eines Drittanbieters mit dem Microsoft Exchange Server Postfach synchronisiert wird. Um dieses Problem zu beheben, probieren Sie Methode 1 aus. Wenn dies nicht funktioniert, probieren Sie Methode 2 oder Methode 3 aus.
  • Ordnernamen werden gewechselt. Beispielsweise werden die Ordnernamen Posteingang und Postausgang gewechselt.Dieses Problem kann auftreten, nachdem ein Wartungszyklus für das Exchange Server Postfach ausgeführt wurde. Um dieses Problem zu beheben, probieren Sie Methode 2 oder Methode 3 aus.
  • Ordnernamen werden falsch, nachdem Sie den Outlook.exe /ResetFolderNames Befehl zum Zurücksetzen der Standardordnernamen ausgeführt haben.Um dieses Problem zu beheben, probieren Sie Methode 2 oder Methode 3 aus.
  • Der Standardordner Posteingang wird in Archiv in Exchange Online umbenannt.Versuchen Sie, das Problem zunächst mit Methode 4 zu beheben.
  • Der Junk-Email Ordner wird in einen anderen Standardordner verschoben, z. B. Journal oder Gelöschte Elemente.Um dieses Problem zu beheben, probieren Sie Methode 5 aus.

Methode 1: Wiederherstellen von Standardordnernamen mithilfe des Schalters /resetfolders

  1. Beenden Sie Outlook.
  2. Ausführen Outlook.exe /resetfolders.
  3. Ausführen Outlook.exe /resetfoldernames.

Methode 2: Zurücksetzen von Standardordnernamen mithilfe von Outlook im Web

Hinweis: Die folgenden Schritte gelten für die neueste Version von Outlook im Web.

  1. Beenden Sie Outlook.
  2. Melden Sie sich mit Ihren Anmeldeinformationen bei Outlook im Web an.
  3. Wählen Sie Einstellungen ( ) >Alle Outlook-Einstellungen anzeigen aus.
  4. Wählen Sie Allgemeine>Sprache und Uhrzeit aus.
  5. Ändern Sie in der Liste Sprache die Sprache in Ihre bevorzugte Sprache, und aktivieren Sie dann das Kontrollkästchen Standardordner umbenennen, damit ihre Namen mit der angegebenen Sprache übereinstimmen .Screenshot der Seite
  6. Wählen Sie das Datums- und Uhrzeitformat aus, das Sie verwenden möchten, und wählen Sie dann Speichern aus.
  7. Beenden Sie Outlook im Web.

    Hinweis

    Wenn Ihre bevorzugte Sprache bereits ausgewählt ist, wählen Sie eine andere Sprache aus, speichern Sie die Einstellung, setzen Sie die Einstellung auf Ihre bevorzugte Sprache zurück, und speichern Sie die Einstellung dann erneut.

  8. Starten Sie Outlook neu, und überprüfen Sie dann, ob die Ordnernamen in der Standardsprache angezeigt werden.

Methode 3: Zurücksetzen von Standardordnernamen mithilfe des Cmdlets Set-MailboxRegionalConfiguration

Sie müssen über Administratorberechtigungen verfügen, um das
Cmdlet Set-MailboxRegionalConfiguration ausführen zu können.

  1. Öffnen Sie ein Eingabeaufforderungsfenster mit erhöhten Rechten.
  2. Führen Sie das folgende Cmdlet aus:
    set-MailboxRegionalConfiguration -id <alias> -LocalizeDefaultFolderName:$true -Language <Language_code_to_switch_to> -DateFormat <your_preferred_DateFormat>

Methode 4: Erstellen eines neuen Archivordners

Option 1 (bevorzugt)

  1. Klicken Sie mit der rechten Maustaste auf den Postfachnamen oben in der Ordnerhierarchie in Outlook, wählen Sie Neuer Ordner aus, und erstellen Sie dann einen Ordner mit dem Namen Archiv01.
  2. Wählen Sie im Menü Dateidie Option Extras>Archivordner festlegen und dann den Ordner Archiv01 aus.
  3. Ausführen Outlook.exe /resetfoldernames.

Wenn diese Option nicht verfügbar ist oder nicht funktioniert, verwenden Sie Option 2.

Option 2

  1. Klicken Sie mit der rechten Maustaste auf den Postfachnamen oben in der Ordnerhierarchie in Outlook, wählen Sie Neuer Ordner aus, und erstellen Sie dann einen Ordner mit dem Namen Archiv01.
  2. Erstellen Sie eine Sicherung der vorhandenen Elemente im aktuellen Archivordner.
  3. Laden Sie die neueste Version von MFCMAPI herunter, und installieren Sie sie.Hinweise:
    • Laden Sie MFCMAPI gemäß Ihrer Office-Installation herunter. Wenn Sie über 32-Bit-Office verfügen, laden Sie MFCMAPI.exe herunter. Wenn Sie über 64-Bit-Office verfügen, laden Sie MFCMAPI.x64.exe herunter.
    • Informationen dazu, welche Office-Version Sie ausführen, finden Sie unter Informationen zu Office: Welche Version von Office verwende ich?
  4. Starten Sie MFCMAPI, und wählen Sie dann Extras>Optionen aus.
  5. Stellen Sie sicher, dass die Kontrollkästchen MDB_ONLINE und MAPI_NO_CACHE aktiviert sind, und wählen Sie dann OK aus.
  6. Wählen SieSitzungsanmeldung> und dann das Postfach aus.
  7. Erweitern Sie Stammcontainer und erweitern Sie dann Oben im Informationsspeicher.Hinweis: Wenn das Benutzerpostfach auf eine andere Sprache als Englisch festgelegt ist, wird der Name dieses Ordners in der Standardsprache verwendet.
  8. Wählen Sie den neuen Ordner Archive01 aus, und suchen Sie dann nach der eigenschaft PR_ENTRYID .
  9. Doppelklicken Sie, um die eigenschaft PR_ENTRYID zu öffnen, und kopieren Sie dann den Binärwert der Eigenschaft.
  10. Schließen Sie den Eigenschaften-Editor für Archive01, und wählen Sie Posteingang aus.
  11. Sortieren Sie die Einträge nach der Spalte Tag , suchen Sie das 0x35FF0102 Eigenschaftstag, und doppelklicken Sie dann auf dieses Eigenschaftentag.
  12. Fügen Sie den Binärwert der PR_ENTRYID-Eigenschaft des Ordners Archive01 , den Sie in Schritt 8 kopiert haben, in das Feld binärwert für das 0x35FF0102-Eigenschaftstag ein.
  13. Ausführen Outlook.exe /resetfolders.
  14. Ausführen Outlook.exe /resetfoldernames.
  15. Importieren Sie Daten aus der Sicherung in den neuen Archivordner, oder verschieben Sie die Elemente in den neuen Ordner.
  16. Löschen Sie den alten Archivordner (da der Ordner Archive01 jetzt der Standardarchivordner ist).

Methode 5: Wiederherstellen des Speicherorts des Junk-Email-Ordners mithilfe von MFCMAPI

Sie können das MFCMAPI-Tool verwenden, um den Junk-Email-Ordner wieder unter den Obersten Informationsspeicher oder auf die gleiche Ebene wie die anderen Standardpostfachordner zu bringen.

  1. Laden Sie die neueste Version von MFCMAPI herunter, und installieren Sie sie.Hinweise:
    • Laden Sie MFCMAPI gemäß Ihrer Office-Installation herunter. Wenn Sie über 32-Bit-Office verfügen, laden Sie MFCMAPI.exe herunter. Wenn Sie über 64-Bit-Office verfügen, laden Sie MFCMAPI.x64.exe herunter.
    • Informationen dazu, welche Office-Version Sie ausführen, finden Sie unter Informationen zu Office: Welche Version von Office verwende ich?
  2. Klicken Sie mit der rechten Maustaste auf den Namen Ihres Kontos in Outlook, wählen Sie Neuer Ordner aus, und erstellen Sie dann einen Ordner mit dem Namen, z. B. Neuer Junk-Ordner. Dadurch wird ein neuer Junk-E-Mail-Ordner auf der gleichen Ebene wie der Posteingangsordner erstellt.
  3. Schließen Sie alle Outlook-Clients, um sicherzustellen, dass nur MFCMAPI auf das Postfach zugreifen kann.
  4. Starten Sie MFCMAPI, und wählen Sie dann Extras>Optionen aus.
  5. Stellen Sie sicher, dass die Kontrollkästchen MDB_ONLINE und MAPI_NO_CACHE aktiviert sind, und wählen Sie dann OK aus.
  6. Wählen SieSitzungsanmeldung> aus, um das Outlook-Profil des betroffenen Postfachs auszuwählen.
  7. Doppelklicken Sie auf den Namen des betroffenen Postfachs, und erweitern Sie dann Stammcontainer.
  8. Erweitern Sie oben im Informationsspeicher.Hinweis: Wenn das Postfach auf eine andere Sprache als Englisch festgelegt ist, wird der Name dieses Ordners in der Standardsprache verwendet.
  9. Wählen Sie den Ordner Posteingang aus, und suchen Sie dann die eigenschaft PR_ADDITIONAL_REN_ENTRYIDS mit dem Tag 0x36D81102 .Hinweis: Diese Eigenschaft enthält die IDs mehrerer Standardordner, einschließlich des Junk-Email Ordners.Hier sehen Sie ein Beispiel für die eigenschaft PR_ADDITIONAL_REN_ENTRYIDS .Screenshot der MFCMAPI-Seite, auf der die eigenschaft PR_ADDITIONAL_REN_ENTRYIDS hervorgehoben ist.
  10. Klicken Sie mit der rechten Maustaste auf die Eigenschaft, und wählen Sie dann Löschen aus.
  11. Schließen Sie MFCMAPI.
  12. Führen Sie Outlook.exe /ResetFolderNamesaus.
  13. Starten Sie Outlook neu.

Content retrieved from: https://learn.microsoft.com/de-de/outlook/troubleshoot/user-interface/incorrect-folder-names.

How To Set Up VLANs When You Don’t Understand VLANs

Several years ago, I needed to partition a network into separate VLANs.  The switches I had were capable, but I wasn’t.  I was having trouble understanding what the terms meant (Tagged, Untagged, Excluded) and how to configure each port to achieve my desired result.  I had trouble finding a good I-don’t-really-care-that-much-about-VLANS-or-Cisco-documentation-I-just-want-this-to-work-so-I-can-get-on-with-what-I-am-really-trying-to-do kind of explanation, so I thought I would write one.  Remember I said that was years ago?  My TODO list is very long.

The switches I was using in this project were Cisco/Linksys SGE2000P which is a “small business” switch.

VLAN concepts:

  1. VLANs are a way to group ports, potentially across multiple switches, into networks (Virtual Local Area Networks). In this way, a switch can be partitioned to, among other things, serve multiple networks all isolated from each other.
  2. Each VLAN is identified by an ID which is a number.
  3. Each port on the switch is designated as Tagged, Untagged or Excluded in each VLAN.
  4. If a port is Tagged, the switch will add the VLAN ID to the header of any packets sent on that interface.  Tagged packets are only understood by network equipment that is VLAN aware.
  5. If a port is Untagged the switch will not add the VLAN ID to the header of packets sent on that interface and will remove and VLAN IDs in packets that came in on a Tagged interface.
  6. If a port is Excluded from a VLAN packets with that VLAN ID will never be sent out on that port.
  7. If a port is marked Untagged on one VLAN, it will be excluded from all other VLANs.  In other words, an Untagged interface can only be a part of one VLAN at a time.
  8. A port can be marked as Tagged on any number of VLANs

What does all of that mean?

Any port that is going to carry traffic between 2 switches must be able to carry packets from all of the VLANs so therefore must be included in every VLAN that must transit that link.  The switch on the other end must be able to determine which VLAN to forward the packet to so the packets sent out that port must be tagged. It is also important that both switches understand VLANs.

Any port that is going to connect to a non-switch device must be marked untagged in the VLAN the device is supposed to be a part of.

Example

Say you want to create 3 different networks with 2 VLAN capable 16 port switches.  We’ll use VLAN IDs 7, 8, and 9.

We want to configure the networks thusly:

  • Connect port 16 on switch #1 to port 16 switch #2.  This cable will carry traffic from all 3 VLANs between the switches.  These ports must be tagged in all 3 VLANs
  • VLAN 7 will include ports 1, 2, and 3 on switch #1 and ports 1 and 2 on switch #2. These ports must be untagged on VLAN 7  and excluded from VLANs 8 and 9.
  • VLAN 8 will include ports 4 and 5 on switch #1 and ports 3, 4, and 5 on switch #2. These ports must be untagged on VLAN 8 and excluded from VLANs 7 and 9.
  • All other ports will be on VLAN 9. These ports must be untagged on VLAN 9 and excluded from VLANs 7 and 8.

So configure the ports like this:

Switch #1
Port VLAN 7 VLAN 8 VLAN 9
1 Untagged Excluded Excluded
2 Untagged Excluded Excluded
3 Untagged Excluded Excluded
4 Excluded Untagged Excluded
5 Excluded Untagged Excluded
6 Excluded Excluded Untagged
7 Excluded Excluded Untagged
8 Excluded Excluded Untagged
9 Excluded Excluded Untagged
10 Excluded Excluded Untagged
11 Excluded Excluded Untagged
12 Excluded Excluded Untagged
13 Excluded Excluded Untagged
14 Excluded Excluded Untagged
15 Excluded Excluded Untagged
16 Tagged Tagged Tagged


Switch #2
Port VLAN 7 VLAN 8 VLAN 9
1 Untagged Excluded Excluded
2 Untagged Excluded Excluded
3 Excluded Untagged Excluded
4 Excluded Untagged Excluded
5 Excluded Untagged Excluded
6 Excluded Excluded Untagged
7 Excluded Excluded Untagged
8 Excluded Excluded Untagged
9 Excluded Excluded Untagged
10 Excluded Excluded Untagged
11 Excluded Excluded Untagged
12 Excluded Excluded Untagged
13 Excluded Excluded Untagged
14 Excluded Excluded Untagged
15 Excluded Excluded Untagged
16 Tagged Tagged Tagged
 

Content retrieved from: https://www.megajason.com/2016/03/03/how-to-set-up-vlans-when-you-dont-understand-vlans/.

Allow unsupported CPUs when upgrading to ESXi 7.0

As outlined in the vSphere 7.0 release notes (which everyone should carefully read through before upgrading), the following CPU processors are no longer supported:

  • Intel Family 6, Model = 2C (Westmere-EP)
  • Intel Family 6, Model = 2F (Westmere-EX)

To help put things into perspective, these processors were released about 10 years ago! So this should not come as a surprise that VMware has decided remove support for these processors which probably also implies the underlying hardware platforms are probably quite dated as well. In any case, this certainly has affected some folks and from what I have seen, it has mostly been personal homelab or smaller vSphere environments.

One of my readers had reached out to me the other day to share an interesting tidbit which might help some folks prolong their aging hardware for another vSphere release. I have not personally tested this trick and I do not recommend it as you can have other issues longer term or hit a similiar or worse situation upon the next patch or upgrade.

Disclaimer: This is not officially supported by VMware and you run the risk of having more issues in the future.

Per the reader, it looks like you can append the following ESXi boot option which will allow you to bypass the unsupported CPU during the installation/upgrade. To do so, just use SHIFT+O (see VMware documentation for more details) and append the following:

allowLegacyCPU=true

There have also been other interesting and crazy workarounds that attempt to workaround this problem. Although some of these tricks may work, folks should really think long term on what other issues can face by deferring hardware upgrade. I have always looked at homelab as not only a way to learn but to grow yourself as an individual.

Note: The boot option above is only temporarily and you will need to pass in this option upon each restart. It looks like this setting is also not configurable via ESXCLI which I initially had thought, so if you are installing this on a USB device, the best option is to edit the boot.cfg and simply append the parameter to kernelopt line so it’ll automatically be included for you without having to manually typing this. If this is install on disk, then you will need to edit both /bootbank/boot.cfg and /altbootbank/boot.cfg for the settings to passed in automatically.

This is ultimately an investment you are making into yourself, so do not cut yourself short and consider looking at a newer platform, especially something like an Intel NUC which is fairly affordable both in cost as well as power, cooling and form factor.


Content retrieved from: https://williamlam.com/2020/04/quick-tip-allow-unsupported-cpus-when-upgrading-to-esxi-7-0.html.

VMware iSCSI

Should I enable jumbo frames with iSCSI?

The general recommendation is to use the standard MTU of 1500 for iSCSI connectivity.

This recommendation is predicated upon several things:

  1. Simplicity. Enabling jumbo frames requires setting the proper MTU throughout the entire network. This means the vSphere Switch, vmkernel port (vmknic), physical NIC (pNIC), physical switches, routers (if routed iSCSI), and finally the FlashArray target ports. It is an all too common tale to see one or more of these components missed and thus problems with stability or performance are reported. 
  2. Not all environments benefit from jumbo frames. This was at one time a common (and rather heated) discussion in previous years. The anthem was almost always „jumbo frames enabled for best performance“. The reality though is actually based upon the workload between the initiators and target. If your applications / environment are consistently sending larger I/O requests than there is a good chance jumbo frames could help. How much will it help? Well, that answer can vary greatly so we won’t go into that here. The caveat though is that if the opposite is true (mostly smaller I/O requests), it can actually result in a performance penalty in your environment. If your host is waiting around to fill up a jumbo frame with smaller I/O requests then you are actually delaying transmission of your I/O and thus a slight performance penalty can be noted. How much? Again, it varies and isn’t the scope of this document.

The key takeaway here is know your environment. If you find jumbo frames are optimal for your environment please have all proper parties involved from end-to-end to ensure everything is implemented correctly.

If you decide to implement jumbo frames, the following command is vital to ensure you have properly configured your environment end-to-end:

vmkping -I <iscsi_vmk_interface> -d -s 8972 <ip_addr_of_target>

This ensures packets are not fragmented during the ping test (-d) and tests jumbo frames (-s 8972).

Upgrade Windows Server 2022 Evaluation to Full Edition

upgrade server evaluation to production errors product key you entered didnt work 0xC004F069

If you try to convert / upgrade Windows Server Evaluation to a licensed full edition using the normal command line or the CHANGE KEY GUI, you will see errors like: The product key you entered didn’t work, Check the product key and try again or enter a different one

Fortunately, there is an easy fix. You have to change Windows Server Eval editions to a production licensed versions of Standard or Data Center:

  1. Launch a PowerShell as an Administrator
  2. Type dism /online /get-currentedition and press ENTER
  3. Type dism /online /get-targeteditions and press ENTER
  4. Type dism /online /set-edition:ServerDatacenter /productkey:WX4NM-KYWYW-QJJR4-XV3QB-6VM33 /accepteula or dism /online /set-edition:ServerStandard /productkey:VDYBN-27WPP-V4HQT-9VMD4-VMK7H /accepteula and press ENTER
  5. After that you need to restart the server.
  6. Then you will have a changed Windows version, which is unlicensed.
    You can add a valid, licenced Product Key with
    slmgr.vbs /ipk #####-#####-#####-#####-##### and press ENTER

how to upgrade windows server evaluation version to standard datacenter production licensed versions

Key Zwischenschritt:
Server 2016 Standard:      WC2BQ-8NRM3-FDDYY-2BFGV-KHKQY
Server 2016 Datacenter:  CB7KF-BWN84-R7R2Y-793K2-8XDDG
Server 2019 Standard:      N69G4-B89J2-4G8F4-WWYCC-J464C
Server 2019 Datacenter:  WMDGN-G9PQG-XVVXX-R3X43-63DFG
Server 2022 Standard:      VDYBN-27WPP-V4HQT-9VMD4-VMK7H
Server 2022 Datacenter:  WX4NM-KYWYW-QJJR4-XV3QB-6VM33
Keys von:
https://www.tenforums.com/tutorials/95922-generic-product-keys-install-windows-10-editions.html
https://learn.microsoft.com/en-us/windows-server/get-started/kms-client-activation-keys#windows-server-2022

Windows Server GUI auf Server Server Core wechseln

Windows Server Core Mode Performance Benefits

The most obvious reason for converting to Core is performance: you get more bang for your buck on the same hardware by reducing unused operating-system components from running. Performance benefits include:

  • Fewer RAM requirements
  • Fewer CPU requirements
  • Fewer patches
  • Faster operation
  • Faster boot time
  • Better Uptime

For Fastvue Reporter running as a syslog server, the uptime is vital because messages can be missed and only caught much later when the historical log archive rolls over at midnight. The more stable and robust your platform is, the lower the potential for lost log data.

Windows Server Core Mode Security Benefits

The additional performance gains and improved uptime is nice, but even without these benefits, some still prefer to run Core from a security perspective. Having less code and tools on a system makes it harder to attack, and once compromised, it makes it less useful to the attacker.

Security benefits of this switch include:

  • Smaller attack surface
  • Windows server RSAT
  • Easily switch from full GUI to Core

Managing Windows Server Core Mode

There are many compelling reasons to switch from Full GUI to Core, but the question that comes up most often involves management. „How would I manage the switch to Core?“. This is normally followed closely by „My staff only know how to use the GUI. What if we need need it for some reason?“.

Back in Windows Server 2008, you selected whether you want Core or Full GUI. It was a one-way trip.

But now in Windows Server 2012, you have the option of switching between modes. Depending on how you switch, your experience is either simple, or requires a bit more time and effort.

Switching Between Modes

I am going to show you how to switch between Windows Server Core Mode and the full GUI mode the easy way, Based on my several years of experience to figuring out the „best way“ of doing it.

The steps include:

  • Configuring your server to take advantage of the reduced requirements
  • Switch to Core mode using PowerShell
  • Manage your core server from a machine with Full GUI using RSAT
  • Switch from Core back to Full GUI mode

Step 1: Configure your server

I am going to configure my Fastvue Reporter Server as a Hyper-V Virtual Machine with dynamic RAM in order to take advantage of the reduced requirements of Windows Core Mode.

Fastvue Reporter is a good candidate for virtualisation and running Windows Core Mode because of its predictable CPU and RAM requirements. It is also more resource-hungry when other servers are typically not because Fastvue Reporter generates reports on a schedule at midnight each day, week, and end of the month.

This works best on host and guest OS of Windows Server 2012 R2. To configure your server:

  1. Open Hyper-V Manager and select the Virtual Server and go to Settings
  2. Enable Dynamic RAM
  3. Set the Minimum RAM to something realistically low (2048)
  4. Set the Maximum RAM to something nice and high
  5. Ensure that Memory Buffer is around 20% because of the predictable resource requirements
  6. Designate the CPU to allocate at least 3 Cores

You may also like to see our article on Understanding Hyper-V Dynamic Memory (Dynamic RAM).

Step 2: Switch from using Full GUI to Core Mode – The Easy Way

Don’t worry. Switching from the full GUI to Windows Core Mode is a reversible step. You can always bring the GUI back.

There are two ways to remove the GUI and switch to Core Mode:

  1. Via the Windows Server GUI using the ‚Remove Roles and Features‘ wizard, or
  2. Using PowerShell

I recommend using PowerShell, as when you use the ‚Remove Roles and Features‘ wizard, it also removes all the binary components instead of simply disabling them. This makes switching back to the full GUI version much more difficult as you need to provide the installation source media.

To switch to Windows Core Mode using PowerShell, open a PowerShell Console as Administrator and execute these two commands

Uninstall-WindowsFeature Server-Gui-Shell Uninstall-WindowsFeature Server-Gui-Mgmt-Infra –Restart

The server will reboot and everything will look normal until you log on. When you log on, you get a command shell, nothing more. Welcome to Windows Server Core!

Step 3: Remotely Managing Windows Server Core using RSAT

You should be using this method for administering your servers already. If you are not, here is a quick intro to using the Windows Remote Server Administration Tools (RSAT). Various RSAT snap-ins can be added to a machine at any stage.

  1. From your management server, open Server Manager
  2. From the Dashboard page, select Add servers to manage
  3. Add your Core server, which is now a manageable object from this server

You can also elect to use a Windows client machine as your management station. If so, download and install the RSAT tools for Windows.

Step 4: Re-enabling the Windows GUI

If you ever need to restore the GUI onto the server, simply reverse the commands we issued earlier at any stage. This works because we did not explicitly use the –Remove flag, like the GUI method would have.

You can do this remotely or by logging onto the server and using the following steps:

To switch back to Full FUI mode, open a PowerShell Console as Administrator and execute these commands:

Install-WindowsFeature Server-Gui-Shell, Server-Gui-Mgmt-Infra –Restart

Then wait for reboot.

Your machine will now boot back with the full Windows GUI.

Conclusion

Using Windows Server Core for back-end infrastructure without requiring a user to login on a console is a great way to maximise your performance on a shared infrastructure. Thanks to the tools available now, it is easier than ever to manage Core through PowerShell or remotely via RSAT.

Using the PowerShell method in this article makes switching back and forth between Core and GUI simple.

How to export your computers using the TeamViewer API

Step 1: Create an api token in the Management Console

1) Click on your Username on the top right corner and click Edit Profile

2021-07-02 12_56_04-TeamViewer Management Console.png

2) Go to Apps and click Create script token

2021-01-15 11_56_00-TeamViewer Management Console.png

3) Give the token a name and select the parameter Computers & Contacts with the setting View entries and click Save.

2021-01-15 11_59_11-TeamViewer Management Console.png

4) This will generate the token. Please copy this token and save it for later.

2021-01-15 11_59_59-TeamViewer Management Console.png

Step 2: Run the export script in PowerShell ISE

1) Open PowerShell ISE as administrator and type the following code and press Enter

$jsonFile = "YOURPATH\Computers export.json"
$csvFile = "YOURPATH\Computers export.csv"
$tvAccessToken = read-host "Please type your token "​
$devicesResponse = Invoke-RestMethod -Uri "https://webapi.teamviewer.com/api/v1/devices?full_list=true" -Method Get -Headers @{authorization = "Bearer $tvAccessToken"}
$devicesResponse.devices | ConvertTo-Json | Out-File $jsonFile
$devicesResponse.devices | Export-Csv -Path $csvFile -Delimiter ',' -NoTypeInformation

📌Note: Don’t forget to replace YOURPATH with the path you want the export to be generated to.

2) It will ask you to enter your token. Please paste your token you have saved earlier and press Enter

2021-01-15 12_49_22-Windows PowerShell ISE (x86).png

3) You are done. The script will automatically generate the export in the folder you have selected as [YOURPATH].

How to Install & Update Proxmox Without Subscription

It turns out that getting Proxmox to update from the “Non-Enterprise” repositories is pretty easy, just follow these methods:

Access the console through the web interface, User: root and make a copy of the pve-enterprise.list sources file, like so:

cd /etc/apt/sources.list.d/

cp pve-enterprise.list pve-no-subscription.list

Ok, so now we have a copy of the original file. If we ever purchase a subscription later and want to use the enterprise repositories, we will be able to revert what we’ve done very easily. For now, edit the original file and edit its one line and replace it with the following code.

# deb https://enterprise.proxmox.com/debian/pve bullseye pve-enterprise

Save and close the file.

Next, open the copied file, pve-no-subscription.list.

nano pve-no-subscription.list

Now change the pve-no-subscription.list with the following lines.

deb http://ftp.debian.org/debian bullseye main contrib
deb http://ftp.debian.org/debian bullseye-updates main contrib

# PVE pve-no-subscription repository provided by proxmox.com,
# NOT recommended for production use
deb http://download.proxmox.com/debian/pve bullseye pve-no-subscription

# security updates
deb http://security.debian.org/debian-security bullseye-security main contrib

Save and close the file. Now, update the package lists:

apt update

And when that’s done, run software upgrades!

apt dist-upgrade

Note: Always run dist-upgrade, not just “apt-get upgrade.” Dist-upgrade ensures that all the packages and their dependencies are updated. If you just run “apt-get upgrade” things may break.

That’s it, now you have installed Proxmox and updated it to the latest version. Now you can deploy your virtual machines directly from the web interface https://ip:8006.

Weitere Infos siehe https://pve.proxmox.com/wiki/Package_Repositories

Betrieben von WordPress | Theme: Baskerville 2 von Anders Noren.

Nach oben ↑